BEAR.Sunday Complete Manual
This comprehensive manual contains all BEAR.Sunday documentation in a single page for easy reference, printing, or offline viewing.
Technology
The distinctive technologies and features of BEAR.Sunday are explained in the following chapters.
- Architecture and Design Principles
- Performance and Scalability
- Developer Experience
- Extensibility and Integration
- Design Philosophy and Quality
- The Value BEAR.Sunday Brings
Architecture and Design Principles
Resource Oriented Architecture (ROA)
BEAR.Sunday’s ROA is an architecture that realizes RESTful API within a web application. It is the core of BEAR.Sunday’s design principles, functioning as both a hypermedia framework and a service-oriented architecture. Similar to the Web, all data and functions are considered resources and are operated through standardized interfaces such as GET, POST, PUT, and DELETE.
URI
URI (Uniform Resource Identifier) is a key element to the success of the Web and is also at the heart of BEAR.Sunday’s ROA. By assigning URIs to all resources handled by the application, resources can be easily identified and accessed. URIs not only function as identifiers for resources but also express links between resources.
Uniform Interface
Access to resources is done using HTTP methods such as GET, POST, PUT, and DELETE. These methods specify the operations that can be performed on resources and provide a common interface regardless of the type of resource.
Hypermedia
In BEAR.Sunday’s Resource Oriented Architecture (ROA), each resource provides affordances (available operations and functions for the client) through hyperlinks. These links represent the operations that clients can perform and guide navigation within the application.
Separation of State and Representation
In BEAR.Sunday’s ROA, the state of a resource and its representation are clearly separated. The state of the resource is managed by the resource class, and the renderer injected into the resource converts the state of the resource into a resource state representation in various formats (JSON, HTML, etc.). Domain logic and presentation logic are loosely coupled, and even with the same code, changing the binding of the state representation based on the context will also change the representation.
Differences from MVC
BEAR.Sunday’s ROA (Resource Oriented Architecture) takes a different approach from the traditional MVC architecture. MVC composes an application with three components: model, view, and controller. The controller receives a request object, controls a series of processes, and returns a response. In contrast, a resource in BEAR.Sunday, following the Single Responsibility Principle (SRP), only specifies the state of the resource in the request method and is not involved in the representation.
While there are no constraints on the relationship between controllers and models in MVC, resources have explicit constraints on including other resources using hyperlinks and URIs. This allows for declarative definition of content inclusion relationships and tree structures while maintaining information hiding of the called resources.
MVC controllers manually retrieve values from the request object, while resources declaratively define the required variables as arguments to the request method. Therefore, input validation is also performed declaratively using JsonSchema, and the arguments and their constraints are documented.
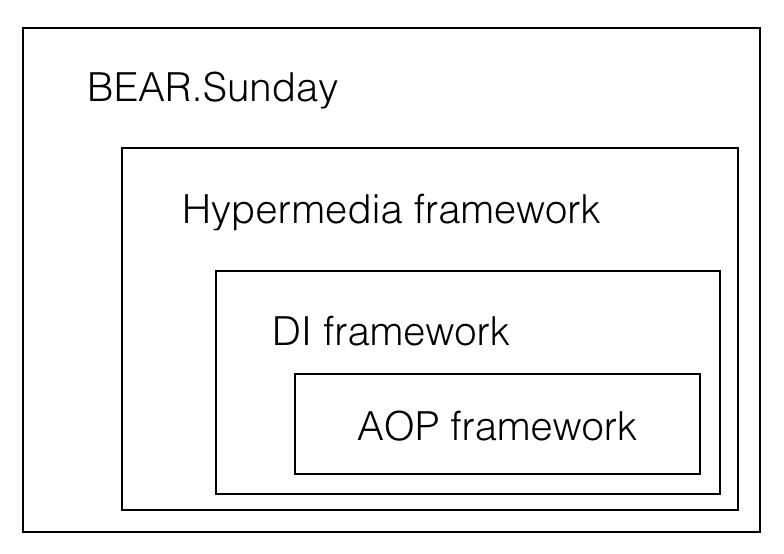
Dependency Injection (DI)
Dependency Injection (DI) is an important technique for enhancing the design and structure of applications in object-oriented programming. The central purpose of DI is to divide an application’s responsibilities into multiple components with independent domains or roles and manage the dependencies between them.
DI helps to horizontally divide one responsibility into multiple functions. The divided functions can be developed and tested independently as “dependencies”. By injecting those dependencies with clear responsibilities and roles based on the single responsibility principle from the outside, the reusability and testability of objects are improved. Dependencies can also be vertically divided into other dependencies, forming a tree of dependencies.
BEAR.Sunday’s DI uses a separate package called Ray.Di, which adopts the design philosophy of Google’s DI framework Guice and covers almost all of its features.
It also has the following characteristics:
- Bindings can be changed by context, allowing different implementations to be injected during testing.
- Attribute-based configuration enhances the self-descriptiveness of the code.
- Ray.Di performs dependency resolution at compile-time, improving runtime performance. This is different from other DI containers that resolve dependencies at runtime.
- Object dependencies can be visualized as a graph. Example: Root Object.
![]()
Aspect Oriented Programming (AOP)
Aspect-Oriented Programming (AOP) is a pattern that realizes flexible applications by separating essential concerns such as business logic from cross-cutting concerns such as logging and caching. Cross-cutting concerns refer to functions or processes that span across multiple modules or layers. It is possible to bind cross-cutting processes based on search conditions and flexibly configure them based on context.
BEAR.Sunday’s AOP uses a separate package called Ray.Aop, which declaratively binds cross-cutting processes by attaching PHP attributes to classes and methods. Ray.Aop conforms to Java’s AOP Alliance.
AOP is often misunderstood as a technology that “has the strong power to break the existing order”. However, its raison d’être is not to exercise power beyond constraints but to complement areas where object-orientation is not well-suited, such as exploratory assignment of functions using matchers and separation of cross-cutting processes. AOP is a paradigm that can create cross-cutting constraints for applications, in other words, it functions as an application framework.
Performance and Scalability
ROA-based Event-Driven Content Strategy with Modern CDN Integration
BEAR.Sunday realizes an advanced event-driven caching strategy by integrating with instant purge-capable CDNs such as Fastly, with Resource Oriented Architecture (ROA) at its core. Instead of invalidating caches based on the conventional TTL (Time to Live), this strategy immediately invalidates the CDN and server-side caches, as well as ETags (entity tags), in response to resource state change events.
By taking this approach of creating non-volatile and persistent content on CDNs, it not only avoids SPOF (Single Point of Failure) and achieves high availability and fault tolerance but also maximizes user experience and cost efficiency. It realizes the same distributed caching as static content for dynamic content, which is the original principle of the Web. It re-realizes the scalable and network cost-reducing distributed caching principle that the Web has had since the 1990s with modern technology.
Cache Invalidation by Semantic Methods and Dependencies
In BEAR.Sunday’s ROA, each resource operation is given a semantic role. For example, the GET method retrieves a resource, and the PUT method updates a resource. These methods collaborate in an event-driven manner and efficiently invalidate related caches. For instance, when a specific resource is updated, the cache of resources that require that resource is invalidated. This ensures data consistency and freshness, providing users with the latest information.
Identity Confirmation and Fast Response with ETag
By setting ETags before the system boots, content identity can be quickly confirmed, and if there are no changes, a 304 Not Modified response is returned to minimize network load.
Partial Updates with Donut Caching and ESI
BEAR.Sunday adopts a donut caching strategy and uses ESI (Edge Side Includes) to enable partial content updates at the CDN edge. This technology allows for dynamic updates of only the necessary parts without re-caching the entire page, improving caching efficiency.
In this way, BEAR.Sunday and Fastly’s integration of ROA-based caching strategy not only realizes advanced distributed caching but also enhances application performance and fault tolerance.
Runtime Optimization
BEAR.Sunday is designed to minimize framework overhead regardless of server configuration.
DI resolution is completed at compile time, with no container lookups at runtime. The entire application is generated as a single root object variable and reused across requests. In php-fpm configurations, the pre-compiled dependency graph and opcache enable fast bootstrapping.
In Swoole configurations, persistent workers reduce bootstrapping to a single initial boot. Coroutine-context-based request isolation enables safe concurrent processing without reliance on superglobals. Combined with the transparent parallel execution described next, I/O wait time is further minimized.
Transparent Parallel Execution
In BEAR.Sunday, a URI expresses “intent” rather than being merely a communication protocol or locator. app://self/user expresses only the intent “I want user information”—whether it comes from MySQL or Redis is hidden from the application.
This complete separation of “What” from “How” enables multiple resources embedded with #[Embed] to be fetched in parallel without changing any application code. Resource classes written 10 years ago can benefit from parallel execution just by adding a Module.
Three tiers of solutions are available based on server environment constraints: ext-parallel (thread pool), Swoole (coroutines), and mysqli (DB queries only). Whichever you choose, application code requires no changes. Develop and debug with standard PHP, then switch to parallel execution in production with just a configuration change.
Developer Experience
Ease of Testing
BEAR.Sunday allows for easy and effective testing due to the following design features:
- Each resource is independent, and testing is easy due to the stateless nature of REST requests. Since the state and representation of resources are clearly separated, it is possible to test the state of resources even when they are in HTML representation.
- API testing can be performed while following hypermedia links, and tests can be written in the same code for PHP and HTTP.
- Different implementations are bound during testing through context-based binding.
Application as Documentation
In BEAR.Sunday, the application itself is the documentation. Multiple documentation formats are automatically generated from code.
- ApiDoc HTML: Developer reference
- OpenAPI 3.1: Toolchain integration
- JSON Schema: Information model definition
- llms.txt: AI-readable application overview
When using an ALPS profile as the SSOT (Single Source of Truth), you define the application semantics (vocabulary, state transitions, operation meanings) first, then generate code from it. The same document holds different meanings for different readers—developers see endpoints, architects read state transitions, and AI extracts ontology.
Visualization and Debugging
Utilizing the technical feature of resources rendering themselves, during development, the scope of resources can be indicated on HTML, resource states can be monitored, and PHP code and HTML templates can be edited in an online editor and reflected in real-time.
Extensibility and Integration
Integration of PHP Interfaces and SQL Execution
In BEAR.Sunday, the execution of SQL statements for interacting with databases can be easily managed through PHP interfaces. It is possible to directly bind SQL execution objects to PHP interfaces without implementing classes. The boundary between the domain and infrastructure is connected by PHP interfaces.
In that case, types can also be specified for arguments, and any missing parts are dependency-resolved by DI and used as strings. Even when the current time is needed for SQL execution, there is no need to pass it; it is automatically bound. This helps keep the code concise as the client is not responsible for passing all arguments.
Moreover, direct management of SQL makes debugging easier when errors occur. The behavior of SQL queries can be directly observed, allowing for quick identification and correction of problems.
Integration with Other Systems
BEAR.Sunday resources can be accessed through various interfaces. In addition to web interfaces, resources can be accessed directly from the console, allowing the same resources to be used from both web and command-line interfaces without changing the source code. Furthermore, using BEAR.CLI, resources can be distributed as standalone UNIX commands. Multiple BEAR.Sunday applications can also run concurrently within the same PHP runtime, enabling collaboration between independent applications without building microservices.
Stream Output
By assigning streams such as file pointers to the body of a resource, large-scale content that cannot be handled in memory can be output. In that case, streams can also be mixed with ordinary variables, allowing flexible output of large-scale responses.
Gradual Migration from Other Systems
BEAR.Sunday provides a gradual migration path and enables seamless integration with other frameworks and systems such as Laravel and Symfony. This framework can be implemented as a Composer package, allowing developers to gradually introduce BEAR.Sunday’s features into their existing codebase.
Flexibility in Technology Migration
BEAR.Sunday protects investments in preparation for future technological changes and evolving requirements. Even if there is a need to migrate from this framework to another framework or language, the constructed resources will not go to waste. In a PHP environment, BEAR.Sunday applications can be integrated as Composer packages and continuously utilized, and BEAR.Thrift allows efficient access to BEAR.Sunday resources from other languages. When not using Thrift, access via HTTP is also possible. SQL code can also be easily reused.
Even if the library being used is strongly dependent on a specific PHP version, different versions of PHP can coexist using BEAR.Thrift.
Design Philosophy and Quality
Adoption of Standard Technologies and Elimination of Proprietary Standards
BEAR.Sunday has a design philosophy of adopting standard technologies as much as possible and eliminating framework-specific standards and rules. For example, it supports content negotiation for JSON format and www-form format HTTP requests by default and uses the vnd.error+json media type format for error responses. It actively incorporates standard technologies and specifications such as adopting HAL (Hypertext Application Language) for links between resources and using JsonSchema for validation.
On the other hand, it eliminates proprietary validation rules and framework-specific standards and rules as much as possible.
Object-Oriented Principles
BEAR.Sunday emphasizes object-oriented principles to make applications maintainable in the long term.
Composition over Inheritance
Composition is recommended over inheritance classes. Generally, directly calling a parent class’s method from a child class can potentially increase the coupling between classes. The only abstract class that requires inheritance at runtime by design is the resource class BEAR\Resource\ResourceObject, but the methods of ResourceObject exist solely for other classes to use. There is no case in BEAR.Sunday where a user calls a method of a framework’s parent class that they have inherited at runtime.
Everything is Injected
Framework classes do not refer to “configuration files” or “debug constants” during execution to determine their behavior. Dependencies corresponding to the behavior are injected. This means that to change the application’s behavior, there is no need to change the code; only the binding of the implementation of the dependency to the interface needs to be changed. Constants like APP_DEBUG or APP_MODE do not exist. There is no way to know in what mode the software is currently running after it has started, and there is no need to know.
Permanent Assurance of Backward Compatibility
BEAR.Sunday is designed with an emphasis on maintaining backward compatibility in the evolution of software and has continued to evolve without breaking backward compatibility since its release. In modern software development, frequent breaking of backward compatibility and the associated burden of modification and testing have become a challenge, but BEAR.Sunday has avoided this problem.
BEAR.Sunday not only adopts semantic versioning but also does not perform major version upgrades that involve breaking changes. It prevents new feature additions or changes to existing features from affecting existing code. Code that has become old and unused is given the attribute “deprecated” but is never deleted and does not affect the behavior of existing code. Instead, new features are added, and evolution continues.
Acyclic Dependencies Principle (ADP)
The Acyclic Dependencies Principle states that dependencies should be unidirectional and non-circular. The BEAR.Sunday framework adheres to this principle and is composed of a series of packages with a hierarchical structure where larger framework packages depend on smaller framework packages. Each level does not need to be aware of the existence of other levels that encompass it, and the dependencies are unidirectional and do not form cycles. For example, Ray.Aop is not even aware of the existence of Ray.Di, and Ray.Di is not aware of the existence of BEAR.Sunday.
As backward compatibility is maintained, each package can be updated independently. Moreover, there is no version number that locks the entire system, as seen in other frameworks, and there is no mechanism for object proxies that hold cross-cutting dependencies between objects.
The Acyclic Dependencies Principle is in harmony with the DI (Dependency Injection) principle, and the root object generated during the bootstrapping process of BEAR.Sunday is also constructed following the structure of this Acyclic Dependencies Principle.
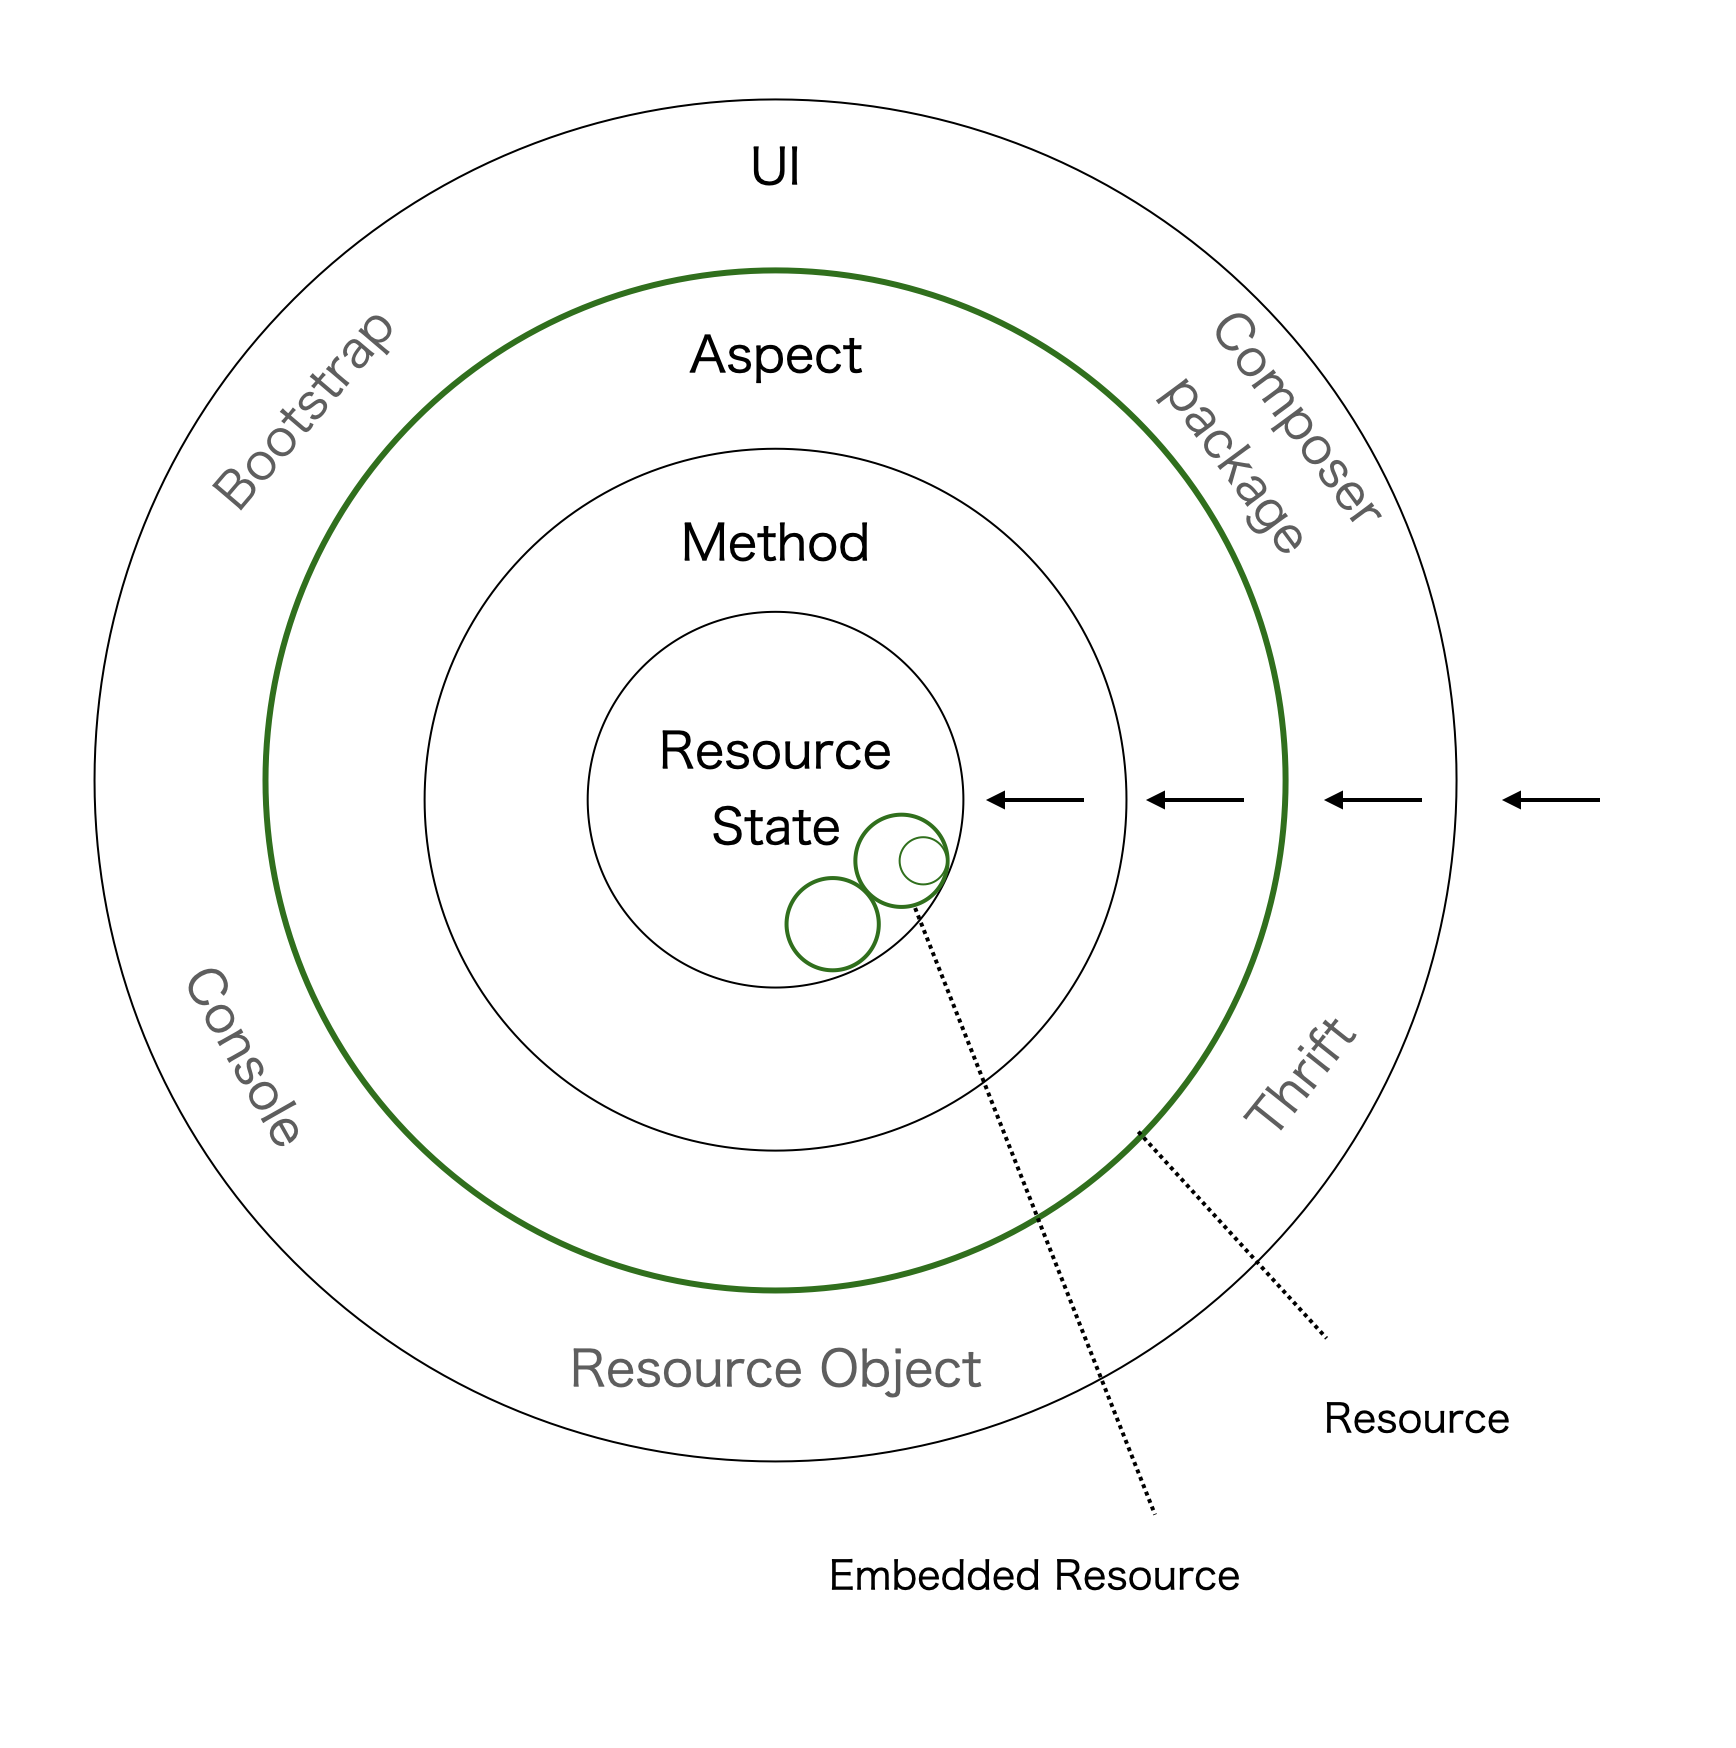
The same applies to the runtime. When accessing a resource, first, the cross-cutting processing of the AOP aspects bound to the method is executed, and then the method determines the state of the resource. At this point, the method is not aware of the existence of the aspects bound to it. The same goes for resources embedded in the resource’s state. They do not have knowledge of the outer layers or elements. The separation of concerns is clearly defined.
Code Quality
To provide applications with high code quality, the BEAR.Sunday framework also strives to maintain a high standard of code quality.
- The framework code is applied at the strictest level by both static analysis tools, Psalm and PHPStan.
- It maintains 100% test coverage and nearly 100% type coverage.
- It is fundamentally an immutable system and is so clean that initialization is not required every time, even in tests. It unleashes the power of PHP’s asynchronous communication engines like Swoole.
Architecture-Enabled Security Analysis
BEAR.Sunday’s architecture fundamentally simplifies security analysis.
Every endpoint is a ResourceObject with explicit onGet and onPost methods, inputs are declared via JSON Schema, and dependencies are explicit through constructor injection. With no hidden magic or global state, static analysis tools can trace complete data flows.
This declarative architecture enables multi-layered security scanning combining SAST (static analysis), DAST (dynamic testing), taint analysis, and AI auditing. Framework-aware specialized tools detect vulnerabilities that generic tools cannot find.
The Value BEAR.Sunday Brings
Value for Developers
- Improved productivity: Based on robust design patterns and principles with constraints that don’t change over time, developers can focus on core business logic.
- Collaboration in teams: By providing development teams with consistent guidelines and structure, it keeps the code of different engineers loosely coupled and unified, improving code readability and maintainability.
- Flexibility and extensibility: BEAR.Sunday’s policy of not including libraries brings developers flexibility and freedom in component selection.
- Ease of testing: BEAR.Sunday’s DI (Dependency Injection) and ROA (Resource Oriented Architecture) increase the ease of testing.
Value for Users
- High performance: BEAR.Sunday’s runtime optimization and CDN-centric caching strategy brings users a fast and responsive experience.
- Reliability and availability: BEAR.Sunday’s CDN-centric caching strategy minimizes single points of failure (SPOF), allowing users to enjoy stable services.
- Ease of use: BEAR.Sunday’s excellent connectivity makes it easy to collaborate with other languages and systems.
Value for Business
- Reduced development costs: The consistent guidelines and structure provided by BEAR.Sunday promote a sustainable and efficient development process, reducing development costs.
- Reduced maintenance costs: BEAR.Sunday’s approach to maintaining backward compatibility increases technical continuity and minimizes the time and cost of change response.
- High extensibility: With technologies like DI (Dependency Injection) and AOP (Aspect Oriented Programming) that change behavior while minimizing code changes, BEAR.Sunday allows applications to be easily extended in line with business growth and changes.
- Excellent User Experience (UX): BEAR.Sunday provides high performance and high availability, increasing user satisfaction, enhancing customer loyalty, expanding the customer base, and contributing to business success.
Summary
Excellent constraints do not change. The constraints brought by BEAR.Sunday provide specific value to developers, users, and businesses respectively.
BEAR.Sunday is a framework designed based on the principles and spirit of the Web, providing developers with clear constraints to empower them to build flexible and robust applications.
Version
Supported PHP
![]()
BEAR.Sunday supports the following supported PHP versions
8.1(Old stable 25 Nov 2021 - 31 Dec 2025)8.2(Old stable 8 Dec 2022 - 31 Dec 2026)8.3(Old stable 23 Nov 2023 - 31 Dec 2027)-
8.4(Current stable 21 Nov 2024 - 31 Dec 2028) -
End of life (EOL)
5.5(21 Jul 2016)5.6(31 Dec 2018)7.0(3 Dec 2018)7.1(1 Dec 2019)7.2(30 Nov 2020)7.3(6 Dec 2021)7.4(28 Nov 2022)8.0(26 Nov 2023)
The new optional package will be developed based on the current stable PHP. We encourage you to use the current stable PHP for quality, performance and security.
BEAR.SupportedVersions, you can check the tests for each version in CI.
Semver
BEAR.Sunday follows Semantic Versioning. It is not necessary to modify the application code on minor version upgrades.
composer update can be done at any time for packages.
Version Policy
- The core package of the framework does not make a breaking change which requires change of user code.
- Since it does not do destructive change, it handles unnecessary old ones as
deprecatedbut does not delete and new functions are always “added”. - When PHP comes to an EOL and upgraded to a major version (ex.
5.6→7.0), BEAR.Sunday will not break the BC of the application code. Even though the version number of PHP that is necessary to use the new module becomes higher, changes to the application codes are not needed.
BEAR.Sunday emphasizes clean code and longevity.
Package version
The version of the framework does not lock the version of the library. The library can be updated regardless of the version of the framework.
Quick Start
Installation is done via composer
VENDOR=MyVendor PACKAGE=MyProject composer create-project bear/skeleton my-project
cd my-project
Use VENDOR to specify the vendor name and PACKAGE to specify the package name for installation. If not specified, you will be prompted interactively.
Next, let’s create a new resource. A resource is a class which corresponds, for instance, to a JSON payload (if working with an API-first driven model)
or a web page.
Create your own basic page resource in src/Resource/Page/Hello.php
<?php
namespace MyVendor\MyProject\Resource\Page;

use BEAR\Resource\ResourceObject;

class Hello extends ResourceObject
{
    public function onGet(string $name = 'BEAR.Sunday'): static
    {
        $this->body = [
            'greeting' => 'Hello ' . $name
        ];

        return $this;
    }
}
In the above example, when the page is requested using a GET method, Hello and the $name parameter (which corresponds to $_GET['name']) are joined, and assigned to a variable greeting.
The BEAR.Sunday application that you have created will work on a web server, but also in the console.
php bin/page.php get /hello
php bin/page.php get '/hello?name=World'
200 OK
Content-Type: application/hal+json

{
    "greeting": "Hello World",
    "_links": {
        "self": {
            "href": "/hello?name=World"
        }
    }
}
Let us fire up the php server and access our page at http://127.0.0.1:8080/hello.
php -S 127.0.0.1:8080 -t public
curl -i 127.0.0.1:8080/hello
Environment Setup
Choose malt / Docker / manual setup based on your OS and team structure. This is a practical guide that consolidates the features, setup procedures, and operational points for each method in one place.
Method Selection
| Method | Target OS | Features | Recommended Use |
|---|---|---|---|
| malt | macOS, WSL2, Linux | Homebrew-based, lightweight, configuration shareable, local-complete Batch service management commands |
Individual dev, team dev |
| Docker | macOS, Windows, Linux | Container-based complete environment reproduction, CI/CD friendly | Team dev, CI/CD, production-like |
| Manual | All OS | Use existing environment as-is, fine-grained control | Existing infrastructure, constrained environments |
Environment Setup with malt
Overview
malt is a development environment management tool based on Homebrew. It consolidates configuration and data directly under the project, achieving local completion.
Key Features
- Completely Local: All configuration and data stored within the project
- Clean Deletion: Folder deletion = environment deletion
- Dedicated Port Commands: Aliases like
mysql@3306/redis@6379 - No Global Pollution: No impact on system MySQL/Redis etc.
- Configuration Visibility: Configuration files can be shared and reviewed within the project
- Batch Service Management:
malt start/malt stopcan start/stop related services together
Prerequisites
- macOS or Linux (including WSL2)
- Homebrew installed
Installation
# Add Homebrew taps
brew tap shivammathur/php
brew tap shivammathur/extensions
brew tap koriym/malt

# Install malt
brew install malt
Basic Operations (Shortest Path)
malt init && malt install && malt create && malt start
source <(malt env)
Configuration Files
malt.json          # malt configuration
malt/
  conf/
    my_3306.cnf     # MySQL configuration
    php.ini         # PHP configuration
    httpd_8080.conf # Apache configuration
    nginx_80.conf   # Nginx configuration
These files can be included in your project for team environment sharing.
Service Management
# Status check
malt status

# Start / stop / restart all services
malt start
malt stop
malt restart

# Specific services only
malt start mysql
malt stop nginx
Database Operations
mysql@3306  # Connect to project-specific MySQL
redis@6379  # Connect to project-specific Redis
mysql@3306 -e "CREATE DATABASE IF NOT EXISTS myapp"
Important:
mysql@3306is project-specific connection. It’s isolated from the system’s global MySQL.
Environment Setup with Docker
Overview
Docker provides OS-independent, consistent development environments.
Docker Considerations:
- Global Command Conflicts: The system
mysqlcommand points to global MySQL installation - Container-specific Access: Requires specific connection methods for Docker container databases
- Port Conflict Risk: Ports like 3306 may conflict with system services
- macOS File Access: Host-container file mount performance degradation, especially noticeable during bulk file operations (builds, tests)
- Security:
MYSQL_ALLOW_EMPTY_PASSWORDshould be limited to development use only
Prerequisites
- Docker Desktop installed
- Docker Compose available
Basic docker-compose.yml
version: '3.8'

services:
  mysql:
    image: mysql:8.0
    environment:
      MYSQL_ROOT_PASSWORD: ""
      MYSQL_ALLOW_EMPTY_PASSWORD: "yes"
      MYSQL_DATABASE: myapp
    ports:
      - "3306:3306"
    volumes:
      - mysql_data:/var/lib/mysql
      - ./docker/mysql/init.sql:/docker-entrypoint-initdb.d/init.sql
    command: --default-authentication-plugin=mysql_native_password
    healthcheck:
      test: ["CMD", "mysqladmin", "ping", "-h", "localhost"]
      interval: 10s
      timeout: 5s
      retries: 3

  redis:
    image: redis:alpine
    ports:
      - "6379:6379"

  memcached:
    image: memcached:alpine
    ports:
      - "11211:11211"

volumes:
  mysql_data:
Usage
# Start environment
docker-compose up -d

# Check status
docker-compose ps

# Check logs
docker-compose logs mysql

# Stop environment
docker-compose stop

# Complete removal (including data)
docker-compose down -v
Database Connection
# Connect from host (port specification required)
mysql -h 127.0.0.1 -P 3306 -u root

# Connect from within container (recommended)
docker-compose exec mysql mysql -u root
Warning: If mysql is installed on your system, running just mysql will connect to your system’s MySQL, not the Docker container. To access the Docker database, you must either specify host/port or execute from within the container.
Manual Environment Setup
PHP
# macOS (Homebrew)
brew install php@8.4
brew install composer

# Ubuntu/Debian
sudo apt update
sudo apt install php8.4 php8.4-{cli,mysql,mbstring,xml,zip,curl}
curl -sS https://getcomposer.org/installer | php
sudo mv composer.phar /usr/local/bin/composer

# CentOS/RHEL
sudo dnf install php php-{cli,mysql,mbstring,xml,zip,curl}
MySQL
# macOS (Homebrew)
brew install mysql@8.0
brew services start mysql@8.0

# Ubuntu/Debian
sudo apt install mysql-server-8.0
sudo systemctl start mysql

# CentOS/RHEL
sudo dnf install mysql-server
sudo systemctl start mysqld
Useful PHP Extensions for Development
# Xdebug (debugging)
brew install shivammathur/extensions/xdebug@8.4    # Homebrew
sudo apt install php8.4-xdebug                    # Ubuntu

# XHProf (profiling)
brew install shivammathur/extensions/xhprof@8.4   # Homebrew
sudo apt install php8.4-xhprof                    # Ubuntu

# Redis
brew install shivammathur/extensions/redis@8.4    # Homebrew
sudo apt install php8.4-redis                     # Ubuntu

# APCu (caching)
brew install shivammathur/extensions/apcu@8.4     # Homebrew
sudo apt install php8.4-apcu                      # Ubuntu
Important: Xdebug and XHProf impact performance, so avoid leaving them enabled all the time. When you configure them, Xdebug uses zend_extension=xdebug.so, while XHProf uses extension=xhprof.so; enable them from the CLI only when needed.
# Enable Xdebug only when debugging
php -dzend_extension=xdebug.so -S 127.0.0.1:8080 -t public

# Enable XHProf only when profiling
php -dextension=xhprof.so script.php

# Disable Xdebug when running Composer (recommended)
XDEBUG_MODE=off composer install

# Or override the PHP ini setting
php -dxdebug.mode=off /usr/local/bin/composer install
BEAR.Sunday Quick Start Example
composer create-project bear/skeleton my-app
cd my-app
malt init && malt install && malt create && malt start
source <(malt env)
Project-specific Configuration
.env (Example)
# MySQL
DB_HOST=127.0.0.1
DB_PORT=3306
DB_NAME=myapp
DB_USER=root
DB_PASS=
DB_DSN=mysql:host=127.0.0.1;port=3306;dbname=myapp

# SQLite (switching example)
# DB_DSN=sqlite:var/db.sqlite3

# Redis
REDIS_HOST=127.0.0.1:6379

# Memcached
MEMCACHED_HOST=127.0.0.1:11211
Migration (Phinx Example)
composer require --dev robmorgan/phinx
./vendor/bin/phinx init
./vendor/bin/phinx create MyMigration
./vendor/bin/phinx migrate
Development Server
PHP Built-in Server
# Start on port 8080
php -S 127.0.0.1:8080 -t public

# Enable Xdebug only when debugging
php -dzend_extension=xdebug.so -S 127.0.0.1:8080 -t public
malt Server
# Choose Apache / Nginx and start
malt start apache   # http://127.0.0.1:8080
malt start nginx    # http://127.0.0.1:80

# Check services
malt status

# Start/stop all services
malt start
malt stop

# Individual stop
malt stop apache
malt stop nginx
Troubleshooting
Port Conflicts
# macOS/Linux
lsof -i :3306
netstat -tulpn | grep :3306

# Kill the process
kill -9 <PID>
PHP Configuration Check
php --ini     # Loaded configuration
php -m        # Loaded modules
MySQL Connection Errors
# Connection test
mysql -h 127.0.0.1 -P 3306 -u root -p

# Linux service status
sudo systemctl status mysql

# Error logs
sudo tail -f /var/log/mysql/error.log
malt-specific Issues
# Status check
malt status

# Reset configuration
malt stop
rm -rf malt/
malt create
malt start
.gitignore for Team Development
malt/logs/
malt/data/
malt/tmp/
CI/CD (GitHub Actions Example)
name: Tests

on: [push, pull_request]

jobs:
  test:
    runs-on: ubuntu-latest

    services:
      mysql:
        image: mysql:8.0
        env:
          MYSQL_ROOT_PASSWORD: ""
          MYSQL_ALLOW_EMPTY_PASSWORD: yes
          MYSQL_DATABASE: test_db
        ports:
          - 3306:3306
        options: >-
          --health-cmd="mysqladmin ping"
          --health-interval=10s
          --health-timeout=5s
          --health-retries=3

    steps:
      - uses: actions/checkout@v3

      - name: Setup PHP
        uses: shivammathur/setup-php@v2
        with:
          php-version: '8.4'
          extensions: mbstring, xml, pdo_mysql, mysqli, intl, curl, zip

      - name: Install dependencies
        run: composer install --no-interaction --prefer-dist

      - name: Run tests
        run: ./vendor/bin/phpunit
Environment Selection Guidelines
Development environments prioritize transparency and direct access, while production environments prioritize reproducibility and monitoring capabilities.
- Daily Development & Learning: malt (instant
mysql@3306, visible configuration, fast file access) - Team Development: malt (configuration sharing) or Docker (reproducibility priority)
- Production & CI/CD: Docker only (same behavior anywhere, rich monitoring tool ecosystem)
- Complex Configurations: Docker (assuming integration and scale of dependent services)
Follow your project’s tutorials and team conventions for detailed configuration and BEAR.Sunday best practices.
Tutorial
In this tutorial, we introduce the basic features of BEAR.Sunday, including DI (Dependency Injection), AOP (Aspect-Oriented Programming), and REST API. Follow along with the commits from tutorial1.
Project Creation
Let’s create a web service that returns the day of the week when a date (year, month, day) is entered. Start by creating a project.
VENDOR=MyVendor PACKAGE=Weekday composer create-project bear/skeleton weekday
cd weekday
Resources
BEAR.Sunday applications are made up of resources. A ResourceObject is an object that represents a web resource itself. It receives HTTP requests and transforms itself into the current state of that resource.
First, create an application resource file at src/Resource/App/Weekday.php.
<?php

declare(strict_types=1);

namespace MyVendor\Weekday\Resource\App;

use BEAR\Resource\ResourceObject;
use DateTimeImmutable;

class Weekday extends ResourceObject
{
    public function onGet(int $year, int $month, int $day): static
    {
        $dateTime = DateTimeImmutable::createFromFormat('Y-m-d', "$year-$month-$day");
        $weekday = $dateTime->format('D');
        $this->body = ['weekday' => $weekday];

        return $this;
    }
}
This resource class MyVendor\Weekday\Resource\App\Weekday can be accessed via the path /weekday. The query parameters of the GET method are passed to the onGet method.
The job of a ResourceObject is to receive requests and determine its own state.
Try accessing it via the console. First, test with an error.
php bin/app.php get /weekday
400 Bad Request
content-type: application/vnd.error+json

{
    "message": "Bad Request",
    "logref": "e29567cd",
Errors are returned in the application/vnd.error+json media type. The 400 error code indicates a problem with the request. Each error is assigned a logref ID, and the details of the error can be found in var/log/.
Next, try a correct request with parameters.
php bin/app.php get '/weekday?year=2001&month=1&day=1'
200 OK
Content-Type: application/hal+json

{
    "weekday": "Mon",
    "_links": {
        "self": {
            "href": "/weekday?year=2001&month=1&day=1"
        }
    }
}
The result is correctly returned in the application/hal+json media type. HAL+JSON is a JSON format that uses the _links section to link related resources. For more details about HAL+JSON, see here.
Let’s turn this into a Web API service. Start the built-in server.
php -S 127.0.0.1:8080 bin/app.php
Test it with an HTTP GET request using curl.
Modify public/index.php as shown below:
<?php

declare(strict_types=1);

use MyVendor\Weekday\Bootstrap;

require dirname(__DIR__) . '/autoload.php';
- exit((new Bootstrap())(PHP_SAPI === 'cli-server' ? 'hal-app' : 'prod-hal-app', $GLOBALS, $_SERVER));
+ exit((new Bootstrap())(PHP_SAPI === 'cli-server' ? 'hal-api-app' : 'prod-hal-api-app', $GLOBALS, $_SERVER));
curl -i 'http://127.0.0.1:8080/weekday?year=2001&month=1&day=1'
HTTP/1.1 200 OK
Host: 127.0.0.1:8080
Date: Tue, 04 May 2021 01:55:59 GMT
Connection: close
X-Powered-By: PHP/8.0.3
Content-Type: application/hal+json

{
    "weekday": "Mon",
    "_links": {
        "self": {
            "href": "/weekday/2001/1/1"
        }
    }
}
This resource class does not have methods other than GET, so trying other methods will return 405 Method Not Allowed. Let’s test this as well.
curl -i -X POST 'http://127.0.0.1:8080/weekday?year=2001&month=1&day=1'
HTTP/1.1 405 Method Not Allowed
...
The HTTP OPTIONS method request can be used to determine the available HTTP methods and required parameters (RFC7231).
curl -i -X OPTIONS http://127.0.0.1:8080/weekday
HTTP/1.1 200 OK
...
Content-Type: application/json
Allow: GET

{
    "GET": {
        "parameters": {
            "year": {
                "type": "integer"
            },
            "month": {
                "type": "integer"
            },
            "day": {
                "type": "integer"
            }
        },
        "required": [
            "year",
            "month",
            "day"
        ]
    }
}
Testing
Let’s create a test for the resource using PHPUnit.
tests/Resource/App/WeekdayTest.php with the following test code:
<?php

declare(strict_types=1);

namespace MyVendor\Weekday\Resource\App;

use BEAR\Resource\ResourceInterface;
use MyVendor\Weekday\Injector;
use PHPUnit\Framework\TestCase;

class WeekdayTest extends TestCase
{
    private ResourceInterface $resource;

    protected function setUp(): void
    {
        $injector = Injector::getInstance('app');
        $this->resource = $injector->getInstance(ResourceInterface::class);
    }

    public function testOnGet(): void
    {
        $ro = $this->resource->get('app://self/weekday', ['year' => '2001', 'month' => '1', 'day' => '1']);
        $this->assertSame(200, $ro->code);
        $this->assertSame('Mon', $ro->body['weekday']);
    }
}
The setUp() method specifies the context (app) and uses the application’s injector Injector to obtain a resource client (ResourceInterface), and the testOnGet method requests the resource for testing.
Let’s run it.
./vendor/bin/phpunit
PHPUnit 9.5.4 by Sebastian Bergmann and contributors.

....                                                                4 / 4 (100%)

Time: 00:00.281, Memory: 14.00 MB
The installed project also includes commands for running tests and code inspections. To obtain test coverage, run composer coverage.
composer coverage
pcov can measure coverage more quickly.
composer pcov
You can view the details of the coverage by opening build/coverage/index.html in a web browser.
To check if the coding standards are being followed, use the composer cs command.
Automatic corrections can be done with the composer cs-fix command.
composer cs
composer cs-fix
Static Analysis
Static analysis of the code is performed using the composer sa command.
composer sa
When running the code up to this point, the following error was detected by phpstan.
 ------ ---------------------------------------------------------
  Line   src/Resource/App/Weekday.php
 ------ ---------------------------------------------------------
  15     Cannot call method format() on DateTimeImmutable|false.
 ------ ---------------------------------------------------------
The earlier code did not consider that DateTimeImmutable::createFromFormat might return false when invalid values (such as the year being -1) are passed.
Let’s try it.
php bin/app.php get '/weekday?year=-1&month=1&day=1'
Even if a PHP error occurs, the error handler catches it and displays the error message in the correct application/vnd.error+json media type, but to pass static analysis inspection, you need to add code to assert the result of DateTimeImmutable or check the type and throw an exception.
Using assert
$dateTime = DateTimeImmutable::createFromFormat('Y-m-d', "$year-$month-$day");
assert($dateTime instanceof DateTimeImmutable);
Throwing an exception
First, create a dedicated exception src/Exception/InvalidDateTimeException.php.
<?php

declare(strict_types=1);

namespace MyVendor\Weekday\Exception;

use RuntimeException;

class InvalidDateTimeException extends RuntimeException
{
}
Modify the code to check values.
<?php

declare(strict_types=1);

namespace MyVendor\Weekday\Resource\App;

use BEAR\Resource\ResourceObject;
use DateTimeImmutable;
+use MyVendor\Weekday\Exception\InvalidDateTimeException;

class Weekday extends ResourceObject
{
    public function onGet(int $year, int $month, int $day): static
    {
        $dateTime = DateTimeImmutable::createFromFormat('Y-m-d', "$year-$month-$day");
+        if (! $dateTime instanceof DateTimeImmutable) {
+            throw new InvalidDateTimeException("$year-$month-$day");
+        }

        $weekday = $dateTime->format('D');
        $this->body = ['weekday' => $weekday];

        return $this;
    }
}
Add a test as well.
+    public function testInvalidDateTime(): void
+    {
+        $this->expectException(InvalidDateTimeException::class);
+        $this->resource->get('app://self/weekday', ['year' => '-1', 'month' => '1', 'day' => '1']);
+    }
Best Practices for Exception Creation
Since the exception occurred due to an input mistake, there is no problem with the code itself. Such exceptions that become apparent at runtime are
RuntimeExceptions. We have extended this to create a dedicated exception. Conversely, if the occurrence of an exception is due to a bug requiring code correction, you would extendLogicExceptionto create the exception. Instead of explaining the type of exception in the message, create dedicated exceptions for each type.
Defensive Programming
This modification eliminates the possibility of
falsebeing in$dateTimewhen executing$dateTime->format('D');. This type of programming, which avoids problems before they occur, is called defensive programming, and static analysis is helpful for these inspections.
Pre-Commit Testing
composer tests not only performs composer test but also checks coding standards (cs) and static analysis (sa).
composer tests
Routing
The default router is WebRouter, which maps URLs to directories.
Here, we use the Aura router to accept dynamic parameters in the path.
First, install it with composer.
composer require bear/aura-router-module ^2.0
Next, install AuraRouterModule in src/Module/AppModule.php before PackageModule.
<?php

declare(strict_types=1);

namespace MyVendor\Weekday\Module;

use BEAR\Dotenv\Dotenv;
use BEAR\Package\AbstractAppModule;
use BEAR\Package\PackageModule;
+use BEAR\Package\Provide\Router\AuraRouterModule;
use function dirname;

class AppModule extends AbstractAppModule
{
    protected function configure(): void
    {
        (new Dotenv())->load(dirname(__DIR__, 2));
+        $appDir = $this->appMeta->appDir;
+        $this->install(new AuraRouterModule($appDir . '/var/conf/aura.route.php'));
        $this->install(new PackageModule());
    }
}
Place the router script file in var/conf/aura.route.php.
<?php
/**
 * @see http://bearsunday.github.io/manuals/1.0/ja/router.html
 * @var \Aura\Router\Map $map
 */

$map->route('/weekday', '/weekday/{year}/{month}/{day}');
Let’s try it.
php bin/app.php get /weekday/1981/09/08
200 OK
Content-Type: application/hal+json

{
    "weekday": "Tue",
    "_links": {
        "self": {
            "href": "/weekday/1981/09/08"
        }
    }
}
DI
Let’s add a feature to log the requested weekday.
First, create src/MyLoggerInterface.php to log the weekday.
<?php

declare(strict_types=1);

namespace MyVendor\Weekday;

interface MyLoggerInterface
{
    public function log(string $message): void;
}
The resource will be modified to use this logging feature.
<?php
namespace MyVendor\Weekday\Resource\App;

use BEAR\Resource\ResourceObject;
use MyVendor\Weekday\MyLoggerInterface;

class Weekday extends ResourceObject
{
+    public function __construct(public MyLoggerInterface $logger)
+    {
+    }

    public function onGet(int $year, int $month, int $day): static
    {
        $dateTime = DateTimeImmutable::createFromFormat('Y-m-d', "$year-$month-$day");
        $weekday = $dateTime->format('D');
        $this->body = [
            'weekday' => $weekday
        ];
+        $this->logger->log("$year-$month-$day {$weekday}");

        return $this;
    }
}
The Weekday class receives the logger service via the constructor.
This mechanism, where the necessary objects (dependencies) are not created with new or obtained from a container but are instead injected from outside, is called DI.
Next, implement MyLoggerInterface in MyLogger.
<?php

declare(strict_types=1);

namespace MyVendor\Weekday;

use BEAR\AppMeta\AbstractAppMeta;

use function error_log;

use const PHP_EOL;

class MyLogger implements MyLoggerInterface
{
    private string $logFile;

    public function __construct(AbstractAppMeta $meta)
    {
        $this->logFile = $meta->logDir . '/weekday.log';
    }

    public function log(string $message): void
    {
        error_log($message . PHP_EOL, 3, $this->logFile);
    }
}
Implementing MyLogger requires information about the application’s log directory (AbstractAppMeta), which is also received as a dependency in the constructor.
Thus, while the Weekday resource depends on MyLogger, MyLogger also depends on the log directory information. In this way, objects constructed with DI are recursively injected with their dependencies.
This dependency resolution is performed by the DI tool (dependency injector).
To bind MyLoggerInterface and MyLogger using the DI tool, edit the configure method in src/Module/AppModule.php.
class AppModule extends AbstractAppModule
{
    protected function configure(): void
    {
        (new Dotenv())->load(dirname(__DIR__, 2));
        $appDir = $this->appMeta->appDir;
        $this->install(new AuraRouterModule($appDir . '/var/conf/aura.route.php'));
+        $this->bind(MyLoggerInterface::class)->to(MyLogger::class);
        $this->install(new PackageModule());
    }
}
This allows any class to receive a logger via the constructor using MyLoggerInterface.
Run it and check that the results are output to var/log/cli-hal-api-app/weekday.log.
php bin/app.php get /weekday/2011/05/23
cat var/log/cli-hal-api-app/weekday.log
AOP
Let’s consider a benchmarking process to measure the execution time of methods.
$start = microtime(true);
// method invokation
$time = microtime(true) - $start;
Adding this code every time you perform a benchmark and removing it when it’s no longer needed is cumbersome. Aspect-Oriented Programming (AOP) allows you to nicely synthesize such specific pre- and post-method processes.
First, to achieve AOP, create an interceptor that hijacks the method execution and performs the benchmark in src/Interceptor/BenchMarker.php.
<?php

declare(strict_types=1);

namespace MyVendor\Weekday\Interceptor;

use MyVendor\Weekday\MyLoggerInterface;
use Ray\Aop\MethodInterceptor;
use Ray\Aop\MethodInvocation;

use function microtime;
use function sprintf;

class BenchMarker implements MethodInterceptor
{
    public function __construct(private MyLoggerInterface $logger)
    {
    }

    public function invoke(MethodInvocation $invocation): mixed
    {
        $start = microtime(true);
        $result = $invocation->proceed(); // Execute the original method
        $time = microtime(true) - $start;
        $message = sprintf('%s: %0.5f(µs)', $invocation->getMethod()->getName(), $time);
        $this->logger->log($message);

        return $result;
    }
}
In the interceptor’s invoke method, the original method’s execution can be performed using $invocation->proceed();, and the timer reset and recording process are performed before and after this. (The original method’s object and method name are obtained from the method execution object MethodInvocation $invocation.)
Next, create an attribute to mark the method you want to benchmark in src/Annotation/BenchMark.php.
<?php

declare(strict_types=1);

namespace MyVendor\Weekday\Annotation;

use Attribute;

#[Attribute(Attribute::TARGET_METHOD)]
final class BenchMark
{
}
In AppModule, use Matcher to bind (bind) the interceptor to the method to which you want to apply it.
+use MyVendor\Weekday\Annotation\BenchMark;
+use MyVendor\Weekday\Interceptor\BenchMarker;

class AppModule extends AbstractAppModule
{
    protected function configure(): void
    {
        (new Dotenv())->load(dirname(__DIR__, 2));
        $appDir = $this->appMeta->appDir;
        $this->install(new AuraRouterModule($appDir . '/var/conf/aura.route.php'));
        $this->bind(MyLoggerInterface::class)->to(MyLogger::class);
+        $this->bindInterceptor(
+            $this->matcher->any(),                           // In any class,
+            $this->matcher->annotatedWith(BenchMark::class), // To #[BenchMark] attributed method
+            [BenchMarker::class]                             // Apply BenchMarker interceptor interception
+        );
        $this->install(new PackageModule());
    }
}
Apply the #[BenchMark] attribute to the method you want to benchmark.
+use MyVendor\Weekday\Annotation\BenchMark;

class Weekday extends ResourceObject
{

+   #[BenchMark]
    public function onGet(int $year, int $month, int $day): static
    {
Now you can benchmark any method by adding the #[BenchMark] attribute.
Adding functionality with attributes and interceptors is flexible. There are no changes to the target methods or the methods that call them. The attribute remains as is, but you can remove the binding if you don’t want to benchmark. For example, you can bind only during development and issue a warning if it exceeds a certain number of seconds.
Run it and check that the execution time logs are output to var/log/weekday.log.
php bin/app.php get '/weekday/2015/05/28'
cat var/log/cli-hal-api-app/weekday.log
HTML
Next, let’s turn this API application into an HTML application.
In addition to the current app resource, add a page resource in src/Resource/Page/Index.php.
<?php

declare(strict_types=1);

namespace MyVendor\Weekday\Resource\Page;

use BEAR\Resource\ResourceObject;
use BEAR\Resource\Annotation\Embed;

class Index extends ResourceObject
{
    #[Embed(rel:"_self", src: "app://self/weekday{?year,month,day}")]
    public function onGet(int $year, int $month, int $day): static
    {
        $this->body += [
            'year' => $year,
            'month' => $month,
            'day' => $day,
        ];

        return $this;
    }
}
The page resource class is essentially the same as the app resource class, just with different locations and roles.
Linking with _self copies the app://self/weekday resource onto itself.
The app resource’s weekday is assigned to $body['weekday'], and the arguments year, month, day are added to the body.
Let’s see what representation this resource has.
php bin/page.php get '/?year=2000&month=1&day=1'
200 OK
Content-Type: application/hal+json

{
    "year": 2000,
    "month": 1,
    "day": 1,
    "weekday": "Sat",
    "_links": {
        "self": {
            "href": "/index?year=2000&month=1&day=1"
        }
    }
}
The resource is output as the application/hal+json media type, but to output it as HTML (text/html), install the HTML module. See HTML Manual.
composer install
composer require madapaja/twig-module ^2.0
Create src/Module/HtmlModule.php.
<?php
namespace MyVendor\Weekday\Module;

use Madapaja\TwigModule\TwigErrorPageModule;
use Madapaja\TwigModule\TwigModule;
use Ray\Di\AbstractModule;

class HtmlModule extends AbstractModule
{
    protected function configure(): void
    {
        $this->install(new TwigModule);
        $this->install(new TwigErrorPageModule);
    }
}
Copy the templates folder.
cp -r vendor/madapaja/twig-module/var/templates var
Change bin/page.php to use the html-app context.
<?php
use MyVendor\Weekday\Bootstrap;

require dirname(__DIR__) . '/autoload.php';
exit((new Bootstrap())(PHP_SAPI === 'cli' ? 'cli-html-app' : 'html-app', $GLOBALS, $_SERVER));
This prepares you for text/html output.
Finally, edit the var/templates/Page/Index.html.twig file.
{% extends 'layout/base.html.twig' %}
{% block title %}Weekday{% endblock %}
{% block content %}
The weekday of {{ year }}/{{ month }}/{{ day }} is {{ weekday }}.
{% endblock %}
Preparations are complete. First, check that this HTML is output in the console.
php bin/page.php get '/?year=1991&month=8&day=1'
200 OK
Content-Type: text/html; charset=utf-8

<!DOCTYPE html>
<html>
...
If html is not displayed at this time, there may be an error in the template engine.
In that case, check the error in the log file (var/log/cli-html-app/last.log ref.log).
Next, to provide web services, also change public/index.php.
<?php

use MyVendor\Weekday\Bootstrap;

require dirname(__DIR__) . '/autoload.php';
exit((new Bootstrap())(PHP_SAPI === 'cli-server' ? 'html-app' : 'prod-html-app', $GLOBALS, $_SERVER));
Start the PHP server and check by accessing http://127.0.0.1:8080/?year=2001&month=1&day=1 in a web browser.
php -S 127.0.0.1:8080 public/index.php
Context is something like the application’s execution mode, and multiple can be specified. Let’s try it.
<?php

use MyVendor\Weekday\Bootstrap;

// JSON Application
require dirname(__DIR__) . '/autoload.php';
exit((new Bootstrap())('prod-app', $GLOBALS, $_SERVER));
<?php

use MyVendor\Weekday\Bootstrap;

// Production HAL Application
require dirname(__DIR__) . '/autoload.php';
exit((new Bootstrap())('prod-hal-app', $GLOBALS, $_SERVER));
PHP code that generates instances according to the context is created. Check the var/tmp/{context}/di folder of the application.
You don’t usually need to see these files, but you can check how the objects are created.
REST API
Let’s create an application resource using sqlite3.
First, create a DB in var/db/todo.sqlite3 in the console.
mkdir var/db
sqlite3 var/db/todo.sqlite3

sqlite> create table todo(id integer primary key, todo, created_at);
sqlite> .exit
You can choose database access from AuraSql, Doctrine Dbal, CakeDB, etc., but here we will install Ray.AuraSqlModule.
composer require ray/aura-sql-module
Install the module in src/Module/AppModule::configure().
At that time, bind DateTimeImmutable so that you can receive the current time in the constructor.
<?php
+use Ray\AuraSqlModule\AuraSqlModule;
+use DateTimeImmutable;

class AppModule extends AbstractAppModule
{
    protected function configure(): void
    {
        // ...
+        $this->bind(DateTimeImmutable::class);
+        $this->install(new AuraSqlModule(sprintf('sqlite:%s/var/db/todo.sqlite3', $this->appMeta->appDir)));
        $this->install(new PackageModule());
    }
}
Place the Todo resource in src/Resource/App/Todos.php.
<?php

declare(strict_types=1);

namespace MyVendor\Weekday\Resource\App;

use Aura\Sql\ExtendedPdoInterface;
use BEAR\Package\Annotation\ReturnCreatedResource;
use BEAR\RepositoryModule\Annotation\Cacheable;
use BEAR\Resource\ResourceObject;
use DateTimeImmutable;
use Ray\AuraSqlModule\Annotation\Transactional;

use function sprintf;

#[Cacheable]
class Todos extends ResourceObject
{
    public function __construct(
        private readonly ExtendedPdoInterface $pdo,
        private readonly DateTimeImmutable $date,
    ) {
    }

    public function onGet(string $id = ''): static
    {
        $sql = $id ? /** @lang SQL */'SELECT * FROM todo WHERE id=:id' : /** @lang SQL */'SELECT * FROM todo';
        $this->body = $this->pdo->fetchAssoc($sql, ['id' => $id]);

        return $this;
    }

    #[Transactional, ReturnCreatedResource]
    public function onPost(string $todo): static
    {
        $this->pdo->perform(/** @lang SQL */'INSERT INTO todo (todo, created_at) VALUES (:todo, :created_at)', [
            'todo' => $todo,
            'created_at' => $this->date->format('Y-m-d H:i:s')
        ]);
        $this->code = 201; // Created
        $this->headers['Location'] = sprintf('/todos?id=%s', $this->pdo->lastInsertId()); // new URL

        return $this;
    }

    #[Transactional]
    public function onPut(int $id, string $todo): static
    {
        $this->pdo->perform(/** @lang SQL */'UPDATE todo SET todo = :todo WHERE id = :id', [
            'id' => $id,
            'todo' => $todo
        ]);
        $this->code = 204; // No content

        return $this;
    }
}
Pay attention to the attributes.
#[Cacheable]
The class attribute #[Cacheable] indicates that the GET method of this resource is cacheable.
#[Transactional]
#[Transactional] on onPost and onPut indicates database access transactions.
#[ReturnCreatedResource]
#[ReturnCreatedResource] on onPost creates and includes a resource indicated by the Location URL in the body. At this time, onGet is actually called using the Location header URI, ensuring the content of the Location header is correct while also creating a cache.
POST Request
Let’s try a POST.
First, to perform a cache-enabled test, create a test context boot file bin/test.php.
<?php

declare(strict_types=1);

use MyVendor\Weekday\Bootstrap;

require dirname(__DIR__) . '/autoload.php';
exit((new Bootstrap())('prod-cli-hal-api-app', $GLOBALS, $_SERVER));
Make a request with a console command. It’s a POST, but in BEAR.Sunday, parameters are passed in the form of a query.
php bin/test.php post '/todos?todo=shopping'
201 Created
Location: /todos?id=1

{
    "id": "1",
    "todo": "shopping",
    "created": "2017-06-04 15:58:03",
    "_links": {
        "self": {
            "href": "/todos?id=1"
        }
    }
}
The status code is 201 Created. The Location header indicates that a new resource has been created at /todos/?id=1.
RFC7231 Section-6.3.2
Next, get this resource.
php bin/test.php get '/todos?id=1'
200 OK
ETag: 2527085682
Last-Modified: Sun, 04 Jun 2017 15:23:39 GMT
content-type: application/hal+json

{
    "id": "1",
    "todo": "shopping",
    "created": "2017-06-04 15:58:03",
    "_links": {
        "self": {
            "href": "/todos?id=1"
        }
    }
}
The Hypermedia API is complete! Let’s start the API server.
php -S 127.0.0.1:8081 bin/app.php
Use the curl command to GET.
curl -i 'http://127.0.0.1:8081/todos?id=1'
HTTP/1.1 200 OK
Host: 127.0.0.1:8081
Date: Sun, 02 May 2021 17:10:55 GMT
Connection: close
X-Powered-By: PHP/8.0.3
Content-Type: application/hal+json
ETag: 197839553
Last-Modified: Sun, 02 May 2021 17:10:55 GMT
Cache-Control: max-age=31536000

{
    "id": "1",
Make multiple requests and confirm that the Last-Modified date does not change. (Try adding echo or similar in the method to check.)
The Cacheable attribute, if not set with expiry, does not invalidate the cache over time.
The cache is regenerated when resources are changed with onPut($id, $todo) or onDelete($id).
Next, change this resource with the PUT method.
curl -i http://127.0.0.1:8081/todos -X PUT -d "id=1&todo=think"
A 204 No Content response is returned, indicating there is no body.
HTTP/1.1 204 No Content
...
You can specify the media type with the Content-Type header. Try it with application/json as well.
curl -i http://127.0.0.1:8081/todos -X PUT -H 'Content-Type: application/json' -d '{"id": 1, "todo":"think" }'
GET again to see that the Etag and Last-Modified have changed.
curl -i 'http://127.0.0.1:8081/todos?id=1'
This Last-Modified date is provided by #[Cacheable].
There is no need for the application to manage this or provide a database column.
Using #[Cacheable], the resource content is managed in a “query repository” dedicated to resource storage, separate from the write database, and headers such as Etag and Last-Modified are automatically added.
Because Everything is A Resource.
In BEAR, everything is a resource.
Resource identifiers (URI), a unified interface, stateless access, powerful caching systems, hyperlinks, layered systems, and self-descriptiveness. BEAR.Sunday applications have these characteristics of REST, adhering to HTTP standards and excelling in reusability.
BEAR.Sunday is a connecting layer framework that ties dependencies with DI, cross-cutting concerns with AOP, and application information as resources with the power of REST.
***

# Tutorial 2


In this tutorial, you will learn how to develop high quality standards-based REST (Hypermedia) applications using the following tools.

* Define a JSON schema and use it for validation and documentation [Json Schema](https://json-schema.org/)
* Hypermedia types [HAL (Hypertext Application Language)](https://stateless.group/hal_specification.html)
* A DB migration tool developed by CakePHP [Phinx](https://book.cakephp.org/phinx/0/en/index.html)
* Binding PHP interfaces to SQL statement execution [Ray. MediaQuery](https://github.com/ray-di/Ray.MediaQuery)

Let's proceed with the commits found in [tutorial2](https://github.com/bearsunday/tutorial2/commits/v2-php8.2).

## Create the project

Create the project skeleton.

```bash
VENDOR=MyVendor PACKAGE=Ticket composer create-project bear/skeleton ticket
cd ticket
Migration
Install Phinx.
composer require --dev robmorgan/phinx
Configure the DB connection information in the .env.dist file in the project root folder.
TKT_DB_HOST=127.0.0.1:3306
TKT_DB_NAME=ticket
TKT_DB_USER=root
TKT_DB_PASS=''
TKT_DB_SLAVE=''
TKT_DB_DSN=mysql:host=${TKT_DB_HOST}
The .env.dist file should look like this, and the actual connection information should be written in .env. 2
Next, create a folder to be used by Phinx.
mkdir -p var/phinx/migrations
mkdir var/phinx/seeds
Set up var/phinx/phinx.php to use the .env connection information we have set up earlier.
<?php
use BEAR\Dotenv\Dotenv;

require_once dirname(__DIR__, 2) . '/vendor/autoload.php';

(new Dotenv())->load(dirname(__DIR__, 2));

$development = new PDO(getenv('TKT_DB_DSN'), getenv('TKT_DB_USER'), getenv('TKT_DB_PASS'));
$test = new PDO(getenv('TKT_DB_DSN') . '_test', getenv('TKT_DB_USER'), getenv('TKT_DB_PASS'));
return [
    'paths' => [
        'migrations' => __DIR__ . '/migrations',
    ],
    'environments' => [
        'development' => [
            'name' => $development->query("SELECT DATABASE()")->fetchColumn(),
            'connection' => $development
        ],
        'test' => [
            'name' => $test->query("SELECT DATABASE()")->fetchColumn(),
            'connection' => $test
        ]
    ]
];
setup script
Edit bin/setup.php for easy database creation and migration.
<?php
use BEAR\Dotenv\Dotenv;

require_once dirname(__DIR__) . '/vendor/autoload.php';

(new Dotenv())->load(dirname(__DIR__));

chdir(dirname(__DIR__));
passthru('rm -rf var/tmp/*');
passthru('chmod 775 var/tmp');
passthru('chmod 775 var/log');
// db
$pdo = new \PDO('mysql:host=' . getenv('TKT_DB_HOST'), getenv('TKT_DB_USER'), getenv('TKT_DB_PASS'));
$pdo->exec('CREATE DATABASE IF NOT EXISTS ' . getenv('TKT_DB_NAME'));
$pdo->exec('DROP DATABASE IF EXISTS ' . getenv('TKT_DB_NAME') . '_test');
$pdo->exec('CREATE DATABASE ' . getenv('TKT_DB_NAME') . '_test');
passthru('./vendor/bin/phinx migrate -c var/phinx/phinx.php -e development');
passthru('./vendor/bin/phinx migrate -c var/phinx/phinx.php -e test');
Next, we will create a migration class to create the ticket table.
./vendor/bin/phinx create Ticket -c var/phinx/phinx.php
Phinx by CakePHP - https://phinx.org.

...
created var/phinx/migrations/20210520124501_ticket.php
Edit var/phinx/migrations/{current_date}_ticket.php to implement the change() method.
<?php
use Phinx\Migration\AbstractMigration;

final class Ticket extends AbstractMigration
{
    public function change(): void
    {
        $table = $this->table('ticket', ['id' => false, 'primary_key' => ['id']]);
        $table->addColumn('id', 'uuid', ['null' => false])
            ->addColumn('title', 'string')
            ->addColumn('date_created', 'datetime')
            ->create();
    }
}
In addition, edit .env.dist like the following.
 TKT_DB_USER=root
 TKT_DB_PASS=
 TKT_DB_SLAVE=
-TKT_DB_DSN=mysql:host=${TKT_DB_HOST}
+TKT_DB_DSN=mysql:host=${TKT_DB_HOST};dbname=${TKT_DB_NAME}
Now that we are done with the setup, run the setup command to create the table.
composer setup
> php bin/setup.php
...
All Done. Took 0.0248s
The table has been created. The next time you want to set up a database environment for this project, just run composer setup.
For more information about writing migration classes, see Phinx Manual: Writing Migrations.
Module
Install the module as a composer.
composer require ray/identity-value-module ray/media-query -w
Install the package with AppModule.
src/Module/AppModule.php
<?php
namespace MyVendor\Ticket\Module;

use BEAR\Dotenv\Dotenv;
use BEAR\Package\AbstractAppModule;
use BEAR\Package\PackageModule;

use BEAR\Resource\Module\JsonSchemaModule;
use Ray\AuraSqlModule\AuraSqlModule;
use Ray\IdentityValueModule\IdentityValueModule;
use Ray\MediaQuery\DbQueryConfig;
use Ray\MediaQuery\MediaQueryModule;
use Ray\MediaQuery\Queries;
use function dirname;

class AppModule extends AbstractAppModule
{
    protected function configure(): void
    {
        (new Dotenv())->load(dirname(__DIR__, 2));
        $this->install(
            new AuraSqlModule(
                (string) getenv('TKT_DB_DSN'),
                (string) getenv('TKT_DB_USER'),
                (string) getenv('TKT_DB_PASS'),
                (string) getenv('TKT_DB_SLAVE')
            )
        );
        $this->install(
            new MediaQueryModule(
                Queries::fromDir($this->appMeta->appDir . '/src/Query'), [
                   new DbQueryConfig($this->appMeta->appDir . '/var/sql'),
                ]
            )
        );
        $this->install(new IdentityValueModule());
        $this->install(
            new JsonSchemaModule(
                $this->appMeta->appDir . '/var/schema/response',
                $this->appMeta->appDir . '/var/schema/request'
            )
        );
        $this->install(new PackageModule());
    }
}
SQL
Save the three SQLs for the ticket in var/sql.3
var/sql/ticket_add.sql
/* ticket add */
INSERT INTO ticket (id, title, date_created)
VALUES (:id, :title, :dateCreated);
var/sql/ticket_list.sql
/* ticket list */
SELECT id, title, date_created
  FROM ticket
 LIMIT 3;
var/sql/ticket_item.sql
/* ticket item */
SELECT id, title, date_created
  FROM ticket
 WHERE id = :id
Make sure that the SQL will work on its own when you create it.
PHPStorm includes a database tool, DataGrip, which has all the necessary features for SQL development such as code completion and SQL refactoring. Once the DB connection and other setups are made, SQL files can be executed directly in the IDE. 45
JsonSchema.
Create new files that will represent the resource Ticket (ticket item) and Tickets (ticket item list) with JsonSchema:
var/schema/response/ticket.json
{
  "$id": "ticket.json",
  "$schema": "http://json-schema.org/draft-07/schema#",
  "title": "Ticket",
  "type": "object",
  "required": ["id", "title", "dateCreated"],
  "properties": {
    "id": {
      "description": "The unique identifier for a ticket.",
      "type": "string",
      "maxLength": 64
    },
    "title": {
      "description": "The unique identifier for a ticket.",
      "type": "string",
      "maxLength": 255
    },
    "dateCreated": {
      "description": "The date and time that the ticket was created",
      "type": "string",
      "format": "datetime"
    }
  }
}
var/schema/response/tickets.json
Tickets is a Ticket array.
{
  "$id": "tickets.json",
  "$schema": "http://json-schema.org/draft-07/schema#",
  "title": "Tickets",
  "type": "object",
  "required": ["tickets"],
  "properties": {
    "tickets": {
      "type": "array",
      "items":{"$ref": "./ticket.json"}
    }
  }
}
- $id - specifies the file name, but if it is to be published, it should be a URL.
- title - This will be treated in the API documentation as an object name.
- examples - specify examples as appropriate. You can also specify the entire object.
In PHPStorm, you will see a green check in the upper right corner of the editor to indicate that everything is OK. You should also validate the schema itself when you create it.
Query Interface
We will create a PHP interface that abstracts access to the infrastructure.
- Read Ticket resources TicketQueryInterface.
- Create a Ticket resource TicketCommandInterface.
src/Query/TicketQueryInterface.php
<?php

namespace MyVendor\Ticket\Query;

use Ray\MediaQuery\Annotation\DbQuery;

interface TicketQueryInterface
{
    #[DbQuery('ticket_item')]
    public function item(string $id): Ticket|null;

    /** @return array<Ticket> */
    #[DbQuery('ticket_list')]
    public function list(): array;
}
src/Query/TicketCommandInterface.php
<?php

namespace MyVendor\Ticket\Query;

use DateTimeInterface;
use Ray\MediaQuery\Annotation\DbQuery;

interface TicketCommandInterface
{
    #[DbQuery('ticket_add')]
    public function add(string $id, string $title, DateTimeInterface $dateCreated = null): void;
}
Specify an SQL statement with the #[DbQuery] attribute. You do not need to write any implementation for this interface. An object that performs the specified SQL query will be created automatically.
The interface is divided into two concerns: command which has side effects, and query which returns a value. It can be one interface and one method as in ADR pattern. The application designer decides the policy.
Entity
If you specify array for the return value of a method, you will get the database result as it is, an associative array, but if you specify an entity type for the return value of the method, it will be hydrated to that type.
#[DbQuery('ticket_item')]
public function item(string $id): array // you get an array.
#[DbQuery('ticket_item')]
public function item(string $id): Ticket|null; // yields a Ticket entity.
For multiple rows (row_list), use /** @return array<Ticket>*/ and phpdoc to specify that Ticket is returned as an array.
/** @return array<Ticket> */
#[DbQuery('ticket_list')]
public function list(): array; // yields an array of Ticket entities.
The value of each row is passed to the constructor by name argument. 6
<?php

declare(strict_types=1);

namespace MyVendor\Ticket\Entity;

class Ticket
{
    public readonly string $dateCreated;

    public function __construct(
        public readonly string $id,
        public readonly string $title,
        string $date_created
    ) {
        $this->dateCreated = $date_created;
    }
}
Databases use snake_case (date_created) while JSON uses camelCase (dateCreated) naming conventions. For multi-word property names, explicit conversion in the constructor resolves the gap between database and JSON naming cultures.
Resources
The resource class depends on the query interface.
Ticket resource
Create a ticket resource in src/Resource/App/Ticket.php.
<?php

declare(strict_types=1);

namespace MyVendor\Ticket\Resource\App;

use BEAR\Resource\Annotation\JsonSchema;
use BEAR\Resource\ResourceObject;
use MyVendor\Ticket\Query\TicketQueryInterface;

class Ticket extends ResourceObject
{
    public function __construct(
        private TicketQueryInterface $query
    ){}

   #[JsonSchema("ticket.json")]
   public function onGet(string $id = ''): static
    {
        $this->body = (array) $this->query->item($id);

        return $this;
    }
}
The attribute #[JsonSchema] indicates that the value output by onGet() is defined in the ticket.json schema.
It is validated for each request by AOP.
Let’s try to request a resource by entering a seed. 7
% mysql -u root -e "INSERT INTO ticket (id, title, date_created) VALUES ('1', 'foo', '1970-01-01 00:00:00')" ticket
% php bin/app.php get '/ticket?id=1'
200 OK
Content-Type: application/hal+json

{
    "id": "1",
    "title": "foo",
    "date_created": "1970-01-01 00:00:01",
    "_links": {
        "self": {
            "href": "/ticket?id=1"
        }
    }
}
MediaQuery
With Ray.MediaQuery, an auto-generated SQL execution object is injected from the interface without the need to code boilerplate implementation classes. 8
A SQL statement can contain multiple SQLs separated by ;, and multiple SQLs are bound to the same parameter by name, and transactions are executed for queries other than SELECT.
If you want to generate SQL dynamically, you can use an SQL execution class that injects the query builder instead of Ray. For more details, please see Database in the manual.
Embedded links
Usually, a website page contains multiple resources. For example, a blog post page might contain recommendations, advertisements, category links, etc. in addition to the post. Instead of the client getting them separately, they can be bundled into one resource with embedded links as independent resources.
Think of HTML and the <img> tag that is written in it. Both have independent URLs, but the image resource is embedded in the HTML resource, and when the HTML is retrieved, the image is displayed in the HTML.
These are called hypermedia types Embedding links(LE), and the resource to be embedded is linked.
Let’s embed the project resource into the ticket resource, and prepare the Project class.
src/Resource/App/Project.php
<?php

namespace MyVendor\Ticket\Resource\App;

use BEAR\Resource\ResourceObject;

class Project extends ResourceObject
{
    public function onGet(): static
    {
        $this->body = ['title' => 'Project A'];

        return $this;
    }
}
Add the attribute #[Embed] to the Ticket resource.
+use BEAR\Resource\Annotation\Embed;
+use BEAR\Resource\Request;
+
+   #[Embed(src: '/project', rel: 'project')]
    #[JsonSchema("ticket.json")]
    public function onGet(string $id = ''): static
    {
+        assert($this->body['project'] instanceof Request);
-        $this->body = (array) $this->query->item($id);
+        $this->body += (array) $this->query->item($id);
The request for the resource specified by the #[Embed] attribute src will be injected into the rel key of the body property, and will be lazily evaluated into a string representation when rendered.
For the sake of simplicity, no parameters are passed in this example, but you can pass the values received by the method arguments using the URI template, or you can modify or add parameters to the injected request. See resource for details.
If you make the request again, you will see that the status of the project resource has been added to the property _embedded.
% php bin/app.php get '/ticket?id=1'
{
    "id": "1",
    "title": "2",
    "date_created": "1970-01-01 00:00:01",
+    "_embedded": {
+        "project": {
+            "title": "Project A",
+        }
    },
Embedded resources are an important feature of the REST API. It gives a tree structure to the content and reduces the HTTP request cost. Instead of letting the client fetching it as a separate resource each time, the relationship can be represented in server-side. 9
tickets resource
Create a tickets resource in src/resource/App/Tickets.php that can be created with POST and retrieved with GET for a list of tickets.
<?php

declare(strict_types=1);

namespace MyVendor\Ticket\Resource\App;

use BEAR\Resource\Annotation\JsonSchema;
use BEAR\Resource\Annotation\Link;
use BEAR\Resource\ResourceObject;
use Koriym\HttpConstants\ResponseHeader;
use Koriym\HttpConstants\StatusCode;
use MyVendor\Ticket\Query\TicketCommandInterface;
use MyVendor\Ticket\Query\TicketQueryInterface;
use Ray\IdentityValueModule\UuidInterface;
use function uri_template;

class Tickets extends ResourceObject
{
    public function __construct(
        private TicketQueryInterface $query,
        private TicketCommandInterface $command,
        private UuidInterface $uuid
    ){}

    #[Link(rel: "doPost", href: '/tickets')]
    #[Link(rel: "goTicket", href: '/ticket{?id}')]
    #[JsonSchema("tickets.json")]
    public function onGet(): static
    {
        $this->body = [
            'tickets' => $this->query->list()
        ];

        return $this;
    }

    #[Link(rel: "goTickets", href: '/tickets')]
    public function onPost(string $title): static
    {
        $id = (string) $this->uuid;
        $this->command->add($id, $title);

        $this->code = StatusCode::CREATED;
        $this->headers[ResponseHeader::LOCATION] = uri_template('/ticket{?id}', ['id' => $id]);

        return $this;
    }
}
The injected $uuid can be cast to a string to get the UUID. Also, #Link[] represents a link to another resource (application state).
Notice that we don’t pass the current time in the add() method.
If no value is passed, it will not be null, but the MySQL current time string will be bound to the SQL.
This is because the string representation of the current time DateTime object bound to the DateTimeInterface (current time string) is bound to SQL.
public function add(string $id, string $title, DateTimeInterface $dateCreated = null): void;
It saves you the trouble of hard-coding NOW() inside SQL and passing the current time to the method every time.
You can pass a DateTime object, or in the context of a test, you can bind a fixed test time.
In this way, if you specify an interface as an argument to a query, you get that object using DI, and its string representation is bound to SQL. For example, login user IDs can be bound and used across applications. 10
Hypermedia API test
The term REST (representational state transfer) was introduced and defined by Roy Fielding in his doctoral dissertation in 2000, and is intended to give an idea of “the behavior of a properly designed web application”. It is a network of web resources (a virtual state machine) where the user selects a resource identifier (URL) and a resource operation (application state transition) such as GET or POST to proceed with the application, resulting in the next representation of the resource (the next application state) being forwarded to the end user. application state) is transferred to the end user for use.
In a REST application, the following actions are provided by the service as URLs, and the client selects them.
HTML web applications are completely RESTful. The only operations are “Go to the provided URL (with a tag, etc.)” or “Fill the provided form and submit”.
The REST API tests are written in the same way.
<?php

declare(strict_types=1);

namespace MyVendor\Ticket\Hypermedia;

use BEAR\Resource\ResourceInterface;
use BEAR\Resource\ResourceObject;
use Koriym\HttpConstants\ResponseHeader;
use MyVendor\Ticket\Injector;
use MyVendor\Ticket\Query\TicketQueryInterface;
use PHPUnit\Framework\TestCase;
use Ray\Di\InjectorInterface;
use function json_decode;

class WorkflowTest extends TestCase
{
    protected ResourceInterface $resource;
    protected InjectorInterface $injector;

    protected function setUp(): void
    {
        $this->injector = Injector::getInstance('hal-api-app');
        $this->resource = $this->injector->getInstance(ResourceInterface::class);
        $a = $this->injector->getInstance(TicketQueryInterface::class);
    }

    public function testIndex(): static
    {
        $index = $this->resource->get('/');
        $this->assertSame(200, $index->code);

        return $index;
    }

    /**
     * @depends testIndex
     */
    public function testGoTickets(ResourceObject $response): static
    {

        $json = (string) $response;
        $href = json_decode($json)->_links->{'goTickets'}->href;
        $ro = $this->resource->get($href);
        $this->assertSame(200, $ro->code);

        return $ro;
    }

    /**
     * @depends testGoTickets
     */
    public function testDoPost(ResourceObject $response): static
    {
        $json = (string) $response;
        $href = json_decode($json)->_links->{'doPost'}->href;
        $ro = $this->resource->post($href, ['title' => 'title1']);
        $this->assertSame(201, $ro->code);

        return $ro;
    }

    /**
     * @depends testDoPost
     */
    public function testGoTicket(ResourceObject $response): static
    {
        $href = $response->headers[ResponseHeader::LOCATION];
        $ro = $this->resource->get($href);
        $this->assertSame(200, $ro->code);

        return $ro;
    }
}
You will also need a route page as a starting point.
src/Resource/App/Index.php
<?php

declare(strict_types=1);

namespace MyVendor\Ticket\Resource\App;

use BEAR\Resource\Annotation\Link;
use BEAR\Resource\ResourceObject;

class Index extends ResourceObject
{
    #[Link(rel: 'goTickets', href: '/tickets')]
    public function onGet(): static
    {
        return $this;
    }
}
setUpcreates a resource client, andtestIndex()accesses the root page.- The
testGoTickets()method, which receives the response, makes a JSON representation of the response object and gets the linkgoTicketsto get the next list of tickets. - There is no need to write a test for the resource body. * No need to write tests for the resource body, just check the status code, since it is guaranteed that the JsonSchema validation of the response has passed.
- Following the uniform interface of REST, the next request URL to be accessed is always included in the response. Inspect them one after another.
Uniform Interface
REST is defined by four interface constraints: identification of resources; manipulation of resources through representations; self-descriptive messages; and, hypermedia as the engine of application state.11
Let’s run it.
./vendor/bin/phpunit --testsuite hypermedia
Hypermedia API tests (REST application tests) are a good representation of the fact that REST applications are state machines, and workflows can be described as use cases. Ideally, REST API tests should cover how the application will be used.
HTTP Testing
To test the REST API over HTTP, inherit the whole test and set the client to the HTTP test client with setUp.
class WorkflowTest extends Workflow
{
    protected function setUp(): void
    {
        $this->resource = new HttpResource('127.0.0.1:8080', __DIR__ . '/index.php', __DIR__ . '/log/workflow.log');
    }
}
This client has the same interface as the resource client, but the actual request is made as an HTTP request to the built-in server and receives the response from the server.
The first argument is the URL of the built-in server. When new is executed, the built-in server will be started with the bootstrap script specified in the second argument.
The bootstrap script for the test server will also be changed to the API context.
tests/Http/index.php
-exit((new Bootstrap())('hal-app', $GLOBALS, $_SERVER));
+exit((new Bootstrap())('hal-api-app', $GLOBALS, $_SERVER));
Let’s run it.
./vendor/bin/phpunit --testsuite http
HTTP Access Log
The actual HTTP request/response log made by curl will be recorded in the resource log of the third argument.
curl -s -i 'http://127.0.0.1:8080/'

HTTP/1.1 200 OK
Host: 127.0.0.1:8080
Date: Fri, 21 May 2021 22:41:02 GMT
Connection: close
X-Powered-By: PHP/8.0.6
Content-Type: application/hal+json

{
    "_links": {
        "self": {
            "href": "/index"
        },
        "goTickets": {
            "href": "/tickets"
        }
    }
}
curl -s -i -H 'Content-Type:application/json' -X POST -d '{"title":"title1"}' http://127.0.0.1:8080/tickets

HTTP/1.1 201 Created
Host: 127.0.0.1:8080
Date: Fri, 21 May 2021 22:41:02 GMT
Connection: close
X-Powered-By: PHP/8.0.6
Location: /ticket?id=421d997c-9a0e-4018-a6c2-9b8758cac6d6
The actual recorded JSON is useful for checking, especially if it has a complex structure, and is also good to check along with the API documentation. The HTTP client can also be used for E2E testing.
API documentation
In ResourceObjects, method signatures are the input parameters to the API, and responses are schema-defined. Because of its self-descriptiveness, API documentation can be generated automatically.
Let’s create it. The documentation will be output to the docs folder.
composer doc
It reduces the effort of writing IDL (Interface Definition Language), but more valuable is that the documentation follows the latest PHP code and is always accurate. It is a good idea to include it in your CI so that your code and API documentation are always in sync.
You can also link to related documentation. See ApiDoc for more details on configuration.
Code examples
The following code example is also available.
- TestModulethat adds a
Testcontext and clears the DB for each test. 4e9704d entityoption for#[DbQuery]that returns a hydrated entity class instead of an associative array in DB queries 29f0a1f- Query builder synthesizing static and dynamic SQL 9d095ac
REST framework
There are three styles of Web APIs.
- Tunnels (SOAP, GraphQL)
- URI (Object, CRUD)
- Hypermedia (REST)
In contrast to the URI style, where resources are treated as just RPCs 12, what we learned in this tutorial is REST, where resources are linked. 13
Resources are connected by LOs (outbound links) in #Link to represent workflows, and LEs (embedded links) in #[Embed] to represent tree structures.
BEAR.Sunday emphasizes clean, standards-based code.
JsonSchema over framework-specific validators, standard SQL over proprietary ORM, IANA registered standard14 media type JSON over proprietary structure JSON.
Application design is not about “free implementation”, but about “free choice of constraints”. Applications should aim for evolvability without breaking development efficiency, performance, and backward compatibility based on the constraints.
(This manual has been prepared through deepL automated translation.)
The comment is not only descriptive, but also makes it easier to identify the SQL in the slow query log, etc.
BEAR.Sunday CLI Tutorial
Prerequisites
- PHP 8.2 or higher
- Composer
- Git
Step 1: Project Creation
1.1 Create a New Project
VENDOR=MyVendor PACKAGE=Greet composer create-project bear/skeleton greet
cd greet
1.2 Verify Development Server
php -S 127.0.0.1:8080 -t public
Access http://127.0.0.1:8080 in your browser and confirm that “Hello BEAR.Sunday” is displayed.
{
    "greeting": "Hello BEAR.Sunday",
    "_links": {
        "self": {
            "href": "/index"
        }
    }
}
Step 2: Install BEAR.Cli
composer require bear/cli
Step 3: Create Greeting Resource
Create src/Resource/Page/Greeting.php:
<?php

namespace MyVendor\Greet\Resource\Page;

use BEAR\Cli\Attribute\Cli;
use BEAR\Cli\Attribute\Option;
use BEAR\Resource\ResourceObject;

class Greeting extends ResourceObject
{
    #[Cli(
        name: 'greet',
        description: 'Generate a greeting message',
        output: 'message'
    )]
    public function onGet(
        #[Option(shortName: 'n', description: 'Name to greet')]
        string $name = 'World',
        #[Option(shortName: 'l', description: 'Language (en, ja, fr, es)')]
        string $lang = 'en'
    ): static {
        $greeting = match ($lang) {
            'ja' => 'こんにちは',
            'fr' => 'Bonjour',
            'es' => '¡Hola',
            default => 'Hello',
        };

        $this->body = [
            'message' => "{$greeting}, {$name}!",
            'language' => $lang
        ];

        return $this;
    }
}
Step 4: Generate CLI Command
Generate the CLI command using your application namespace:
$ vendor/bin/bear-cli-gen 'MyVendor\Greet'
# Generated files:
#   bin/cli/greet         # CLI command
#   var/homebrew/greet.rb # Homebrew formula (if Git repository is configured)
Step 5: Test the CLI Command
5.1 Basic Usage
$ bin/cli/greet --help
Generate a greeting message

Usage: greet [options]

Options:
  --name, -n     Name to greet (default: World)
  --lang, -l     Language (en, ja, fr, es) (default: en)
  --help, -h     Show this help message

$ bin/cli/greet
Hello, World!

$ bin/cli/greet -n "Alice" -l ja
こんにちは, Alice!
5.2 Advanced Examples
# French greeting
$ bin/cli/greet --name "Pierre" --lang fr
Bonjour, Pierre!

# Spanish greeting
$ bin/cli/greet -n "Carlos" -l es
¡Hola, Carlos!
Step 6: Add More Complex Features
6.1 Add Time-Based Greetings
Update the Greeting resource to include time-based greetings:
<?php

namespace MyVendor\Greet\Resource\Page;

use BEAR\Cli\Attribute\Cli;
use BEAR\Cli\Attribute\Option;
use BEAR\Resource\ResourceObject;
use DateTimeImmutable;

class Greeting extends ResourceObject
{
    #[Cli(
        name: 'greet',
        description: 'Generate a time-aware greeting message',
        output: 'message'
    )]
    public function onGet(
        #[Option(shortName: 'n', description: 'Name to greet')]
        string $name = 'World',
        #[Option(shortName: 'l', description: 'Language (en, ja, fr, es)')]
        string $lang = 'en',
        #[Option(shortName: 't', description: 'Include time-based greeting')]
        bool $timeGreeting = false
    ): static {
        $greeting = $this->getGreeting($lang, $timeGreeting);

        $this->body = [
            'message' => "{$greeting}, {$name}!",
            'language' => $lang,
            'time' => (new DateTimeImmutable())->format('Y-m-d H:i:s')
        ];

        return $this;
    }

    private function getGreeting(string $lang, bool $timeGreeting): string
    {
        $baseGreeting = match ($lang) {
            'ja' => 'こんにちは',
            'fr' => 'Bonjour',
            'es' => '¡Hola',
            default => 'Hello',
        };

        if (!$timeGreeting) {
            return $baseGreeting;
        }

        $hour = (int) (new DateTimeImmutable())->format('H');

        return match ($lang) {
            'ja' => match (true) {
                $hour < 12 => 'おはようございます',
                $hour < 18 => 'こんにちは',
                default => 'こんばんは'
            },
            'fr' => match (true) {
                $hour < 12 => 'Bonjour',
                $hour < 18 => 'Bon après-midi',
                default => 'Bonsoir'
            },
            'es' => match (true) {
                $hour < 12 => 'Buenos días',
                $hour < 18 => 'Buenas tardes',
                default => 'Buenas noches'
            },
            default => match (true) {
                $hour < 12 => 'Good morning',
                $hour < 18 => 'Good afternoon',
                default => 'Good evening'
            }
        };
    }
}
6.2 Test Enhanced Features
# Regenerate CLI command after changes
$ vendor/bin/bear-cli-gen 'MyVendor\Greet'

# Test time-based greetings
$ bin/cli/greet -n "Alice" -l en -t
Good morning, Alice!  # (if run in the morning)

$ bin/cli/greet -n "田中" -l ja -t
おはようございます, 田中!  # (if run in the morning)
Step 7: Testing
7.1 Create Unit Tests
Create tests/Resource/Page/GreetingTest.php:
<?php

namespace MyVendor\Greet\Resource\Page;

use BEAR\Resource\ResourceInterface;
use MyVendor\Greet\Injector;
use PHPUnit\Framework\TestCase;

class GreetingTest extends TestCase
{
    private ResourceInterface $resource;

    protected function setUp(): void
    {
        $this->resource = Injector::getInstance('test-cli-app')
            ->getInstance(ResourceInterface::class);
    }

    public function testDefaultGreeting(): void
    {
        $response = $this->resource->get('page://self/greeting');

        $this->assertSame(200, $response->code);
        $this->assertSame('Hello, World!', $response->body['message']);
        $this->assertSame('en', $response->body['language']);
    }

    public function testJapaneseGreeting(): void
    {
        $response = $this->resource->get('page://self/greeting', [
            'name' => '太郎',
            'lang' => 'ja'
        ]);

        $this->assertSame('こんにちは, 太郎!', $response->body['message']);
        $this->assertSame('ja', $response->body['language']);
    }

    public function testTimeBasedGreeting(): void
    {
        $response = $this->resource->get('page://self/greeting', [
            'name' => 'Alice',
            'lang' => 'en',
            'timeGreeting' => true
        ]);

        $this->assertStringContains('Alice!', $response->body['message']);
        $this->assertArrayHasKey('time', $response->body);
    }
}
7.2 Run Tests
$ composer test
Step 8: Deployment and Distribution
8.1 GitHub Repository Setup
If you have a GitHub repository configured, a Homebrew formula will be generated automatically. You can distribute your CLI tool via Homebrew:
# Create a tap repository
$ git clone https://github.com/yourusername/homebrew-tap.git
$ cp var/homebrew/greet.rb homebrew-tap/greet.rb
$ cd homebrew-tap
$ git add greet.rb
$ git commit -m "Add greet formula"
$ git push
8.2 Install via Homebrew
Users can then install your CLI tool:
$ brew tap yourusername/tap
$ brew install greet
$ greet -n "User" -l en
Hello, User!
Conclusion
This tutorial has demonstrated more than just CLI tool creation—it has revealed the essential value of BEAR.Sunday:
The True Value of Resource-Oriented Architecture
One Resource, Multiple Boundaries
- The
Greetingresource functions as Web API, CLI, and Homebrew package with a single implementation - No duplication of business logic, maintenance in one place
Boundary-Crossing Framework
BEAR.Sunday functions as a boundary framework, transparently handling:
- Protocol boundaries: HTTP ↔ Command line
- Interface boundaries: Web ↔ CLI ↔ Package distribution
- Environment boundaries: Development ↔ Production ↔ User environments
Design Philosophy in Action
// One resource
class Greeting extends ResourceObject {
    public function onGet(string $name, string $lang = 'en'): static
    {
        // Business logic in one place
    }
}
↓
# As Web API
curl "http://localhost/greeting?name=World&lang=ja"

# As CLI
./bin/cli/greet -n "World" -l ja

# As Homebrew package
brew install your-vendor/greet && greet -n "World" -l ja
Long-term Maintainability and Productivity
- DRY Principle: Domain logic is not coupled with interfaces
- Unified Testing: Testing one resource covers all boundaries
- Consistent API Design: Same parameter structure for Web API and CLI
- Future Extensibility: New boundaries (gRPC, GraphQL, etc.) can use the same resource
- PHP Version Independence: Freedom to continue using what works
Integration with Modern Distribution Systems
BEAR.Sunday resources integrate naturally with modern package systems. By leveraging package managers like Homebrew and the Composer ecosystem, users can utilize tools through unified interfaces without being aware of the execution environment.
BEAR.Sunday’s “Because Everything is a Resource” is not just a slogan, but a design philosophy that realizes consistency and maintainability across boundaries. As experienced in this tutorial, resource-oriented architecture creates boundary-free software and brings new horizons to both development and user experiences.
Next Steps
- Explore more complex CLI patterns
- Add configuration file support
- Implement subcommands
- Add logging and error handling
- Create interactive CLI interfaces
For more information, see the CLI documentation and BEAR.Cli repository.
Package
BEAR.Sunday application is a composer package taking BEAR.Sunday framework as dependency package. You can also install another BEAR.Sunday application package as dependency.
Application organization
The file layout of the BEAR.Sunday application conforms to php-pds/skeleton standard.
Invoke sequence
- Console input (
bin/app.php,bin/page.php) or the web entry file (public/index.php) executes thebootstrap.phpfunction. - The
$appapplication object is created for the given$contextinbootstrap.php. - The router in
$appconverts the external resource request to an internal resource request. - The resource request is invoked, and the resulting representation is transferred to the client.
bootstrap/
You can access same resource through console input or web access with same boot file.
php bin/app.php options /todos // console API access (app resource)
php bin/page.php get '/todos?id=1' // console Web access (page resource)
php -S 127.0.0.1bin/app.php // PHP server
You can create your own boot file for different context.
bin/
Place command-line executable files.
src/
Place application class file.
public/
Web public folder.
var/
log and tmp folder need write permission.
Framework Package
ray/aop

![]()

![]()
An aspect oriented framework based on Java AOP Alliance API.
ray/di

![]()

![]()
A Google Guice style DI framework. It contains ray/aop.
bear/resource

![]()

![]()
A REST framework for PHP object as a service. It contains ray/di.
bear/sunday

![]()

![]()
A web application interface package. It contains bear/resource.
bear/package

![]()

![]()
A web application implmentation package. It contains bear/sunday.
Library Package
Optional library package can be installed with composer require command.
| Category | Composer package | Library |
| Router | ||
| bear/aura-router-module | Aura.Router v2 | |
| Database | ||
| ray/media-query | ||
| ray/aura-sql-module | Aura.Sql v2 | |
| ray/dbal-module | Doctrine DBAL | |
| ray/cake-database-module | CakePHP v3 database | |
| ray/doctrine-orm-module | Doctrine ORM | |
| Storage | ||
| bear/query-repository | CQRS inspired repository | |
| bear/query-module | Separation of external access such as DB or Web API | |
| Web | ||
| madapaja/twig-module | Twig | |
| ray/web-form-module | Web form | |
| ray/aura-web-module | Aura.Web | |
| ray/aura-session-module | Aura.Session | |
| ray/symfony-session-module | Symfony Session | |
| Validation | ||
| ray/validate-module | Aura.Filter | |
| satomif/extra-aura-filter-module | Aura.Filter | |
| Authorization and Authentication | ||
| ray/oauth-module | OAuth | |
| kuma-guy/jwt-auth-module | JSON Web Token | |
| ray/role-module | Zend Acl | |
| bear/acl-resource | ACL based embedded resource | |
| Hypermedia | ||
| kuma-guy/siren-module | Siren | |
| Development | ||
| ray/test-double | Test Double | |
| Asynchronous high performance | ||
| MyVendor.Swoole | Swoole |
Vendor Package
You can reuse common packages and tool combinations as modules with only modules and share modules of similar projects.2
Semver
All packages adhere to Semantic Versioning.
Application
Sequence
A BEAR.Sunday app has a run order of compile, request and response.
0. Compile
An $app application object is created through DI and AOP configuration depending on a specified context.
An $app is made up of service objects as it’s properties that are needed to run the application such as a router or transfer etc.
$app then connects these object together depending on whether it is owned by another or contains other objects.
This is called an Object Graph.
$app is then serialized and reused in each request and response.
- router - Converting external input to resource requests
- resource - Resource client
- transfer - Output
1. Request
An application resource request and resource object is created based on the HTTP request.
A resource object which has methods that respond to onGet, onPost etc upon request sets the code or body property of it’s own resource state.
The resource object can then #[Embed] or #[Link] other resource objects.
Methods on the resource object are only for changing the resources state and have no interest in the representation itself (HTML, JSON etc).
Before and after the method, application logic bound to the method, such as logging and authentication, is executed in AOP.
2. Response
A Renderer is injected into the resource object, then the state of resource is represented as HTML, JSON etc or however it has been configured, it is then transfered to the client.

Boot File
To run an application, we need just two lines of code.
An entry point for a web server or console application access is usually set to public/index.php or bin/app.php.
As you can see below, we need to pass an application context to bootstrap.php the application script.
<?php
require dirname(__DIR__) . '/autoload.php';
exit((require dirname(__DIR__) . '/bootstrap.php')('prod-html-app'));
Depending on your context choose a boot file.
// fire php server
php -S 127.0.0.1:8080 public/index.php
// console access
php bin/app.php get /user/1
Context
The composition of the application object $app changes in response to the defined context, so that application behavior changes.
Depending on the defined context the building of the application object $app changes, altering the overall behavior.
For example, WebRouter is bound to RouterInterface by default.
However, if Cli mode is set (instead of HTTP) the CliRouter is bound to the RouterInterface and it will then take console input.
There are built-in and custom contexts that can be used in an application.
Built-in Contexts
apiAPI ApplicationcliConsole ApplicationhalHAL ApplicationprodProduction
For app, resources are rendered in JSON.
api changes the default resource schema from page to app; web root access (GET /) is from page://self/ to app://self/.
Set cli to be a console application.
prod` makes it a production application with cache settings, etc.
You can also use a combination of these built-in contexts and add your own custom contexts.
If you set the context to prod-hal-api-app your application will run as an API application in production mode using the HAL media type.
Custom Context
Place it in src/Module/ of the application; if it has the same name as the builtin context, the custom context will take precedence. You can override some of the constraints by calling the built-in context from the custom context.
Each application context (cli, app etc) represents a module.
For example the cli context relates to a CliModule, then binds all of the DI and AOP bindings that is needed for a console application.
Context Agnostic
The context value is used only to create the root object and then disappears. There is no global “mode” that can be referenced by the application, and the application can not know what context it is currently running in. The behavior should only change through code that is dependent on an interface15 and changes of dependencies by context.
Modules
A Module is a collection of DI & AOP bindings that sets up your application.
BEAR.Sunday doesn’t have a global config file or a config class to set default values for components such as a database or a template engine. Instead for each peice of functionality we set up DI and AOP by injecting configuration values into a stand alone module.
AppModule (src/Module/AppModule.php) is the root module. We use an install() method in here to load each module that we would like to invoke.
You can also override existing bindings by using override().
class AppModule extends AbstractAppModule
{
    /**
     * {@inheritdoc}
     */
    protected function configure()
    {
        // ...
        // install additional modules
        $this->install(new AuraSqlModule('mysql:host=localhost;dbname=test', 'username', 'password');
        $this->install(new TwigModule));
        // install basic module
        $this->install(new PackageModule));
    }
}
DI bindings
Ray.Di is the core DI framework used in BEAR.Sunday. It binds interfaces to a class or factory to create an object graph.
// Class binding
$this->bind($interface)->to($class);
// Provider (factory) binding
$this->bind($interface)->toProvider($provider);
// Instance binding
$this->bind($interface)->toInstance($instance);
// Named binding
$this->bind($interface)->annotatedWith($annotation)->to($class);
// Singleton
$this->bind($interface)->to($class)->in(Scope::SINGLETON);
// Constructor binding
$this->bind($interface)->toConstructor($class, $named);
More info can be found at Ray.Di README
Binding Priority
See also: Ray.Di Bindings
Within a Single Module
Bindings declared first take priority. In the following example, Foo1 takes priority:
$this->bind(FooInterface::class)->to(Foo1::class);
$this->bind(FooInterface::class)->to(Foo2::class);
Module Installation Priority
Modules installed first take priority. In the following example, Foo1Module takes priority:
$this->install(new Foo1Module);
$this->install(new Foo2Module);
To give a later module priority, use override(). In the following example, Foo2Module takes priority:
$this->install(new Foo1Module);
$this->override(new Foo2Module);
Context String Priority
Context modules are processed in reverse order (right-to-left). For example, with context prod-hal-api-app:
Installation order: AppModule → ApiModule → HalModule → ProdModule
Later installed modules can override earlier bindings. This means:
HalModuletakes priority overAppModuleProdModuletakes priority overHalModule
When creating a custom context module that needs to override bindings from a built-in context (like HalModule), position it to the left of that context in the context string. For example, to override HalModule’s RenderInterface binding:
// Context: "prod-mycontext-hal-api-app"
// Installation order: AppModule → ApiModule → HalModule → MycontextModule → ProdModule
AOP Bindings
We can “search” for classes and methods with a built-in Matcher, then interceptors can be bound to any found methods.
$this->bindInterceptor(
    // In any class
    $this->matcher->any(),
    // Method(s) names that start with "delete"
    $this->matcher->startWith('delete'),
    // Bind a Logger interceptor
    [LoggerInterceptor::class]
);

$this->bindInterceptor(
    // The AdminPage class or a class inherited from it.
    $this->matcher->SubclassesOf(AdminPage::class),
    // Annotated with the @Auth annotation
    $this->matcher->annotatedWith(Auth::class),
    // Bind the AdminAuthenticationInterceptor
    [AdminAuthenticationInterceptor::class]
);
Matcher has various binding methods.
- Matcher::any - Any
- Matcher::annotatedWith - Annotation
- Matcher::subclassesOf - Sub class
- Matcher::startsWith - start with name (class or method)
- Matcher::logicalOr - OR
- Matcher::logicalAnd - AND
- Matcher::logicalNot - NOT
Interceptor
In an interceptor a MethodInvocation object gets passed to the invoke method. We can the decorate the targetted instances so that you run computations before or after any methods on the target are invoked.
class MyInterceptor implements MethodInterceptor
{
    public function invoke(MethodInvocation $invocation)
    {
        // Before invocation
        // ...

        //  Method invocation
        $result = $invocation->proceed();

        //  After invocation
        // ...

        return $result;
    }
}
With the MethodInvocation object, you can access the target method’s invocation object, method’s and parameters.
- MethodInvocation::proceed - Invoke method
- MethodInvocation::getMethod - Get method reflection
- MethodInvocation::getThis - Get object
- MethodInvocation::getArguments - Get parameters
Annotations can be obtained using the reflection API.
$method = $invocation->getMethod();
$class = $invocation->getMethod()->getDeclaringClass();
$method->getAnnotations()$method->getAnnotation($name)$class->getAnnotations()$class->getAnnotation($name)
Environment Settings
BEAR.Sunday does not have any special environment mode except prod.
A Module and the application itself are unaware of the current environment.
There is no way to get the current “mode”, this is intentional to keep the code clean.
DI
Dependency injection is basically providing the objects that an object needs (its dependencies) instead of having it construct them itself.
With dependency injection, objects accept dependencies in their constructors. To construct an object, you first build its dependencies. But to build each dependency, you need its dependencies, and so on. So when you build an object, you really need to build an object graph.
Building object graphs by hand is labour intensive, error prone, and makes testing difficult. Instead, Dependency Injector (Ray.Di) can build the object graph for you.
| What is object graph ? |
| Object-oriented applications contain complex webs of interrelated objects. Objects are linked to each other by one object either owning or containing another object or holding a reference to another object. This web of objects is called an object graph and it is the more abstract structure that can be used in discussing an application’s state. - Wikipedia |
Ray.Di is the core DI framework used in BEAR.Sunday, which is heavily inspired by Google Guice DI framework.See more detail at Ray.Di Manual.
AOP
BEAR.Sunday AOP enables you to write code that is executed each time a matching method is invoked. It’s suited for cross cutting concerns (“aspects”), such as transactions, security and logging. Because interceptors divide a problem into aspects rather than objects, their use is called Aspect Oriented Programming (AOP).
The method interceptor API implemented is a part of a public specification called AOP Alliance.
Interceptor
MethodInterceptors are executed whenever a matching method is invoked. They have the opportunity to inspect the call: the method, its arguments, and the receiving instance. They can perform their cross-cutting logic and then delegate to the underlying method. Finally, they may inspect the return value or the exception and return. Since interceptors may be applied to many methods and will receive many calls, their implementation should be efficient and unintrusive.
use Ray\Aop\MethodInterceptor;
use Ray\Aop\MethodInvocation;

class MyInterceptor implements MethodInterceptor
{
    public function invoke(MethodInvocation $invocation)
    {
        // Process before method invocation
        // ...

        // Original method invocation
        $result = $invocation->proceed();

        // Process after method invocation
        // ...

        return $result;
    }
}
Bindings
“Find” the target class and method with Matcher and bind the interceptor to the matching method in Module.
$this->bindInterceptor(
    $this->matcher->any(),                   // In any class,
    $this->matcher->startsWith('delete'),    // Method(s) names that start with "delete",
    [Logger::class]                          // Bind a Logger interceptor
);

$this->bindInterceptor(
    $this->matcher->subclassesOf(AdminPage::class),  // Of the AdminPage class or a class inherited from it
    $this->matcher->annotatedWith(Auth::class),      // Annotated method with the @Auth annotation
    [AdminAuthentication::class]                     //Bind the AdminAuthenticationInterceptor
);
There are various matchers.
- Matcher::any
- Matcher::annotatedWith
- Matcher::subclassesOf
- Matcher::startsWith
- Matcher::logicalOr
- Matcher::logicalAnd
- Matcher::logicalNot ```text
With the MethodInvocation object, you can access the target method’s invocation object, method’s and parameters.
- MethodInvocation::proceed - Invoke method
- MethodInvocation::getMethod - Get method reflection
- MethodInvocation::getThis - Get object
- MethodInvocation::getArguments - Pet parameters
Annotations can be obtained using the reflection API.
$method = $invocation->getMethod();
$class = $invocation->getMethod()->getDeclaringClass();
$method->getAnnotations()// get method annotations$method->getAnnotation($name)$class->getAnnotations()// get class annotations$class->getAnnotation($name)
Own matcher
You can have your own matcher.
To create contains matcher, You need to provide a class which has two methods. One is matchesClass for a class match.
The other one is matchesMethod method match. Both return the boolean result of match.
use Ray\Aop\AbstractMatcher;

class ContainsMatcher extends AbstractMatcher
{
    /**
     * {@inheritdoc}
     */
    public function matchesClass(\ReflectionClass $class, array $arguments) : bool
    {
        list($contains) = $arguments;

        return (strpos($class->name, $contains) !== false);
    }

    /**
     * {@inheritdoc}
     */
    public function matchesMethod(\ReflectionMethod $method, array $arguments) : bool
    {
        list($contains) = $arguments;

        return (strpos($method->name, $contains) !== false);
    }
}
Module
class AppModule extends AbstractAppModule
{
    protected function configure()
    {
        // ...
        $this->bindInterceptor(
            $this->matcher->any(),       // In any class,
            new ContainsMatcher('user'), // When 'user' contained in method name
            [UserLogger::class]          // Bind UserLogger class
        );
    }
};
Resource
A BEAR.Sunday application is RESTful and is made up of a collection of resources connected by links.
Object as a service
An HTTP method is mapped to a PHP method in the ResourceObject class.
It transfers its resource state as a resource representation from stateless request.
(Representational State Transfer)
Here are some examples of a resource object:
class Index extends ResourceObject
{
    public $code = 200;
    public $headers = [];

    public function onGet(int $a, int $b): static
    {
        $this->body = [
            'sum' => $a + $b // $_GET['a'] + $_GET['b']
        ] ;

        return $this;
    }
}
class Todo extends ResourceObject
{
    public function onPost(string $id, string $todo): static
    {
        $this->code = 201; // status code
        $this->headers = [ // header
            'Location' => '/todo/new_id'
        ];

        return $this;
    }
}
The PHP resource class has URIs such as page://self/index similar to the URI of the web, and conforms to the HTTP method onGet, onPost, onPut, onPatch, onDelete interface.
$_GET for onGet and $_POST for onPost are passed to the arguments of the method depending on the variable name, and the methods of onPut, onPatch, onDelete are content. The value that can be handled according to content-type(x-www-form-urlencoded or application/json) is an argument.
The resource state (code,headers orbody) is handled by these method using the given parameters. Then the resource class returns itself($this).
URI
URIs are mapped to PHP classes. Applications use the URI instead of the class name to access resources.
| URI | Class |
|---|---|
| page://self/ | Koriym\Todo\Resource\Page\Index |
| page://self/index | Koriym\Todo\Resource\Page\Index |
| app://self/blog/posts?id=3 | Koriym\Todo\Resource\App\Blog\Posts |
Scheme
The equivalent to a MVC model is an app resource. A resource functions as an internal API, but as it is designed using REST it also works as an external API transport.
The page resource carries out a similar role as a page controller which is also a resource. Unlike app resources, it receives external requests and generates representations for output.
| URI | Class |
|---|---|
| page://self/index | Koriym\Todo\Resource\Page\Index |
| app://self/blog/posts | Koriym\Todo\Resource\App\Blog\Posts |
Method
Resources have 6 interfaces conforming to HTTP methods.16
GET
Reads resources. This method does not provide any changing of the resource state. A safe method with no possible side affects.
POST
The POST method requests processing of the representation contained in the request. For example, adding a new resource to a target URI or adding a representation to an existing resource. Unlike PUT, requests do not have idempotence, and multiple consecutive executions will not produce the same result.
PUT
Replaces the resource with the payload of the request at the requested URI. If the target resource does not exist, it is created. Unlike POST, PUT is idempotent.
PATCH
Performs resource updates, but unlike PUT, it applies a delta rather than replacing the entire resource.
DELETE
Resource deletion. Has idempotence just like PUT.
OPTIONS
Get information on parameters and responses required for resource request. It is as secure as GET method.
List of method properties
| Methods | Safe | Idempotent | Cacheable |
|---|---|---|---|
| GET | Yes | Yes | Yes |
| POST | No | No | No |
| PUT | No | Yes | No |
| PATCH | No | No | No |
| DELETE | No | Yes | No |
| OPTIONS | Yes | Yes | No |
Parameters
The response method argument is passed the request value corresponding to the variable name.
class Index extends ResourceObject
{
    // $_GET['id'] to $id
    public function onGet(int $id): static
    {
    }

    // $_POST['name'] to $name
    public function onPost(string $name): static
    {
    }
See Resource Parameters for other methods and how to pass external variables such as cookies as parameters.
Rendering and transfer
The request method of a ResourceObject is not concerned with the representation of the resource. The injected renderer generates the representation of the resource and the responder outputs it. See Rendering and Transferring for details.
Client
Use the resource client to request other resources. This request executes a request to the app://self/blog/posts resource with the query ?id=1.
use BEAR\Sunday\Inject\ResourceInject;

class Index extends ResourceObject
{
    use ResourceInject;

    public function onGet(): static
    {
        $this->body = [
            'posts' => $this->resource->get('app://self/blog/posts', ['id' => 1])
        ];
    }
}
Other historical notations include the following
// PHP 5.x and up
$posts = $this->resource->get->uri('app://self/posts')->withQuery(['id' => 1])->eager->request();
// PHP 7.x and up
$posts = $this->resource->get->uri('app://self/posts')(['id' => 1]);
// you can omit `get`
$posts = $this->resource->uri('app://self/posts')(['id' => 1]);
// bear/resource 1.11 and up
$posts = $this->resource->get('app://self/posts', ['id' => 1]);
Lazy evaluation
The above is an eager request that makes the request immediately, but it is also possible to generate a request and delay execution instead of the request result.
$request = $this->resource->get('app://self/posts'); // callable
$posts = $request(['id' => 1]);
When this request is embedded in a template or resource, it is evaluated lazily. That is, when it is not evaluated, the request is not made and has no execution cost.
$this->body = [
    'lazy' => $this->resource->get('app://self/posts')->withQuery(['id' => 3])->request();
];
Cache
Along with regular TTL caching, we support REST client caching and advanced partial caching (doughnut caching), including CDN. See cache for details. Also see the previous resource(v1) document for the previous @Cacheable annotation.
Link
One important REST constraint is resource linking; ResourceObject supports both internal and external linking. See Resource Linking for details.
BEAR.Resource
The functionality of the BEAR.Sunday resource object is also available in a stand-alone package for stand-alone use: BEAR.Resource README.
Resource Parameters
Basics
Web runtime values such as HTTP requests and cookies that ResourceObjects require are passed directly to method arguments. For HTTP requests, the onGet and onPost method arguments receive $_GET and $_POST respectively, according to variable names.
For example, the following $id receives $_GET['id']. When input is from HTTP, string arguments are cast to the specified type.
class Index extends ResourceObject
{
    public function onGet(int $id): static
    {
        // ....
Parameter Types
Scalar Parameters
All parameters passed via HTTP are strings, but specifying non-string types like int will cast them.
Array Parameters
Parameters can be nested data 1. Data sent as JSON or nested query strings can be received as arrays.
class Index extends ResourceObject
{
    public function onPost(array $user): static
    {
        $name = $user['name']; // bear
Class Parameters
Parameters can also be received as dedicated Input classes.
class Index extends ResourceObject
{
    public function onPost(User $user): static
    {
        $name = $user->name; // bear
Input classes are pre-defined with parameters as public properties.
<?php
namespace Vendor\App\Input;

final class User
{
    public int $id;
    public string $name;
}
If a constructor exists, it will be called. 17
<?php
namespace Vendor\App\Input;

final class User
{
    public function __construct(
        public readonly int $id,
        public readonly string $name
    ) {}
}
Namespaces are arbitrary. Input classes can implement methods to aggregate or validate input data.
Ray.InputQuery Integration
Use the #[Input] attribute to leverage type-safe input object generation from the Ray.InputQuery library.
By grouping BEAR.Resource request parameters into an Input DTO, the Resource method can stay focused on receiving HTTP input and building the response. Types, default values, normalization such as trim(), and validation such as format checks can be centralized in the input object. The same DTO is also easy to pass on to Query or MediaQuery.
use InvalidArgumentException;
use Ray\InputQuery\Attribute\Input;

final class SearchInput
{
    public readonly string $keyword;

    public function __construct(
        #[Input] string $keyword,
        #[Input] public readonly int $page = 1
    ) {
        $this->keyword = trim($keyword);

        if ($this->keyword === '') {
            throw new InvalidArgumentException('keyword is required');
        }

        if ($this->page < 1) {
            throw new InvalidArgumentException('page must be greater than 0');
        }
    }
}

class Search extends ResourceObject
{
    public function onGet(#[Input] SearchInput $input): static
    {
        // The same Input DTO can be passed to Query / MediaQuery
        $this->body = $this->searchQuery->get($input);
        return $this;
    }
}
Note: Even for a single input value, a DTO such as
NameInputcan keeptrim()and format checks inside the constructor. DTOs are not only for grouping multiple parameters.
use Ray\InputQuery\Attribute\Input;

class Index extends ResourceObject
{
    public function onPost(#[Input] ArticleInput $article): static
    {
        $this->body = [
            'title' => $article->title,
            'author' => $article->author->name
        ];
        return $this;
    }
}
Parameters with the #[Input] attribute automatically receive structured objects generated from flat query data.
use Ray\InputQuery\Attribute\Input;

final class ArticleInput
{
    public function __construct(
        #[Input] public readonly string $title,
        #[Input] public readonly AuthorInput $author
    ) {}
}

final class AuthorInput
{
    public function __construct(
        #[Input] public readonly string $name,
        #[Input] public readonly string $email
    ) {}
}
In this case, nested object structures are automatically generated from flat data like title=Hello&authorName=John&authorEmail=john@example.com.
Array data can also be handled.
Simple Arrays
final class TagsInput
{
    public function __construct(
        #[Input] public readonly string $title,
        #[Input] public readonly array $tags
    ) {}
}
class Index extends ResourceObject
{
    public function onPost(#[Input] TagsInput $input): static
    {
        // For tags[]=php&tags[]=web&title=Hello
        // $input->tags = ['php', 'web']
        // $input->title = 'Hello'
    }
}
Object Arrays
Use the item parameter to generate array elements as objects of the specified Input class.
use Ray\InputQuery\Attribute\Input;

final class UserInput
{
    public function __construct(
        #[Input] public readonly string $id,
        #[Input] public readonly string $name
    ) {}
}

class Index extends ResourceObject
{
    public function onPost(
        #[Input(item: UserInput::class)] array $users
    ): static {
        foreach ($users as $user) {
            echo $user->name; // Each element is a UserInput instance
        }
    }
}
This generates arrays from data in the following format:
// users[0][id]=1&users[0][name]=John&users[1][id]=2&users[1][name]=Jane
$data = [
    'users' => [
        ['id' => '1', 'name' => 'John'],
        ['id' => '2', 'name' => 'Jane']
    ]
];
- When a parameter has the
#[Input]attribute: Object generation with Ray.InputQuery - When a parameter doesn’t have the
#[Input]attribute: Traditional dependency injection
File Upload
Use the #[InputFile] attribute to implement type-safe file upload processing with direct mapping between HTML forms and PHP code. Form name attributes correspond directly to method parameter names, making code the specification and improving readability.
Single File Upload
HTML Form:
<form method="post" enctype="multipart/form-data" action="/image-upload">
    <input type="file" name="image" accept="image/*" required>
    <input type="text" name="title" placeholder="Image title">
    <button type="submit">Upload</button>
</form>
Corresponding resource method:
use Ray\InputQuery\Attribute\InputFile;
use Koriym\FileUpload\FileUpload;
use Koriym\FileUpload\ErrorFileUpload;

class ImageUpload extends ResourceObject
{
    public function onPost(
        #[InputFile(
            maxSize: 1024 * 1024, // 1MB
            allowedTypes: ['image/jpeg', 'image/png', 'image/svg+xml'],
            allowedExtensions: ['jpg', 'jpeg', 'png', 'svg'],
            required: false  // Make file upload optional
        )]
        FileUpload|ErrorFileUpload|null $image = null, // null when no file specified
        string $title = 'Default Title'
    ): static {
        if ($image === null) {
            // Handle case when no file is specified
            $this->body = ['title' => $title, 'image' => null];
            return $this;
        }

        if ($image instanceof ErrorFileUpload) {
            // Handle validation errors
            $this->code = 400;
            $this->body = [
                'error' => true,
                'message' => $image->message
            ];
            return $this;
        }

        // Handle successful file upload - move file to destination directory
        $uploadDir = '/var/www/uploads/';
        $originalName = basename($image->name);
        $extension = pathinfo($originalName, PATHINFO_EXTENSION);
        $safeName = preg_replace('/[^a-zA-Z0-9._-]/', '', pathinfo($originalName, PATHINFO_FILENAME));
        $filename = bin2hex(random_bytes(8)) . '_' . uniqid() . '_' . $safeName . '.' . $extension;
        $image->move($uploadDir . $filename);

        $this->body = [
            'success' => true,
            'filename' => $image->name,
            'savedAs' => $filename,
            'size' => $image->size,
            'type' => $image->type,
            'title' => $title
        ];
        return $this;
    }
}
Multiple File Upload
HTML Form:
<form method="post" enctype="multipart/form-data" action="/gallery-upload">
    <input type="file" name="images[]" multiple accept="image/*" required>
    <input type="text" name="galleryName" placeholder="Gallery name">
    <button type="submit">Upload</button>
</form>
Corresponding resource method:
class GalleryUpload extends ResourceObject
{
    /**
     * @param array<FileUpload|ErrorFileUpload> $images
     */
    public function onPost(
        #[InputFile(
            maxSize: 2 * 1024 * 1024, // 2MB
            allowedTypes: ['image/jpeg', 'image/png', 'image/svg+xml']
        )]
        array $images, // Receive multiple files as array
        string $galleryName = 'Default Gallery'
    ): static {
        $uploadDir = '/var/www/uploads/gallery/';
        $results = [];
        $hasError = false;

        foreach ($images as $index => $image) {
            if ($image instanceof ErrorFileUpload) {
                $hasError = true;
                $results[] = [
                    'index' => $index,
                    'error' => true,
                    'message' => $image->message
                ];
                continue;
            }

            // Save file
            $originalName = basename($image->name);
            $extension = pathinfo($originalName, PATHINFO_EXTENSION);
            $safeName = preg_replace('/[^a-zA-Z0-9._-]/', '', pathinfo($originalName, PATHINFO_FILENAME));
            $filename = bin2hex(random_bytes(8)) . '_' . uniqid() . '_' . $safeName . '.' . $extension;
            $image->move($uploadDir . $filename);

            $results[] = [
                'index' => $index,
                'success' => true,
                'filename' => $image->name,
                'savedAs' => $filename,
                'size' => $image->size,
                'type' => $image->type
            ];
        }

        $this->code = $hasError ? 207 : 200; // 207 Multi-Status
        $this->body = [
            'galleryName' => $galleryName,
            'files' => $results,
            'total' => count($images),
            'hasErrors' => $hasError
        ];
        return $this;
    }
}
Testing File Uploads
File upload functionality can be easily tested:
use Koriym\FileUpload\FileUpload;
use Koriym\FileUpload\ErrorFileUpload;

class FileUploadTest extends TestCase
{
    public function testSuccessfulFileUpload(): void
    {
        // Create FileUpload object from actual file
        $fileUpload = FileUpload::fromFile(__DIR__ . '/fixtures/test.jpg');

        $resource = $this->getResource();
        $result = $resource->post('app://self/image-upload', [
            'image' => $fileUpload,
            'title' => 'Test Image'
        ]);

        $this->assertSame(200, $result->code);
        $this->assertTrue($result->body['success']);
        $this->assertSame('test.jpg', $result->body['filename']);
    }

    public function testFileUploadValidationError(): void
    {
        // Simulate validation error
        $errorFileUpload = new ErrorFileUpload([
            'name' => 'large.jpg',
            'type' => 'image/jpeg',
            'size' => 5 * 1024 * 1024, // 5MB - exceeds size limit
            'tmp_name' => '/tmp/test',
            'error' => UPLOAD_ERR_OK
        ], 'File size exceeds maximum allowed size');

        $resource = $this->getResource();
        $result = $resource->post('app://self/image-upload', [
            'image' => $errorFileUpload
        ]);

        $this->assertSame(400, $result->code);
        $this->assertTrue($result->body['error']);
        $this->assertStringContainsString('exceeds maximum allowed size', $result->body['message']);
    }

    public function testMultipleFileUpload(): void
    {
        // Test multiple files
        $file1 = FileUpload::fromFile(__DIR__ . '/fixtures/image1.jpg');
        $file2 = FileUpload::fromFile(__DIR__ . '/fixtures/image2.png');

        $resource = $this->getResource();
        $result = $resource->post('app://self/gallery-upload', [
            'images' => [$file1, $file2],
            'galleryName' => 'Test Gallery'
        ]);

        $this->assertSame(200, $result->code);
        $this->assertSame(2, $result->body['total']);
        $this->assertCount(2, $result->body['files']);
    }
}
The #[InputFile] attribute enables direct correspondence between HTML form input elements and PHP method parameters, achieving type-safe and intuitive file upload processing. Array support makes multiple file uploads easy to implement, and testing is also straightforward.
For more details, see the Ray.InputQuery documentation.
Enum Parameters
You can specify PHP8.1 enumerations to restrict possible values.
enum IceCreamId: int
{
    case VANILLA = 1;
    case PISTACHIO = 2;
}
class Index extends ResourceObject
{
    public function onGet(IceCreamId $iceCreamId): static
    {
        $id = $iceCreamId->value; // 1 or 2
    }
}
In the above case, passing anything other than 1 or 2 will raise a ParameterInvalidEnumException.
Web Context Binding
Values from PHP superglobals like $_GET and $_COOKIE can be bound to method arguments instead of retrieving them within methods.
use Ray\WebContextParam\Annotation\QueryParam;

class News extends ResourceObject
{
    public function foo(
        #[QueryParam('id')] string $id
    ): static {
        // $id = $_GET['id'];
You can also bind values from $_ENV, $_POST, and $_SERVER.
use Ray\WebContextParam\Annotation\QueryParam;
use Ray\WebContextParam\Annotation\CookieParam;
use Ray\WebContextParam\Annotation\EnvParam;
use Ray\WebContextParam\Annotation\FormParam;
use Ray\WebContextParam\Annotation\ServerParam;

class News extends ResourceObject
{
    public function onGet(
        #[QueryParam('id')] string $userId,            // $_GET['id']
        #[CookieParam('id')] string $tokenId = "0000", // $_COOKIE['id'] or "0000" when unset
        #[EnvParam('app_mode')] string $app_mode,      // $_ENV['app_mode']
        #[FormParam('token')] string $token,           // $_POST['token']
        #[ServerParam('SERVER_NAME')] string $server   // $_SERVER['SERVER_NAME']
    ): static {
When clients specify values, those values take precedence and bound values become invalid. This is useful for testing.
Resource Binding
The #[ResourceParam] annotation can bind results from other resource requests to method arguments.
use BEAR\Resource\Annotation\ResourceParam;

class News extends ResourceObject
{
    public function onGet(
        #[ResourceParam('app://self//login#nickname')] string $name
    ): static {
In this example, when the method is called, it makes a get request to the login resource and receives $body['nickname'] as $name.
Content Negotiation
HTTP request content-type headers are supported. application/json and x-www-form-urlencoded media types are distinguished and values are passed to parameters. 18
Reousrce link
Resources can be linked to other resources. There are two types of links: external links 19, which link external resources, and internal links 20, which embed other resources in the resource itself.
Out-bound links
Specify links by rel (relation) and href of the link name. The href can be a regular URI or RFC6570 URI template.
    #[Link rel: 'profile', href: '/profile{?id}']
    public function onGet($id): static
    {
        $this->body = [
            'id' => 10
        ];

        return $this;
    }
In the above example, href is represented by and $body['id'] is assigned to {?id}. The output in HAL format is as follows
{
    "id": 10,
    "_links": {
        "self": {
            "href": "/test"
        },
        "profile": {
            "href": "/profile?id=10"
        }
    }
}
Internal links
A resource can embed another resource. Specify the resource in the src of #[Embed].
Internally linked resources may also internally link other resources. In that case, another internally linked resource is needed, and the process is repeated recursively to obtain a resource graph. The client can retrieve the desired set of resources at once without having to fetch the resources multiple times. 21 For example, instead of calling a customer resource and a product resource respectively, embed them both in an order resource.
use BEAR\Resource\Annotation\Embed;

class News extends ResourceObject
{
    #[Embed(rel: 'sports', src: '/news/sports')]
    #[Embed(rel: 'weather', src: '/news/weather')]
    public function onGet(): static
It is the resource request that is embedded. It is executed at rendering time, but before that you can add arguments with the addQuery() method or replace them with withQuery().
A URI template can be used for the src, and request method arguments will be bound to it. (Unlike external links, it is not $body)
use BEAR\Resource\Annotation\Embed;

class News extends ResourceObject
{
    #[Embed(rel: 'website', src: '/website{?id}']
    public function onGet(string $id): static
    {
        // ...
        $this->body['website']->addQuery(['title' => $title]); // 引数追加
Self linking
Linking a relation as _self in #[Embed] copies the linked resource state to its own resource state.
namespace MyVendor\Weekday\ResourcePage;.

class Weekday extends ResourceObject
{
#[Embed(rel: '_self', src: 'app://self/weekday{?year,month,day}'])
public function onGet(string $id): static
{
In this example, the Page resource copies the state of the weekday resource of the App resource to itself.
Internal links in HAL
Handled as _embedded in the HAL renderer.
Link request
Clients can link resources connected by hyperlinks.
$blog = $this
    ->resource
    ->get
    ->uri('app://self/user')
    ->withQuery(['id' => 1])
    ->linkSelf("blog")
    ->eager
    ->request()
    ->body;
There are three types of links. The body linked resource of the original resource is embedded using $rel as the key.
linkSelf($rel)which will be replaced with the link destination.linkNew($rel)the linked resource is added to the original resourcelinkCrawl($rel)crawl the link and create a resource graph.
crawl
Crawls are lists (arrays) of resources, and links can be traversed in sequence to compose complex resource graphs. Just as a crawler crawls a web page, the resource client crawls hyperlinks and generates a source graph.
Crawl Example
Consider a resource graph with author, post, meta, tag, and tag/name associated with each. Name this resource graph post-tree and specify a hyperreference href in the `#[Link]’ attribute of each resource.
The first starting point, the author resource, has a hyperlink to the post resource. 1:n relationship.
#[Link(crawl: "post-tree", rel: "post", href: "app://self/post?author_id={id}")]
public function onGet($id = null)
The post resource has hyperlinks to the meta and tag resources. 1:n relationship.
#[Link(crawl: "post-tree", rel: "meta", href: "app://self/meta?post_id={id}")]
#[Link(crawl: "post-tree", rel: "tag", href: "app://self/tag?post_id={id}")]
public function onGet($author_id)
{
A tag resource is just an ID with a hyperlink to the corresponding tag/name resource. 1:1 relationship.
#[Link(crawl:"post-tree", rel:"tag_name", href:"app://self/tag/name?tag_id={tag_id}")]
public function onGet($post_id)
Each is now connected. Request with a crawl name.
$graph = $resource
  ->get
  ->uri('app://self/marshal/author')
  ->linkCrawl('post-tree')
  ->eager
  ->request();
When a resource client finds a crawl name specified in the #[Link] attribute, it creates a resource graph by connecting resources by their rel names.
var_export($graph->body);

array (
    0 =>
    array (
        'name' => 'Athos',
        'post' =>
        array (
            0 =>
            array (
                'author_id' => '1',
                'body' => 'Anna post #1',
                'meta' =>
                array (
                    0 =>
                    array (
                        'data' => 'meta 1',
                    ),
                ),
                'tag' =>
                array (
                    0 =>
                    array (
                        'tag_name' =>
                        array (
                            0 =>
                            array (
                                'name' => 'zim',
                            ),
                        ),
                    ),
 ...
DataLoader Beta
Available in
bear/resource:1.x-dev
When crawling resources with links, each child resource triggers individual queries, causing the N+1 problem. DataLoader solves this by batching multiple resource requests into a single efficient query.
The N+1 Problem
Request: GET /author/1 with linkCrawl('post-tree')

[Query 1] SELECT * FROM author WHERE id = 1
  └─ Author has 3 posts

[Query 2] SELECT * FROM post WHERE author_id = 1
  └─ Returns 3 posts (id: 10, 11, 12)

[Query 3] SELECT * FROM meta WHERE post_id = 10  ← N+1 starts here
[Query 4] SELECT * FROM meta WHERE post_id = 11
[Query 5] SELECT * FROM meta WHERE post_id = 12

Total: 5 queries (grows with data size!)
With DataLoader
[Query 1] SELECT * FROM author WHERE id = 1
[Query 2] SELECT * FROM post WHERE author_id = 1
[Query 3] SELECT * FROM meta WHERE post_id IN (10, 11, 12)  ← Batched!

Total: 3 queries (constant regardless of data size)
Usage
Add the dataLoader parameter to the #[Link] attribute:
#[Link(crawl: 'post-tree', rel: 'meta', href: 'app://self/meta{?post_id}', dataLoader: MetaDataLoader::class)]
public function onGet($author_id)
{
DataLoader Implementation
Implement DataLoaderInterface to batch queries:
use Aura\Sql\ExtendedPdoInterface;
use BEAR\Resource\DataLoader\DataLoaderInterface;

class MetaDataLoader implements DataLoaderInterface
{
    public function __construct(
        private ExtendedPdoInterface $pdo
    ){}

    /**
     * @param list<array<string, mixed>> $queries
     * @return list<array<string, mixed>>
     */
    public function __invoke(array $queries): array
    {
        $postIds = array_column($queries, 'post_id');

        // Batch query: SELECT * FROM meta WHERE post_id IN (...)
        return $this->pdo->fetchAll(
            'SELECT * FROM meta WHERE post_id IN (:post_ids)',
            ['post_ids' => $postIds]
        );
    }
}
This example uses SQL directly for clarity, but Ray.MediaQuery can also be used for the implementation.
Key Inference
The key for matching results is auto-inferred from the URI template:
| URI Template | Inferred Key |
|---|---|
{?post_id} |
post_id |
post_id={id} |
post_id |
{?post_id,locale} |
post_id, locale |
The returned rows must contain the key column(s) for proper distribution.
Multiple Keys
For multiple key parameters, use all keys in your query:
// URI template: app://self/translation{?post_id,locale}
// $queries: [['post_id' => '1', 'locale' => 'en'], ['post_id' => '1', 'locale' => 'ja']]

public function __invoke(array $queries): array
{
    // Build query using both keys
    $sql = "SELECT * FROM translation WHERE (post_id, locale) IN (...)";
    // ...
}
Rendering and transfer
The request method of a ResourceObject is not concerned with the representation of the resource. The context-sensitive injected renderer generates the representation of the resource. The same application can be output in HTML or JSON and benefit by simply changing the context.
Lazy evaluation
Rendering occurs when the resource is string-evaluated.
$weekday = $api->resource->get('app://self/weekday', ['year' => 2000, 'month'=> 1, 'day'=> 1]);
var_dump($weekday->body);
//array(1) {
//    ["weekday"]=>
//  string(3) "Sat"
//}

echo $weekday;
//{
//    "weekday": "Sat",
//    "_links": {
//    "self": {
//        "href": "/weekday/2000/1/1"
//        }
//    }
//}
Renderer
Each ResourceObject is injected with a renderer for its representation as specified by its context. When performing resource-specific rendering, inject or set the renderer property.
Example: If you write a renderer for the default JSON representation from scratch
class Index extends ResourceObject
{
    #[Inject]
    public function setRenderer(RenderInterface $renderer)
    {
        $this->renderer = new class implements RenderInterface {
            public function render(ResourceObject $ro)
            {
                $ro->headers['content-type'] = 'application/json;';
                $ro->view = json_encode($ro->body);

                return $ro->view;
            }
        };
    }
}
Transfer
Transfers the resource representation injected into the root object $app to the client (console or web client). Normally, output is done with the header function or echo, but for large data, etc., stream transfer is useful.
Override the transfer method to perform resource-specific transfers.
public function transfer(TransferInterface $responder, array $server)
{
    $responder($this, $server);
}
Resource autonomy
Each resource class has the ability to change its own resource state upon request and transfer it as an expression.
Router
The router converts resource requests for external contexts such as Web and console into resource requests inside BEAR.Sunday.
$request = $app->router->match($GLOBALS, $_SERVER);
echo (string) $request;
// get page://self/user?name=bear
Web Router
The default web router accesses the resource class corresponding to the HTTP request path ($_SERVER['REQUEST_URI']).
For example, a request of /index is accessed by a PHP method corresponding to the HTTP method of the {Vendor name}\{Project name}\Resource\Page\Index class.
The Web Router is a convention-based router. No configuration or scripting is required.
namespace MyVendor\MyProject\Resource\Page;

// page://self/index
class Index extends ResourceObject
{
    public function onGet(): static // GET request
    {
    }
}
CLI Router
In the cli context, the argument from the console is “input of external context”.
php bin/page.php get /
The BEAR.Sunday application works on both the Web and the CLI.
Multiple words URI
The path of the URI using hyphens and using multiple words uses the class name of Camel Case.
For example /wild-animal requests are accessed to the WildAnimal class.
Parameters
The name of the PHP method executed corresponding to the HTTP method and the value passed are as follows.
| HTTP method | PHP method | Parameters |
|---|---|---|
| GET | onGet | $_GET |
| POST | onPost | $_POST or ※ standard input |
| PUT | onPut | ※ standard input |
| PATCH | onPatch | ※ standard input |
| DELETE | onDelete | ※ standard input |
There are two media types available for request:
application/x-www-form-urlencoded// param1=one¶m2=twoapplication/json// {“param1”: “one”, “param2”: “one”}
Please also see the PUT method support of the PHP manual.
Method Override
There are firewalls that do not allow HTTP PUT traffic or HTTP DELETE traffic. To deal with this constraint, you can send these requests in the following two ways.
X-HTTP-Method-OverrideSend a PUT request or DELETE request using the header field of the POST request._methodUse the URI parameter. ex) POST /users?…&_method=PUT
Aura Router
To receive the request path as a parameter, use Aura Router.
composer require bear/aura-router-module ^2.0
Install AuraRouterModule with the path of the router script.
use BEAR\Package\AbstractAppModule;
use BEAR\Package\Provide\Router\AuraRouterModule;

class AppModule extends AbstractAppModule
{
    protected function configure()
    {
        // ...
        $this->install(new AuraRouterModule($appDir . '/var/conf/aura.route.php'));
    }
}
Delete cached DI files to activate new router.
rm -rf var/tmp/*
Router Script
Router scripts set routes for Map objects passed globally.
You do not need to specify a method for routing.
The first argument specifies the path as the root name and the second argument specifies the path containing the place folder of the named token.
var/conf/aura.route.php
<?php
/* @var \Aura\Router\Map $map */
$map->route('/blog', '/blog/{id}');
$map->route('/user', '/user/{name}')->tokens(['name' => '[a-z]+']);
$map->route('/blog/comment', '/blog/{id}/comment');
- In the first line, accessing
/blog/bearwill be accessed aspage://self/blog?id=bear. (=Blogclass’sonGet($id)method with the value$id=bear.) tokenis used to restrict parameters with regular expressions./blog/{id}/commentto routeBlog\Commentclass.
Preferred router
If it is not routed by the Aura router, a web router will be used. In other words, it is OK to prepare the router script only for the URI that passes the parameters in the path.
Parameter
Aura router have various methods to obtain parameters from the path.
Custom Placeholder Token Matching
The script below routes only when {date} is in the proper format.
$map->route('/calendar/from', '/calendar/from/{date}')
    ->tokens([
        'date' => function ($date, $route, $request) {
            try {
                new \DateTime($date);
                return true;
            } catch(\Exception $e) {
                return false;
            }
        }
    ]);
Optional Placeholder Tokens
Sometimes it is useful to have a route with optional placeholder tokens for attributes. None, some, or all of the optional values may be present, and the route will still match.
To specify optional attributes, use the notation {/attribute1,attribute2,attribute3} in the path. For example:
ex)
$map->route('archive', '/archive{/year,month,day}')
    ->tokens([
        'year' => '\d{4}',
        'month' => '\d{2}',
        'day' => '\d{2}',
    ]);
Please note that there is the first slash inside of the place holder. Then all the paths below are routed to ‘archive’ and the value of the parameter is appended.
/archive : ['year' => null, 'month' => null, 'day' => null]/archive/1979 : ['year' => '1979', 'month' => null, 'day' => null]/archive/1979/11 : ['year' => '1979', 'month' => '11', 'day' => null]/archive/1979/11/07 : ['year' => '1979', 'month' => '11', 'day' => '07']
Optional parameters are options in the order of. In other words, you can not specify “day” without “month”.
Wildcard Attributes
Sometimes it is useful to allow the trailing part of the path be anything at all. To allow arbitrary trailing path segments on a route, call the wildcard() method. This will let you specify the attribute name under which the arbitrary trailing values will be stored.
$map->route('wild', '/wild')
    ->wildcard('card');
All slash-separated path segments after the {id} will be captured as an array in the in wildcard attribute. For example:
/wild : ['card' => []]/wild/foo : ['card' => ['foo']]/wild/foo/bar : ['card' => ['foo', 'bar']]/wild/foo/bar/baz : ['card' => ['foo', 'bar', 'baz']]
For other advanced routes, please refer to Aura Router’s defining-routes.
Generating Paths From Routes
You can generate a URI from the name of the route and the value of the parameter.
use BEAR\Sunday\Extension\Router\RouterInterface;

class Index extends ResourceObject
{
    /**
     * @var RouterInterface
     */
    private $router;

    public function __construct(RouterInterface $router)
    {
        $this->router = $router;
    }

    public function onGet(): static
    {
        $userLink = $this->router->generate('/user', ['name' => 'bear']);
        // '/user/bear'
Request Method
It is not necessary to specify a request method.
Request Header
Normally request headers are not passed to Aura.Router, but installing RequestHeaderModule allows Aura.Router to match using headers.
$this->install(new RequestHeaderModule());
Custom Router Component
Implement RouterInterface with by referring to BEAR.AuraRouterModule.
*This document needs to be proofread by native speaker. *
Production
For BEAR.Sunday’s default prod binding, the application customizes the module according to each deployment environment and performs the binding.
Default ProdModule
The default prod binding binds the following interfaces:
- Error page generation factory
- PSR logger interface
- Local cache
- Distributed cache
See ProdModule.php in BEAR.Package for details.
Application’s ProdModule
Customize the application’s ProdModule in src/Module/ProdModule.php against the default ProdModule. Error pages and distributed caches are particularly important.
<?php
namespace MyVendor\Todo\Module;

use BEAR\Package\Context\ProdModule as PackageProdModule;
use BEAR\QueryRepository\CacheVersionModule;
use BEAR\Resource\Module\OptionsMethodModule;
use BEAR\Package\AbstractAppModule;

class ProdModule extends AbstractModule
{
    /**
     * {@inheritdoc}
     */
    protected function configure()
    {
        $this->install(new PackageProdModule);       // Default prod settings
        $this->override(new OptionsMethodModule);    // Enable OPTIONS method in production as well
        $this->install(new CacheVersionModule('1')); // Specify resource cache version

        // Custom error page
        $this->bind(ErrorPageFactoryInterface::class)->to(MyErrorPageFactory::class);
    }
}
Cache
There are two types of caches: a local cache and a distributed cache that is shared between multiple web servers. Both caches default to PhpFileCache.
Local Cache
The local cache is used for caches that do not change after deployment, such as annotations, while the distributed cache is used to store resource states.
Distributed Cache
To provide services with two or more web servers, a distributed cache configuration is required. Modules for each of the popular memcached and Redis cache engines are provided.
Memcached
<?php
namespace BEAR\HelloWorld\Module;

use BEAR\QueryRepository\StorageMemcachedModule;
use BEAR\Resource\Module\ProdLoggerModule;
use BEAR\Package\Context\ProdModule as PackageProdModule;
use BEAR\Package\AbstractAppModule;
use Ray\Di\Scope;

class ProdModule extends AbstractModule
{
    protected function configure()
    {
        // memcache
        // {host}:{port}:{weight},...
        $memcachedServers = 'mem1.domain.com:11211:33,mem2.domain.com:11211:67';
        $this->install(new StorageMemcachedModule($memcachedServers));

        // Install Prod logger
        $this->install(new ProdLoggerModule);
        // Install default ProdModule
        $this->install(new PackageProdModule);
    }
}
Redis
// redis
$redisServer = 'localhost:6379'; // {host}:{port}
$this->install(new StorageRedisModule($redisServer));
In addition to simply updating the cache by TTL for storing resource states, it is also possible to operate (CQRS) as a persistent storage that does not disappear after the TTL time.
In that case, you need to perform persistent processing with Redis or prepare your own storage adapter for other KVS such as Cassandra.
Specifying Cache Time
To change the default TTL, install StorageExpiryModule.
// Cache time
$short = 60;
$medium = 3600;
$long = 24 * 3600;
$this->install(new StorageExpiryModule($short, $medium, $long));
Specifying Cache Version
Change the cache version when the resource schema changes and compatibility is lost. This is especially important for CQRS operation that does not disappear over TTL time.
$this->install(new CacheVersionModule($cacheVersion));
To discard the resource cache every time you deploy, it is convenient to assign a time or random value to $cacheVersion so that no change is required.
Logging
ProdLoggerModule is a resource execution log module for production. When installed, it logs requests other than GET to the logger bound to Psr\Log\LoggerInterface.
If you want to log on a specific resource or specific state, bind a custom log to BEAR\Resource\LoggerInterface.
use BEAR\Resource\LoggerInterface;
use Ray\Di\AbstractModule;

final class MyProdLoggerModule extends AbstractModule
{
    protected function configure(): void
    {
        $this->bind(LoggerInterface::class)->to(MyProdLogger::class);
    }
}
The __invoke method of LoggerInterface passes the resource URI and resource state as a ResourceObject object, so log the necessary parts based on its contents.
Refer to the existing implementation ProdLogger for creation.
Deployment
⚠️ Avoid Overwriting Updates
When deploying to a server
- Overwriting a running project folder with
rsyncor similar poses a risk of inconsistency with caches and on-demand generated files, and can exceed capacity on high-load sites. Set up in a separate directory for safety and switch if the setup is successful. - You can use the BEAR.Sunday recipe of Deployer.
When deploying to the cloud
- It is recommended to incorporate compilation into CI as the compiler outputs exit code 1 when it finds dependency issues and 0 when compilation succeeds.
Compilation Recommended
When setting up, you can warm up the project using the vendor/bin/bear.compile script.
The compile script creates all static cache files such as dynamically created files for DI/AOP and annotations in advance, and outputs an optimized autoload.php file and preload.php.
- If you compile, the possibility of DI errors at runtime is extremely low because injection is performed in all classes.
- The contents included in
.envare incorporated into the PHP file, so.envcan be deleted after compilation.
When compiling multiple contexts (ex. api-app, html-app) in one application, such as when performing content negotiation, it is necessary to evacuate the files.
mv autoload.php api.autoload.php
Edit composer.json to change the content of composer compile.
autoload.php
An optimized autoload.php file is output to {project_path}/autoload.php.
It is much faster than vendor/autoload.php output by composer dumpa-autoload --optimize.
Note: If you use preload.php, most of the classes used are loaded at startup, so the compiled autoload.php is not necessary. Please use vendor/autload.php generated by Composer.
preload.php
An optimized preload.php file is output to {project_path}/preload.php.
To enable preloading, you need to specify opcache.preload and opcache.preload in php.ini. It is a feature supported in PHP 7.4, but it is unstable in the initial versions of 7.4. Let’s use the latest version of 7.4.4 or higher.
Example)
opcache.preload=/path/to/project/preload.php
opcache.preload_user=www-data
Note: Please refer to the benchmark for performance benchmarks.
.compile.php
When there are classes that cannot be generated in a non-production environment (for example, a ResourceObject that requires successful authentication to complete injection), you can compile them by describing dummy class loading in the root .compile.php file, which is only loaded during compilation.
.compile.php
Example) If there is an AuthProvider that throws an exception when authentication cannot be obtained in the constructor, you can create an empty class as follows and load it in .compile.php:
/tests/Null/AuthProvider.php
<?php
class AuthProvider
{  // Only for instantiation, so implementation is not required
}
.compile.php
<?php
require __DIR__ . '/tests/Null/AuthProvider.php'; // Always-generatable Null object
$_SERVER[__REQUIRED_KEY__] = 'fake'; // For cases where errors occur without specific environment variables
This allows you to avoid exceptions and perform compilation. Additionally, since Symfony’s cache component connects to the cache engine in the constructor, it’s good to load a dummy adapter during compilation like this:
tests/Null/RedisAdapter.php
namespace Ray\PsrCacheModule;

use Ray\Di\ProviderInterface;
use Serializable;
use Symfony\Component\Cache\Adapter\RedisAdapter as OriginAdapter;
use Symfony\Component\Cache\Marshaller\MarshallerInterface;

class RedisAdapter extends OriginAdapter implements Serializable
{
    use SerializableTrait;

    public function __construct(ProviderInterface $redisProvider, string $namespace = '', int $defaultLifetime = 0, ?MarshallerInterface $marshaller = null)
    {
      // do nothing
    }
}
module.dot
When you compile, a “dot file” is output, so you can convert it to an image file with graphviz or use GraphvizOnline to display the object graph. Also, please see the object graph of the skeleton.
dot -T svn module.dot > module.svg
Bootstrap Performance Tuning
immutable_cache is a PECL package for caching immutable values in shared memory. It is based on APCu but is faster than APCu because it stores immutable values such as PHP objects and arrays in shared memory. Additionally, installing PECL’s Igbinary with either APCu or immutable_cache can reduce memory usage and further improve performance.
Currently, there are no dedicated cache adapters available. Please refer to ImmutableBootstrap to create and call a dedicated Bootstrap. This allows you to minimize initialization costs and achieve maximum performance.
php.ini
// Extensions
extension="apcu.so"
extension="immutable_cache.so"
extension="igbinary.so"

// Specifying serializer
apc.serializer=igbinary
immutable_cache.serializer=igbinary
----
***
# Import
BEAR applications can cooperate with multiple BEAR applications into a single system without having to be microservices. It is also easy to use BEAR resources from other applications.
## Composer Install
Install the BEAR application you want to use as a composer package.
composer.json
```json
{
"require": {
"bear/package": "^1.13",
"my-vendor/weekday": "dev-master"
},
"repositories": [
{
"type": "vcs",
"url": "https://github.com/bearsunday/tutorial1.git"
}
]
}
```
Requires `bear/package ^1.13`.
## Module Install
Install other applications with `ImportAppModule`, specifying the hostname, application name (namespace) and context to import.
```diff
+use BEAR\Package\Module\ImportAppModule;
+use BEAR\Package\Module\Import\ImportApp;
class AppModule extends AbstractAppModule
{
protected function configure(): void
{
// ...
+ $this->install(new ImportAppModule([
+ new ImportApp('foo', 'MyVendor\Weekday', 'prod-app')
+ ]));
$this->install(new PackageModule());
}
}
```
## Request
The imported resource will be used with the specified host name.
```php
class Index extends ResourceObject
{
use ResourceInject;
public function onGet(string $name = 'BEAR.Sunday'): static
{
$weekday = $this->resource->get('app://foo/weekday?year=2022&month=1&day=1');
$this->body = [
'greeting' => 'Hello ' . $name,
'weekday' => $weekday
];
return $this;
}
}
You can also use #[Embed] and #[Link] in the same way.
Requests from other systems
It is easy to use BEAR resources from other frameworks or CMS.
Install it as a package in the same way, and use Injector::getInstance to get the resource client of the application you require and request it.
use BEAR\Package\Injector;
use BEAR\Resource\ResourceInterface;
$resource = Injector::getInstance(
'MyVendor\Weekday',
'prod-api-app',
dirname(__DIR__) . '/vendor/my-vendor/weekday'
)->getInstance(ResourceInterface::class);
$weekdday = $resource->get('/weekday', ['year' => '2022', 'month' => '1', 'day' => 1]);
echo $weekdday->body['weekday'] . PHP_EOL;
Environment variables
Environment variables are global. Care should be taken to prefix them to avoid conflicts between applications. Instead of using .env files, the application to be imported will get the shell environment variables just like in production.
System Boundary
It is similar to microservices in that a large application can be built as a collection of multiple smaller applications, but without the disadvantages of microservices such as increased infrastructure overhead. It also has clearer component independence and boundaries than modular monoliths.
The code for this page can be found at bearsunday/example-app-import.
Multilingual Framework
Using BEAR.Thrift, you can access resources from other languages, different versions of PHP, or BEAR applications using Apache Thrift. Apache Thrift is a framework that enables efficient communication between different languages.
Database
The following modules are available for database use, with different problem solving methods. They are all independent libraries for SQL based on PDO.
- ExtendedPdo with PDO extended (Aura.sql)
- Query Builder (Aura.SqlQuery)
- Binding PHP interface and SQL execution (Ray.MediaQuery)
Having static SQL in a file22 makes it easier to use and tune with other SQL tools. SqlQuery can dynamically assemble queries, but the rest of the library is for basic static SQL execution. Ray.MediaQuery can also replace parts of the SQL with those assembled by the builder.
Module
Modules are provided for using the database. They are all independent libraries for SQL.
Ray.AuraSqlModule is a PDO extension Aura.Sql and a query builder Aura.SqlQuery SqlQuery, plus a low-level module that provides pagination functionality.
Ray.MediaQuery is a high-performance DB access framework that generates and injects SQL execution objects from user-provided interfaces and SQL 23 .
Other
DBAL is Doctrine and CakeDB is CakePHP’s DB library. Ray.QueryModule is an earlier library of Ray.MediaQuery that converts SQL to anonymous functions.
CQRS Read Model
BEAR.Projection provides SQL-based projections mapped to typed value objects. Projections are exposed as resources via the query:// scheme and can be embedded with #[Embed] for parallel execution.
#[Embed(rel: 'profile', src: 'query://self/user_profile{?id}')]
#[Embed(rel: 'orders', src: 'query://self/user_orders{?id}')]
public function onGet(string $id): static
Ray.MediaQuery
Ray.MediaQuery generates and injects query execution objects from database query interfaces.
- Clarifies the boundary between domain layer and infrastructure layer.
- Reduces boilerplate code.
- Since it’s independent of the actual external media, storage can be changed later. Enables easy parallel development and stub creation.
Installation
composer require ray/media-query
Note: For the same interface-driven approach over Web APIs, see ray/web-query.
Usage
Define an interface for database access.
Interface Definition
Specify the SQL ID with the #[DbQuery] attribute.
use Ray\MediaQuery\Annotation\DbQuery;
interface TodoAddInterface
{
#[DbQuery('todo_add')]
public function add(string $title): void;
}
Module Configuration
Specify SQL directory and interface directory with MediaQuerySqlModule.
use Ray\AuraSqlModule\AuraSqlModule;
use Ray\MediaQuery\MediaQuerySqlModule;
protected function configure(): void
{
$this->install(
new MediaQuerySqlModule(
interfaceDir: '/path/to/query/interfaces',
sqlDir: '/path/to/sql'
)
);
$this->install(new AuraSqlModule(
'mysql:host=localhost;dbname=test',
'username',
'password'
));
}
MediaQuerySqlModule requires AuraSqlModule to be installed.
Injection
Objects are generated directly from interfaces and injected. No implementation class coding is required.
class Todo
{
public function __construct(
private TodoAddInterface $todoAdd
) {}
public function add(string $title): void
{
$this->todoAdd->add($title);
}
}
DbQuery
SQL execution is mapped to methods, binding the SQL specified by ID with method arguments for execution. For example, with ID todo_item, it executes todo_item.sql SQL statement bound with ['id' => $id].
- Prepare SQL files in the
$sqlDirdirectory. - SQL files can contain multiple SQL statements. The last SELECT statement becomes the return value.
The two basic shapes are Entity (single row hydrated to an object) and Entity list (rowlist hydrated to an array of objects). Other shapes — raw assoc arrays, custom collections, pagination, DML results — build on these.
Entity (single row)
When you specify an entity class as the return type, the SQL result is automatically converted (hydrated) into an instance of that class.
interface TodoItemInterface
{
#[DbQuery('todo_item')]
public function getItem(string $id): Todo;
}
Constructor Property Promotion (Recommended)
Using constructor property promotion creates type-safe and immutable entities.
final class Todo
{
public function __construct(
public readonly string $id,
public readonly string $title
) {}
}
Values are bound to constructor arguments by position, in the order of the columns in the SELECT clause. Column names (e.g. user_name) do not need to match property names (e.g. $userName) — just make sure the column order matches the constructor argument order.
Entity|null is also supported and returns null when no row matches.
Note: When the entity has no constructor, Ray.MediaQuery falls back to PDO’s
FETCH_CLASSand maps column name → property name (no snake_case conversion). This avoids any dependency on column ordering, which is useful for wide read-only DTOs or PHP 8.4readonly classdeclarations.
Entity list (rowlist)
Declare array as the return type to receive multiple rows. Tell the framework which entity to hydrate each row into via a @return list<Entity> docblock or the factory: parameter on #[DbQuery].
interface TodoListInterface
{
/** @return list<Todo> */
#[DbQuery('todo_list')]
public function list(): array;
#[DbQuery('todo_list', factory: TodoFactory::class)]
public function listByFactory(): array;
}
Without @return list<Entity> or factory:, rows are returned as associative arrays — see type: ‘row’ below for the single-row equivalent.
type: ‘row’ (raw associative array)
By default, an array return type yields a rowlist ([['id' => '1', 'title' => 'run'], ...]). To receive a single row — for example an aggregate result such as ['total' => 10, 'active' => 5] — directly as an associative array, specify type: 'row'. Without it, that row is returned at $result[0].
interface TodoItemInterface
{
#[DbQuery('todo_stats', type: 'row')]
public function getStats(string $id): array; // ['total' => 10, 'active' => 5]
}
AffectedRows (UPDATE / DELETE row count)
Declare AffectedRows as the return type to receive the affected row count of an UPDATE / DELETE as a typed value rather than a bare int.
use Ray\MediaQuery\Result\AffectedRows;
interface TodoRepositoryInterface
{
#[DbQuery('todo_delete')]
public function delete(string $id): AffectedRows;
}
$affected = $todoRepo->delete($id);
$affected->count; // int — number of affected rows
$affected->isAffected(); // bool — true when count > 0
When a SQL file contains multiple statements, AffectedRows reflects the last executed statement only.
Executable examples: TodoAffectedInterface and DbQueryAffectedRowsTest.
InsertedRow (INSERT resolved values and id)
Use InsertedRow to recover the values the framework injected on the caller’s behalf (UUIDs, timestamps, DateTime → SQL strings, ToScalarInterface reductions) together with the auto-increment id reported by the driver. The same SQL id can be reused with a different return type — the framework switches behaviour (execute-only / affected count / inserted id) based on the declared return type alone.
use Ray\MediaQuery\Result\InsertedRow;
interface TodoAddInterface
{
#[DbQuery('todo_add')]
public function add(string $title): void;
#[DbQuery('todo_add')]
public function addReturning(string $title): InsertedRow;
}
$inserted = $todoAdd->addReturning('Write docs');
$inserted->values; // array<string, mixed> — resolved values bound to the driver
$inserted->id; // ?string — auto-increment id, null when none was assigned
$inserted->id is normalised to null when the driver returns false / '' / '0'.
PostQueryInterface (custom typed results)
Sometimes you want to wrap a SELECT result in your own collection type — exposing domain methods like published() / titles() instead of returning a plain array<Article>. Declare a class that implements PostQueryInterface as the return type, and the framework collects the post-execution state into a PostQueryContext, passes it to the static fromContext() factory, and lets the class decide how to assemble itself.
interface PostQueryInterface
{
public static function fromContext(PostQueryContext $context): static;
}
PostQueryContext provides four readonly properties:
| Property | Type | Purpose |
|---|---|---|
$statement |
PDOStatement |
The executed statement; inspect rowCount(), column metadata, etc. |
$pdo |
ExtendedPdoInterface |
The connection; useful for lastInsertId() and follow-up reads. |
$values |
array<string, mixed> |
Parameter values resolved by ParamConverter / ParamInjector (UUIDs, timestamps, value object scalars). |
$rows |
array<mixed> |
Fetched rows on SELECT — hydrated entities when @return Wrapper<Entity> or factory: resolves an entity, associative arrays otherwise. Always [] for DML. |
use Ray\MediaQuery\Result\PostQueryContext;
use Ray\MediaQuery\Result\PostQueryInterface;
/** @implements IteratorAggregate<int, Article> */
final class Articles implements PostQueryInterface, IteratorAggregate, Countable
{
/** @param list<Article> $rows */
public function __construct(public readonly array $rows) {}
public static function fromContext(PostQueryContext $context): static
{
/** @var list<Article> $rows */
$rows = $context->rows;
return new static($rows);
}
public function getIterator(): ArrayIterator { return new ArrayIterator($this->rows); }
public function count(): int { return count($this->rows); }
}
interface ArticleRepositoryInterface
{
#[DbQuery('article_list', factory: ArticleFactory::class)]
public function list(): Articles;
}
Hydration of each row is configured the same way as for an Entity list: via a generic @return YourWrapper<Entity> docblock or factory:. The wrapper uses composition rather than inheritance, so it can hold any internal collection — Laravel Collection, Doctrine ArrayCollection, or a custom one — without coupling to any specific library.
Executable examples in Ray.MediaQuery:
Articles— collection wrapper aroundPostQueryContext::$rowsArticlesInterface— declaring assoc rows, docblock-hydrated rows, andfactory:hydrated rows
AffectedRowsandInsertedRoware themselves implementations ofPostQueryInterface. If you need a custom DML result type — e.g. one that bundles audit logging or aggregate counters — you can build it through the same mechanism.
Return type cheat sheet
| Single row | Rowlist | |
|---|---|---|
| Hydrated | Entity / Entity|null |
array + @return list<Entity> or factory: |
| Assoc array | array + #[DbQuery(type: 'row')] |
array (no docblock / factory:) |
For richer return types:
MyCollimplementingPostQueryInterface— custom typed collection wrappersPagesInterface+#[Pager]— paginationAffectedRows— DML affected row countInsertedRow— DML insert id + resolved valuesvoid— DML execute only
Parameters
DateTime
You can pass value objects as parameters. For example, DateTimeInterface objects can be specified like this:
interface TaskAddInterface
{
#[DbQuery('task_add')]
public function __invoke(string $title, DateTimeInterface $createdAt = null): void;
}
Values are converted to date-formatted strings during SQL execution.
INSERT INTO task (title, created_at) VALUES (:title, :createdAt); # 2021-2-14 00:00:00
If no value is passed, the bound current time is injected. This eliminates the need to hard-code NOW() in SQL or pass current time every time.
Test Time
For testing, you can bind DateTimeInterface to a single time like this:
$this->bind(DateTimeInterface::class)->to(UnixEpochTime::class);
Value Objects (VO)
When value objects other than DateTime are passed, the return value of the toScalar() method implementing ToScalarInterface, or the __toString() method becomes the argument.
interface MemoAddInterface
{
#[DbQuery('memo_add')]
public function __invoke(string $memo, UserId $userId = null): void;
}
class UserId implements ToScalarInterface
{
public function __construct(
private readonly LoginUser $user
) {}
public function toScalar(): int
{
return $this->user->id;
}
}
INSERT INTO memo (user_id, memo) VALUES (:user_id, :memo);
Parameter Injection
Note that the default value null for value object arguments is never used in SQL or Web requests. When no value is passed, the scalar value of the value object injected by parameter type is used instead of null.
public function __invoke(Uuid $uuid = null): void; // UUID is generated and passed
Pagination
You can paginate SELECT queries with the #[Pager] attribute.
use Ray\MediaQuery\Annotation\DbQuery;
use Ray\MediaQuery\Annotation\Pager;
use Ray\MediaQuery\PagesInterface;
interface TodoList
{
#[DbQuery('todo_list'), Pager(perPage: 10, template: '/{?page}')]
public function __invoke(): PagesInterface;
}
You can get the count with count(), and get page objects with array access by page number. PagesInterface is a SQL lazy execution object.
$pages = ($todoList)();
$cnt = count($pages); // Count SQL is generated and queried when count() is called
$page = $pages[2]; // DB query for that page is executed when array access is made
// $page->data // sliced data
// $page->current; // current page number
// $page->total // total count
// $page->hasNext // whether next page exists
// $page->hasPrevious // whether previous page exists
// $page->maxPerPage; // maximum items per page
// (string) $page // pager HTML
SqlQuery
SqlQuery executes SQL by specifying the SQL file ID. Used when preparing implementation classes for detailed implementation.
class TodoItem implements TodoItemInterface
{
public function __construct(
private SqlQueryInterface $sqlQuery
) {}
public function __invoke(string $id): array
{
return $this->sqlQuery->getRow('todo_item', ['id' => $id]);
}
}
get* Methods
Use appropriate get* methods to retrieve SELECT results based on the expected result type.
$sqlQuery->getRow($queryId, $params); // Result is single row
$sqlQuery->getRowList($queryId, $params); // Result is multiple rows
$statement = $sqlQuery->getStatement(); // Get PDO Statement
$pages = $sqlQuery->getPages(); // Get pager
Ray.MediaQuery includes Ray.AuraSqlModule. For lower-level operations, use Aura.Sql’s Query Builder or PDO-extended Aura.Sql. doctrine/dbal is also available.
Like parameter injection, passing DateTimeInterface objects converts them to date-formatted strings.
$sqlQuery->exec('memo_add', [
'memo' => 'run',
'created_at' => new DateTime()
]);
Other objects are converted to toScalar() or __toString() values.
Integration with Ray.InputQuery
When using Ray.InputQuery with BEAR.Resource, Input classes can be passed directly as MediaQuery parameters.
use Ray\InputQuery\Attribute\Input;
final class UserCreateInput
{
public function __construct(
#[Input] public readonly string $name,
#[Input] public readonly string $email,
#[Input] public readonly int $age
) {}
}
interface UserCreateInterface
{
#[DbQuery('user_create')]
public function add(UserCreateInput $input): void;
}
Input object properties are automatically expanded to SQL parameters.
-- user_create.sql
INSERT INTO users (name, email, age) VALUES (:name, :email, :age);
This integration enables consistent type-safe data flow from ResourceObject to MediaQuery.
Profiler
Media access is logged by loggers. By default, a memory logger for testing is bound.
public function testAdd(): void
{
$this->sqlQuery->exec('todo_add', $todoRun);
$this->assertStringContainsString(
'query: todo_add({"id":"1","title":"run"})',
(string) $this->log
);
}
You can implement your own MediaQueryLoggerInterface to benchmark each media query or log with injected PSR loggers.
PerformSqlInterface
By implementing PerformSqlInterface, you can completely customize the SQL execution layer. Replace the default execution process with your own implementation to achieve advanced logging, performance monitoring, security controls, and more.
use Exception;
use Ray\MediaQuery\PerformSqlInterface;
final class CustomPerformSql implements PerformSqlInterface
{
public function __construct(
private LoggerInterface $logger
) {}
#[Override]
public function perform(ExtendedPdoInterface $pdo, string $sqlId, string $sql, array $values): PDOStatement
{
$startTime = microtime(true);
// Custom logging
$this->logger->info("Executing SQL: {$sqlId}", [
'sql' => $sql,
'params' => $values
]);
try {
/** @var array<string, mixed> $values */
$statement = $pdo->perform($sql, $values);
// Execution time logging
$executionTime = microtime(true) - $startTime;
$this->logger->info("SQL executed successfully", [
'sqlId' => $sqlId,
'execution_time' => $executionTime
]);
return $statement;
} catch (Exception $e) {
$this->logger->error("SQL execution failed: {$sqlId}", [
'error' => $e->getMessage(),
'sql' => $sql
]);
throw $e;
}
}
}
To use your custom implementation, bind it in the DI container:
use Ray\MediaQuery\PerformSqlInterface;
protected function configure(): void
{
$this->bind(PerformSqlInterface::class)->to(CustomPerformSql::class);
}
SQL Template
You can customize SQL log formatting to include query IDs in the executed SQL, making it easier to identify which queries are running when analyzing slow logs.
Use MediaQuerySqlTemplateModule to customize the SQL log format.
use Ray\MediaQuery\MediaQuerySqlTemplateModule;
protected function configure(): void
{
$this->install(new MediaQuerySqlTemplateModule("-- App: .sql\n"));
}
Available template variables:
{{ id }}: Query ID{{ sql }}: The actual SQL statement
Default template: -- {{ id }}.sql\n{{ sql }}
This feature includes the query ID as a comment in the executed SQL, making it easy to identify which application query was executed when analyzing database slow logs.
-- App: todo_item.sql
SELECT * FROM todo WHERE id = :id
Validation
- You can define resource APIs in the JSON schema.
- You can separate the validation code with
#[Valid],#[OnValidate]attribute. - Please see the form for validation by web form.
JSON Schema
The JSON Schema is the standard for describing and validating JSON objects. @JsonSchema and the resource body returned by the method of annotated resource class are validated by JSON schema.
Install
If you want to validate in all contexts including production, create AppModule, if validation is done only during development, create DevModule and install within it
use BEAR\Resource\Module\JsonSchemaModule; // Add this line
use BEAR\Package\AbstractAppModule;
class AppModule extends AbstractAppModule
{
protected function configure()
{
// ...
$this->install(
new JsonSchemaModule(
$appDir . '/var/json_schema',
$appDir . '/var/json_validate'
)
); // Add this line
}
}
Create directories for the JSON schema files
mkdir var/json_schema
mkdir var/json_validate
In the var/json_schema/, store the JSON schema file which is the specification of the body of the resource, and the var/json_validate/ stores the JSON schema file for input validation.
@JsonSchema annotation
Annotate the method of the resource class by adding @JsonSchema, then add the schema property by specifying the JSON schema file name, which is user.json for this purpose.
schema
src/Resource/App/User.php
use BEAR\Resource\Annotation\JsonSchema; // Add this line
class User extends ResourceObject
{
#[JsonSchema('user.json')]
public function onGet(): static
{
$this->body = [
'firstName' => 'mucha',
'lastName' => 'alfons',
'age' => 12
];
return $this;
}
}
We will create a JSON schema named /var/json_schema/user.json
{
"type": "object",
"properties": {
"firstName": {
"type": "string",
"maxLength": 30,
"pattern": "[a-z\\d~+-]+"
},
"lastName": {
"type": "string",
"maxLength": 30,
"pattern": "[a-z\\d~+-]+"
}
},
"required": ["firstName", "lastName"]
}
key
If the body has an index key, specify it with the key property of the annotation
use BEAR\Resource\Annotation\JsonSchema; // Add this line
class User extends ResourceObject
{
#[JsonSchema(key:'user', schema:'user.json')]
public function onGet()
{
$this->body = [
'user' => [
'firstName' => 'mucha',
'lastName' => 'alfons',
'age' => 12
]
];
return $this;
}
}
params
The params property specifies the JSON schema file name for the argument validation
use BEAR\Resource\Annotation\JsonSchema; // Add this line
class Todo extends ResourceObject
{
#[JsonSchema(key:'user', schema:'user.json', params:'todo.post.json')]
public function onPost(string $title)
We place the JSON schema file
/var/json_validate/todo.post.json
{
"$schema": "http://json-schema.org/draft-04/schema#",
"title": "/todo POST request validation",
"properties": {
"title": {
"type": "string",
"minLength": 1,
"maxLength": 40
}
}
By constantly verifying in a standardized way instead of proprietary documentation, the specification is reliable and understandable to both humans and machines.
target
To apply schema validation to the representation of the resource object (the rendered result) rather than to the body of the ResourceObject, specify the option target='view'.
#[JsonSchema(schema: 'user.json', target: 'view')]
Related Links
Exception Handling
When JSON Schema validation fails, BEAR.Resource (1.33.0+) throws a typed exception that tells you whether the problem was in the request (client error) or the response (server bug):
| Exception | HTTP | Meaning |
|---|---|---|
JsonSchemaRequestException |
400 | Input params failed schema validation |
JsonSchemaResponseException |
500 | Response body failed schema validation |
Both extend JsonSchemaException, so you can catch either specifically or together.
Accessing Structured Errors
$e->getErrors() returns a JsonSchemaErrors collection:
use BEAR\Resource\Exception\JsonSchemaRequestException;
use BEAR\Resource\Exception\JsonSchemaResponseException;
try {
$response = $resource->post('app://self/user', $params);
} catch (JsonSchemaRequestException $e) {
$errors = $e->getErrors(); // JsonSchemaErrors
$errors->count(); // number of violations
$errors->first(); // first JsonSchemaError or null
// Iterate over each error
foreach ($errors as $error) {
echo $error->property; // e.g. "email"
echo $error->message; // human-readable message
}
// Group by field — useful for building API error responses
$byField = $errors->byProperty(); // array<string, list<JsonSchemaError>>
// Bulk format with a template
$text = $errors->format('{property}: {message}\n');
} catch (JsonSchemaResponseException $e) {
// This is a server-side bug: the resource returned data that
// does not match its own declared schema.
error_log((string) $e);
}
Default Framework Behaviour
BEAR.Sunday’s default ThrowableHandler (1.x) already maps JsonSchemaRequestException to a 400 application/vnd.error+json response. No extra setup is needed for API (JSON) contexts.
JSON vs HTML Contexts
The appropriate response format depends on context:
- API / JSON context — return a JSON error body (e.g.
{"code": 400, "message": "..."}) - HTML context — render an HTML error page for browser users
Production apps typically override the default handler for each context. See BEAR.Examples for a reference implementation using AppThrowableHandler (JSON) and HtmlThrowableHandler (HTML), backed by a shared ExceptionStatusMapper.
#[Valid] attribute
The #[Valid] attribute is a validation for input.
You can set up validation as AOP for your method.
By separating validation logic from the method, the code will be readable and testable.
Validation libraries are available such as Aura.Filter, Respect\Validation, and PHP Standard Filter
Install
Install Ray.ValidateModule via composer.
composer require ray/validate-module
Installing ValidateModule in your application module src/Module/AppModule.php.
use Ray\Validation\ValidateModule;
class AppModule extends AbstractAppModule
{
protected function configure()
{
// ...
$this->install(new ValidateModule);
}
}
Attribute
There are three attributes #[Valid], #[OnValidate], #[OnFailure] for validation.
Annotate the method that you want to validate with #[Valid]
use Ray\Validation\Annotation\Valid;
class News
{
#[Valid]
public function createUser($name)
{
Validation will be conducted in the method annotated with #[OnValidate].
The arguments of the method should be the same as the original method. The method name can be anything.
use Ray\Validation\Annotation\OnValidate;
class News
{
#[OnValidate]
public function onValidate($name)
{
$validation = new Validation;
if (! is_string($name)) {
$validation->addError('name', 'name should be string');
}
return $validation;
}
Add validations to your elements by addError() with the element name and error message as parameters, then return the validation object.
When validation fails, the exception Ray\Validation\Exception\InvalidArgumentException will be thrown,
but if you have a method annotated with the #[OnFailure], it will be called, instead of throwing an exception
use Ray\Validation\Annotation\OnFailure;
class News
{
#[OnFailure]
public function onFailure(FailureInterface $failure)
{
// original parameters
list($this->defaultName) = $failure->getInvocation()->getArguments();
// errors
foreach ($failure->getMessages() as $name => $messages) {
foreach ($messages as $message) {
echo "Input '{$name}': {$message}" . PHP_EOL;
}
}
}
In the method annotated with #[OnFailure], you can access the validated messages with $failure->getMessages()
and also you can get the object of the original method with $failure->getInvocation().
Various validation
If you want to have different validations for a class, you can specify the name of the validation like below
use Ray\Validation\Annotation\Valid;
use Ray\Validation\Annotation\OnValidate;
use Ray\Validation\Annotation\OnFailure;
class News
{
#[Valid('foo')]
public function fooAction($name, $address, $zip)
{
#[OnValidate('foo')]
public function onValidateFoo($name, $address, $zip)
{
#[OnFailure('foo')]
public function onFailureFoo(FailureInterface $failure)
{
Other validation
If you need to implement complex validation, you can have another class for validation and inject it.
And then call in the method annotated with the onValidate.
You can also change your validation behavior by context with DI.
Command Line Interface (CLI)
BEAR.Sunday’s Resource Oriented Architecture (ROA) represents all application functionality as URI-addressable resources. This approach allows resources to be accessed through various means, not just through the web.
$ php bin/page.php '/greeting?name=World&lang=fr'
{
"greeting": "Bonjour, World",
"lang": "fr"
}
BEAR.Cli is a tool that converts these resources into native CLI commands and makes them distributable via Homebrew, which uses formula scripts to define installation procedures.
$ greet -n "World" -l fr
Bonjour, World
You can reuse existing application resources as standard CLI tools without writing additional code. Through Homebrew distribution, users can utilize these tools like any other command-line tool, without needing to know they’re powered by PHP or BEAR.Sunday.
Installation
Install using Composer:
composer require bear/cli
Basic Usage
Adding CLI Attributes to Resources
Add CLI attributes to your resource class to define the command-line interface:
use BEAR\Cli\Attribute\Cli;
use BEAR\Cli\Attribute\Option;
class Greeting extends ResourceObject
{
#[Cli(
name: 'greet',
description: 'Say hello in multiple languages',
output: 'greeting'
)]
public function onGet(
#[Option(shortName: 'n', description: 'Name to greet')]
string $name,
#[Option(shortName: 'l', description: 'Language (en, ja, fr, es)')]
string $lang = 'en'
): static {
$greeting = match ($lang) {
'ja' => 'こんにちは',
'fr' => 'Bonjour',
'es' => '¡Hola',
default => 'Hello',
};
$this->body = [
'greeting' => "{$greeting}, {$name}",
'lang' => $lang
];
return $this;
}
}
Generating CLI Commands and Formula
To convert a resource into a command, run the following command with your application name (vendor name and project name):
$ vendor/bin/bear-cli-gen 'MyVendor\MyProject'
# Generated files:
# bin/cli/greet # CLI command
# var/homebrew/greet.rb # Homebrew formula
Note: Homebrew formula is generated only when a GitHub repository is configured.
Command Usage
The generated command provides standard CLI features such as:
Displaying Help
$ greet --help
Say hello in multiple languages
Usage: greet [options]
Options:
--name, -n Name to greet (required)
--lang, -l Language (en, ja, fr, es) (default: en)
--help, -h Show this help message
--version, -v Show version information
--format Output format (text|json) (default: text)
Showing Version Information
$ greet --version
greet version 0.1.0
Basic Usage Examples
# Basic greeting
$ greet -n "World"
Hello, World
# Specify language
$ greet -n "World" -l ja
こんにちは, World
# Short options
$ greet -n "World" -l fr
Bonjour, World
# Long options
$ greet --name "World" --lang es
¡Hola, World
JSON Output
$ greet -n "World" -l ja --format json
{
"greeting": "こんにちは, World",
"lang": "ja"
}
Output Behavior
CLI command output follows these specifications:
- Default output: Displays only the specified field value
--format=jsonoption: Displays full JSON response similar to API endpoint- Error messages: Output to standard error (stderr)
- HTTP status code mapping: Maps to exit codes (0: success, 1: client error, 2: server error)
Distribution
Commands created with BEAR.Cli can be distributed via Homebrew. Formula generation requires the application to be published on GitHub:
1. Local Formula Distribution
For testing development versions:
$ brew install --formula ./var/homebrew/greet.rb
2. Homebrew Tap Distribution
Method for wide distribution using a public repository:
Note: The file name of the formula and the class name inside it are based on the name of the repository. For example, if the GH repository is koriym/greet, then var/homebrew/greet.rb will be generated, which contains the Greet class. In this case, greet will be the name of the tap that is published, but if you want to change it, please change the class name and file name of fomula script.
$ brew tap your-vendor/greet
$ brew install your-vendor/greet
This method is particularly suitable for:
- Open source projects
- Continuous updates provision
Testing Development Version
$ brew install --HEAD ./var/homebrew/greet.rb
$ greet --version
greet version 0.1.0
Stable Release
- Create a tag:
$ git tag -a v0.1.0 -m "Initial stable release" $ git push origin v0.1.0 - Update formula:
class Greet < Formula + desc "Your CLI tool description" + homepage "https://github.com/your-vendor/greet" + url "https://github.com/your-vendor/greet/archive/refs/tags/v0.1.0.tar.gz" + sha256 "..." # Add hash value obtained from the command below + version "0.1.0" head "https://github.com/your-vendor/greet.git", branch: "main" depends_on "php@8.1" depends_on "composer" end
You can add dependencies like databases to the formula as needed. However, it’s recommended to handle database setup and other environment configuration in the bin/setup script.
- Get SHA256 hash:
# Download tarball from GitHub and calculate hash $ curl -sL https://github.com/your-vendor/greet/archive/refs/tags/v0.1.0.tar.gz | shasum -a 256 - Create Homebrew tap:
Create a repository using GitHub CLI(gh) or github.com/new. The public repository name must start with
homebrew-, for examplehomebrew-greet:$ gh auth login $ gh repo create your-vendor/homebrew-greet --public --clone # Or create and clone repository using the web interface $ cd homebrew-greet - Place and publish formula:
$ cp /path/to/project/var/homebrew/greet.rb . $ git add greet.rb $ git commit -m "Add formula for greet command" $ git push - Installation and distribution:
End users can start using the tool with just these commands. PHP environment and dependency package installation are handled automatically, so users don’t need to worry about environment setup:
$ brew tap your-vendor/greet # homebrew- prefix can be omitted $ brew install your-vendor/greet # Ready to use immediately $ greet --version greet version 0.1.0
Formula Customization
You can edit the formula using the brew edit command as needed:
$ brew edit your-vendor/greet
class Greet < Formula
desc "Your CLI tool description"
homepage "https://github.com/your-vendor/greet"
url "https://github.com/your-vendor/greet/archive/refs/tags/v0.1.0.tar.gz"
sha256 "..." # tgz SHA256
version "0.1.0"
depends_on "php@8.4" # Specify PHP version
depends_on "composer"
# Add if required by the application
# depends_on "mysql"
# depends_on "redis"
end
Clean Architecture
BEAR.Cli demonstrates the strengths of both Resource Oriented Architecture (ROA) and Clean Architecture. Following Clean Architecture’s principle that “UI is a detail,” you can add CLI as a new adapter alongside the web interface for the same resource.
Furthermore, BEAR.Cli supports not only command creation but also distribution and updates through Homebrew. This allows end users to start using tools with a single command, treating them as native UNIX commands without awareness of PHP or BEAR.Sunday.
Additionally, CLI tools can be version-controlled and updated independently from the application repository. This means they can maintain stability and continuous updates as command-line tools without being affected by API evolution. This represents a new form of API delivery, realized through the combination of Resource Oriented Architecture and Clean Architecture.
HTML
The following template engines are available for HTML representation.
Twig vs Qiq
Twig was first released in 2009 and has a large user base. Qiq is a new template engine released in 2021.
Twig uses implicit escaping by default and has custom syntax for control structures. In contrast, Qiq requires explicit escaping and uses PHP syntax as the base template language. Twig has a large codebase and rich features, while Qiq is compact and simple. (Using pure PHP syntax in Qiq makes it IDE and static analysis-friendly, although it may be redundant.)
Syntax Comparison
PHP
<?= htmlspecialchars($var, ENT_QUOTES|ENT_DISALLOWED, 'utf-8') ?>
<?= htmlspecialchars(helper($var, ENT_QUOTES|ENT_DISALLOWED, 'utf-8')) ?>
<?php foreach ($users => $user): ?>
* <?= $user->name; ?>
<?php endforeach; ?>
Twig
{{ var | raw }}
{{ var }}
{{ var | helper }}
{% for user in users %}
* {{ user.name }}
{% endfor %}
Qiq
{{% var }}
{{h $var }}
{{h helper($var) }}
{{ foreach($users => $user) }}
* {{h $user->name }}
{{ endforeach }}
{{ var }} // Not displayed
<?php /** @var Template $this */ ?>
<?= $this->h($var) ?>
Renderer
The renderer, bound to RenderInterface and injected into the ResourceObject, generates the representation of the resource. The resource itself is agnostic about its representation.
Since the renderer is injected per resource, it is possible to use multiple template engines simultaneously.
Halo UI for Development
During development, you can render a UI element called Halo 24 around the rendered resource. Halo provides information about the resource’s state, representation, and applied interceptors. It also provides links to open the corresponding resource class or resource template in PHPStorm.

- Halo Home (Border and Tools Display)
- Resource State
- Resource Representation
- Profile
You can try a demo of Halo in the demo.
Performance Monitoring
Halo also displays performance information about the resource, including execution time, memory usage, and a link to the profiler.

Installation
To enable profiling, you need to install xhprof, which helps identify performance bottlenecks.
pecl install xhprof
// Also add 'extension=xhprof.so' to your php.ini file
To visualize and graphically display call graphs, you need to install graphviz. Example: Call Graph Demo
// macOS
brew install graphviz
// Windows
// Download and install the installer from the graphviz website
// Linux (Ubuntu)
sudo apt-get install graphviz
In your application, create a Dev context module and install the HaloModule.
class DevModule extends AbstractModule
{
protected function configure(): void
{
$this->install(new HaloModule($this));
}
}
Form
Ray.WebFormModule provides aspect-oriented web form validation powered by Aura.Input and Ray.Di. Form fields, validation rules, submitted values, and rendering helpers are collected in a single form class so the form is easy to test and change.
Installation
Install ray/web-form-module with Composer.
composer require ray/web-form-module
Install WebFormModule in your application module.
use Ray\Di\AbstractModule;
use Ray\WebFormModule\WebFormModule;
class AppModule extends AbstractModule
{
protected function configure()
{
$this->install(new WebFormModule());
}
}
The legacy Ray\WebFormModule\AuraInputModule class remains available as a thin subclass of WebFormModule for backward compatibility. New code should use WebFormModule.
Form Class
A self-initializing form class defines fields and validation rules in init(). If the form implements submit(), the returned values are used as submitted data. See Aura.Input self-initializing forms for the underlying form API.
use Ray\WebFormModule\AbstractForm;
use Ray\WebFormModule\SetAntiCsrfTrait;
class MyForm extends AbstractForm
{
use SetAntiCsrfTrait;
public function init()
{
$this->setField('name', 'text')
->setAttribs([
'id' => 'name'
]);
$this->filter->validate('name')->is('alnum');
$this->filter->useFieldMessage('name', 'Name must be alphanumeric only.');
}
public function submit()
{
return $_POST;
}
public function __toString()
{
$form = $this->form();
$form .= $this->helper->tag('div', ['class' => 'form-group']);
$form .= $this->helper->tag('label', ['for' => 'name']);
$form .= 'Name:';
$form .= $this->helper->tag('/label') . PHP_EOL;
$form .= $this->input('name');
$form .= $this->error('name');
$form .= $this->helper->tag('/div') . PHP_EOL;
$form .= $this->input('submit');
$form .= $this->helper->tag('/form');
return $form;
}
}
Controller
Annotate methods that require form validation with #[FormValidation]. The form argument names the form property on the controller, and onFailure names the method called when validation fails.
use Ray\Di\Di\Inject;
use Ray\Di\Di\Named;
use Ray\WebFormModule\Annotation\FormValidation;
use Ray\WebFormModule\FormInterface;
class MyController
{
/** @var FormInterface */
protected $contactForm;
#[Inject]
public function setForm(#[Named("contact_form")] FormInterface $form)
{
$this->contactForm = $form;
}
#[FormValidation(form: "contactForm", onFailure: "badRequestAction")]
public function createAction()
{
// validation success
// More detail for vnd.error+json can be added with #[VndError].
}
public function badRequestAction()
{
// validation failed
}
}
View
When the form provides string rendering, echoing the form renders the complete HTML.
echo $form;
You can also render individual inputs and errors.
echo $form->input('name'); // <input id="name" type="text" name="name" size="20" maxlength="20" />
echo $form->error('name'); // "Name must be alphanumeric only." or blank.
CSRF Protections
CSRF protection is opt-in and can be enabled through either of two independent paths:
- Per-form: add
use SetAntiCsrfTrait;to the form.AntiCsrfInterfaceis injected at construction time, the token field is added inpostConstruct(), and everyapply()call verifies the token. - Per-action: annotate the validated method with
#[CsrfProtection].AuraInputInterceptorthen injectsAntiCsrfInterfaceinto the form beforeapply()runs.
Either path causes AbstractForm::apply() to throw CsrfViolationException on token mismatch. Without either path, no CSRF check is performed.
use Ray\WebFormModule\AbstractForm;
use Ray\WebFormModule\Annotation\CsrfProtection;
use Ray\WebFormModule\Annotation\FormValidation;
use Ray\WebFormModule\SetAntiCsrfTrait;
class MyForm extends AbstractForm
{
use SetAntiCsrfTrait;
}
class MyController
{
#[FormValidation(form: "contactForm")]
#[CsrfProtection]
public function createAction()
{
}
}
You can provide a custom AntiCsrf class. See Applying CSRF Protections in Aura.Input for details.
Migration From 0.x
Version 1.0 drops Doctrine Annotations in favor of native PHP 8 attributes and tightens type declarations. The most common rewrites are:
| Before (0.x) | After (1.0) |
|---|---|
@FormValidation(form="f", onFailure="badRequest") |
#[FormValidation(form: 'f', onFailure: 'badRequest')] |
@FormValidation(form="f", antiCsrf=true) |
#[FormValidation(form: 'f')] + #[CsrfProtection] |
@InputValidation(form="f") |
#[InputValidation(form: 'f')] |
@VndError(message="...", logref="...") |
#[VndError(message: '...', logref: '...')] |
new AuraInputInterceptor($injector, $reader) |
new AuraInputInterceptor($injector) |
public function input($input) / public function error($input) |
input(string $input): string / error(string $input): string |
See CHANGELOG.md for the full list of breaking changes.
Automated Migration With Claude Code
Ray.WebFormModule ships a Claude Code skill at .claude/skills/migrate-to-1.0/SKILL.md that walks an AI assistant through the rewrites above: annotations to attributes, antiCsrf=true split into #[CsrfProtection], Reader argument removal, and FormInterface signature updates. Copy that directory into your consuming project’s .claude/skills/ and invoke it with /migrate-to-1.0.
Validation Exception
#[InputValidation] throws Ray\WebFormModule\Exception\ValidationException when validation fails. This is useful for API applications where the HTML representation is not used.
use Ray\WebFormModule\Annotation\InputValidation;
class Foo
{
#[InputValidation(form: "form1")]
public function createAction($name)
{
// ...
}
}
Installing Ray\WebFormModule\FormVndErrorModule makes methods annotated with #[FormValidation] throw the same validation exception on failure.
use Ray\Di\AbstractModule;
use Ray\WebFormModule\FormVndErrorModule;
use Ray\WebFormModule\WebFormModule;
class FakeVndErrorModule extends AbstractModule
{
protected function configure()
{
$this->install(new WebFormModule());
$this->override(new FormVndErrorModule());
}
}
Echo the caught exception’s error property to get an application/vnd.error+json representation.
echo $e->error;
//{
// "message": "Validation failed",
// "path": "/path/to/error",
// "validation_messages": {
// "name": [
// "Name must be alphanumeric only."
// ]
// }
//}
Add more detail to vnd.error+json with the #[VndError] attribute.
#[FormValidation(form: "contactForm")]
#[VndError(message: "foo validation failed", logref: "a1000", path: "/path/to/error", href: ["_self" => "/path/to/error", "help" => "/path/to/help"])]
public function createAction()
{
}
Demo
Run the demo application from the Ray.WebFormModule repository.
php -S docs/demo/1.csrf/web.php
Content Negotiation
In HTTP, Content Negotiation is a mechanism used to provide various versions of resources for the same URL. BEAR.Sunday supports server-side content negotiation of media type ‘Accept’ and ‘Accept-Language’ of language. It can be specified on an application basis or resource basis.
Install
Install BEAR.Accept with composer
composer require bear/accept
Next, save the context corresponding to the Accept * request header in /var/locale/available.php
<?php
return [
'Accept' => [
'text/hal+json' => 'hal-app',
'application/json' => 'app',
'cli' => 'cli-hal-app'
],
'Accept-Language' => [ // lower case for key
'ja-jp' => 'ja',
'ja' => 'ja',
'en-us' => 'en',
'en' => 'en'
]
];
The Accept key array specifies an array whose context is a value with the media type as a key. cli is not used in web access in the context of console access.
The Accept-Language key array specifies an array with the context key as the key for the language.
Enable by Application
Change public/index.php to enable content negotiation throughout the application.
<?php
use BEAR\Accept\Accept;
require dirname(__DIR__) . '/vendor/autoload.php';
$accept = new Accept(require dirname(__DIR__) . '/var/locale/available.php');
list($context, $vary) = $accept($_SERVER);
require dirname(__DIR__) . '/bootstrap/bootstrap.php';
For example, in the above setting, the access context of the following Accept* header will be prod-hal-ja-app.
Accept: application/hal+json
Accept-Language: ja-JP
At this time JaModule requires binding for Japanese text. For details, refer to the demo application MyVendor.Locale.
Enable by Resource
To do content negotiation on a resource basis, install the AcceptModule module and use the #[Produces] attribute.
Module Install
protected function configure()
{
// ...
$available = $appDir . '/var/locale/available.php';
$this->install(new AcceptModule($available));
}
#[Produces] Attribute
use BEAR\Accept\Attribute\Produces;
#[Produces(['application/hal+json', 'text/csv'])]
public function onGet()
Specify available media types from left by priority. The representation (JSON or HTML) is changed by the contextual renderer. You do not need to add Vary header manually unlike application level content-negotiation.
Access using curl
Specify the Accept* header with the -H option.
curl -H 'Accept-Language: en' http://127.0.0.1:8080/
curl -i -H 'Accept-Language: en' -H 'Accept: application/hal+json' http://127.0.0.1:8080/
HTTP/1.1 200 OK
Host: 127.0.0.1:8080
Date: Fri, 11 Aug 2017 08:32:33 +0200
Connection: close
X-Powered-By: PHP/7.1.4
Vary: Accept, Accept-Language
content-type: application/hal+json
{
"greeting": "Hello BEAR.Sunday",
"_links": {
"self": {
"href": "/index"
}
}
}
Hypermedia API
HAL
BEAR.Sunday supports the HAL hypermedia (application/hal+json) API.
The HAL resource model consists of the following elements:
- Link
- Embedded resources
- State
HAL is the JSON which represents only the state of the conventional resource plus the link _links plus _embedded to embed other resources. HAL makes API searchable and can find its API document from the API itself.
Links
Resources should have a self URI
{
"_links": {
"self": { "href": "/user" }
}
}
Link Relations
Link rels are the main way of distinguishing between a resource’s links.
There is a rel (relation) on the link, and it shows how the relationship is linked. It is similar to the rel used in the HTML <link> and <a> tag.
{
"_links": {
"next": { "href": "/page=2" }
}
}
For more information about HAL please visit http://stateless.co/hal_specification.html.
Resource Class
You can annotate links and embed other resources.
#[Link]
You can declaratively describe the @Link annotation, or dynamic ones are assigned to body['_links'].
#[Link(rel="user", href="/user")]
#[Link(rel="latest-post", href="/latest-post", title="latest post entrty")]
public function onGet()
or
public function onGet() {
if ($hasCommentPrivilege) {
$this->body += [
'_links' => [
'comment' => [
'href' => '/comments/{post-id}',
'templated' => true
]
]
];
}
}
#[Embed]
To embed other resources statically, use the @Embed annotation, and to embed it dynamically, assign the “request” to body.
#[Embed(rel="todos", src="/todos{?status}")]
#[Embed(rel="me", src="/me")]
public function onGet(string $status): static
or
$this->body['_embedded']['todos'] = $this->resource->uri('app://self/todos');
API document service
The API server can also be an API document server. It solves problems such as the time required to create the API document, deviation from actual API, verification, maintenance.
In order for it to be on service, install bear/api-doc and install it by inheriting the BEAR\ApiDoc\ApiDoc page class
composer require bear/api-doc
<?php
namespace MyVendor\MyPorject\Resource\Page\Rels;
use BEAR\ApiDoc\ApiDoc;
class Index extends ApiDoc
{
}
Publish the folder of JSON Schema to the web
ln -s var/json_schema public/schemas
API documents are automatically generated using Docblock comments and JSON Schema. The page class has its own renderer and is not affected by $context, it serves a document (text/html) for people. Since it is not affected by $context, you can install either App or Page.
If CURIEs is installed at the root, the API itself can be used even for raw JSON which is not hypermedia. Documents generated in real time always accurately reflect property information and validation constraints.
Run demo
git clone https://github.com/koriym/Polidog.Todo.git
cd Polidog.Todo/
composer install
composer setup
composer doc
Open docs/index.md to see API doc page.
Browsable
The API set written in HAL functions as headless REST application.
You can access all the resources by following the link from the root like the website with the Web-based HAL Browser or the CURL command of the console.
HAL Layout Beta
Libraries for rendering HAL resources as React/Vue components:
- hal-layout - React
- hal-layout-vue - Vue 3
Siren
Siren Module is also available for Siren hypermedia (application/vnd.siren+json) type.
PSR-7
You can get server side request information using PSR7 HTTP message interface. Also, you can run BEAR.Sunday application as PSR 7 middleware.
HTTP Request
PHP has Superglobals such as $_SERVER and $_COOKIE, but instead of using them it receives server side request information using the PSR-7 HTTP message interface.
ServerRequest (general)
class Index extends ResourceObject
{
public function __construct(ServerRequestInterface $serverRequest)
{
// retrieve cookies
$cookie = $serverRequest->getCookieParams(); // $_COOKIE
}
}
Upload Files
use Psr\Http\Message\UploadedFileInterface;
use Ray\HttpMessage\Annotation\UploadFiles;
class Index extends ResourceObject
{
/**
* @UploadFiles
*/
public function __construct(array $files)
{
// retrieve file name
$file = $files['my-form']['details']['avatar'][0]
/* @var UploadedFileInterface $file */
$name = $file->getClientFilename(); // my-avatar3.png
}
}
URI
use Psr\Http\Message\UriInterface;
class Index extends ResourceObject
{
public function __construct(UriInterface $uri)
{
// retrieve host name
$host = $uri->getHost();
}
}
PSR-7
An existing BEAR.Sunday application can work as a PSR-7 middleware with these easy steps:
1) Add bear/middleware package then replace bootstrap.php script.
composer require bear/middleware
cp vendor/bear/middleware/bootstrap/bootstrap.php bootstrap/bootstrap.php
2) Replace __PACKAGE__\__VENDOR__ in bootstrap.php to application namespace.
Stat the server.
php -S 127.0.0.1:8080 -t public
Stream
BEAR.Sunday supports HTTP body of a message output in a stream.
In ResourceObject, you can mix stream with a normal string. The output is converted to a single stream.
StreamTransfer is the default HTTP transfer. Seem more at Stream Response.
New Project
You can also create a BEAR.Sunday PSR-7 project with bear/project from scratch.
composer create-project bear/project my-psr7-project
cd my-psr7-project/
php -S 127.0.0.1:8080 -t public
PSR-7 middleware
JavaScript SSR
Instead of rendering views with PHP template engines such as Twig, this module enables server-side JavaScript rendering. PHP handles authorization, authentication, initial state, and API delivery, while JavaScript renders the UI. Only resources with the #[Ssr] attribute are affected, making adoption straightforward within existing projects.
Background and Use Cases
This module was developed to enable JavaScript server-side rendering (SSR) within PHP applications.
Today, JavaScript ecosystem frameworks like Next.js, Nuxt, and Remix provide mature solutions for SSR entirely within JavaScript. For new projects with JavaScript-centric UIs, these frameworks are typically the preferred choice.
This module is suited for the following scenarios:
- Rendering most pages with your existing template engine, while using JS UI only for pages requiring high interactivity
- Adding React or Vue.js UI to specific pages in an existing BEAR.Sunday project
- Maintaining a single PHP application without separating frontend and backend
- Enabling PHP and JS teams to develop in parallel using
state/metasas the contract
Only resources with the #[Ssr] attribute are rendered with JS UI, allowing easy coexistence with traditional template engines.
Prerequisites
Note: If you do not install V8Js then JS will be run using Node.js.
JavaScript
Installation
Install bear/ssr-module into the project.
// composer create-project bear/skeleton MyVendor.MyProject && cd MyVendor.MyProject;
composer require bear/ssr-module
Install the UI skeleton app koriym/js-ui-skeleton.
composer require koriym/js-ui-skeleton 1.x-dev
cp -r vendor/koriym/js-ui-skeleton/ui .
cp -r vendor/koriym/js-ui-skeleton/package.json .
npm install
Running the UI application
Lets start by running the demo application. From the displayed web page lets select the rendering engine and run the JS application.
npm run ui
This applications inputs can be set using the ui/dev/config/ config files.
<?php
$app = 'index'; // =index.bundle.js
$state = [ // Application state
'hello' =>['name' => 'World']
];
$metas = [ // value used in SSR only
'title' =>'page-title'
];
return [$app, $state, $metas];
Lets copy the configuration file and try changing the input values.
cp ui/dev/config/index.php ui/dev/config/myapp.php
Reload the browser and try out the new settings.
In this way without changing the JavaScript or core PHP application we can alter the UI data and check that it is working.
The PHP configuration files that have been edited in this section are only used when executing npm run ui.
All the PHP side needs is the output bundled JS file.
Creating the UI application.
Using the variables that have been passed in from PHP, create a render function that returns a rendered string.
const render = (state, metas) => (
__AWESOME_UI__ // Using a SSR compatible library or JS template engine return an output string.
)
The state value is needed in the document root, metas contains other variables, such as those needed in <head>. The render function name cannot be changed.
Here we can grab the name and create a greeting string to be returned.
const render = state => (
`Hello ${state.name}`
)
Save this as ui/src/page/hello/server.js and register this as a Webpack entry point in ui/entry.js.
module.exports = {
hello: 'src/page/hello/server',
};
Having done this a hello.bundle.js bundled file is created for us.
Create a file at ui/dev/config/myapp.php to test run this application.
<?php
$app = 'hello';
$state = ['name' => 'World'];
$metas = [];
return [$app, $state, $metas];
Thats it! Reload the browser to try it out.
Inside the render function you can use any UI framework such as React or Vue.js to create a rich UI.
In a regular application in order to limit the number of dependencies in the server.js entry file import the render module as below.
import render from './render';
global.render = render;
Thus far there has been nothing happening on the PHP side. Development on the SSR application and PHP development can done independently.
PHP
Module Installation
Install SsrModule in AppModule.
<?php
use BEAR\SsrModule\SsrModule;
class AppModule extends AbstractAppModule
{
protected function configure()
{
// ...
$build = dirname(__DIR__, 2) . '/var/www/build';
$this->install(new SsrModule($build));
}
}
The $build directory is where the JS files live.(The Webpack output location set in ui/ui.config.js)
#[Ssr] Attribute
Annotate the resource function to be SSR’d with #[Ssr]. The JS application name is required in app.
<?php
namespace MyVendor\MyRedux\Resource\Page;
use BEAR\Resource\ResourceObject;
use BEAR\SsrModule\Annotation\Ssr;
class Index extends ResourceObject
{
#[Ssr(app: 'index_ssr')]
public function onGet(string $name = 'BEAR.Sunday'): static
{
$this->body = [
'hello' => ['name' => $name]
];
return $this;
}
}
When you want to pass in distinct values for SSR and CSR set a key in state and metas.
#[Ssr(app: 'index_ssr', state: ['name', 'age'], metas: ['title'])]
public function onGet(): static
{
$this->body = [
'name' => 'World',
'age' => 4.6E8,
'title' => 'Age of the World'
];
return $this;
}
To see exactly how you pass in state and metas to achieve SSR see the sample application ui/src/page/index/server. The only influence is from the annotated method, the rest comes straight from the API or HTML rendering configuration.
Runtime PHP Application Settings
Edit ui/ui.config.js, set the Webpack build location in build and web directory in public. The build directory is the same that you set in the SsrModule installation.
const path = require('path');
module.exports = {
public: path.join(__dirname, '../var/www'),
build: path.join(__dirname, '../var/www/build')
};
Running the PHP application
npm run dev
Run using live updating.
When the PHP file is changed it will be automatically reloaded, if there is a change in a React component without hitting refresh the component will update. If you want to run the app without live updating you can by running npm run start.
For other commands such lint or test etc. please see commands.
Performance
The V8 snapshot can be saved to APCu for improved performance. Install ApcSsrModule in ProdModule. V8Js is required:
$bundleSrcBasePath = dirname(__DIR__, 2) . '/var/www/build';
$this->install(new ApcSsrModule($bundleSrcBasePath));
The $bundleSrcBasePath is the directory path where the JavaScript bundle files are located.
Stream Response
Normally, resources are rendered by renderers into one string and finally echoed out, but then you cannot output content whose size exceeds the memory limit of PHP. With StreamRenderer you can stream HTTP output and you can output large size content while keeping memory consumption low. Stream output can also be used in coexistence with existing renderers.
Change Transferer and Renderer
Use the StreamTransferInject trait on the page to render and respond to the stream output. In the example of this download page, since $body is made to be a resource variable of the stream, the injected renderer is ignored and the resource is streamed.
use BEAR\Streamer\StreamTransferInject;
class Download extends ResourceObject
{
use StreamTransferInject;
public $headers = [
'Content-Type' => 'image/jpeg',
'Content-Disposition' => 'attachment; filename="image.jpg"'
];
public function onGet(): static
{
$fp = fopen(__DIR__ . '/BEAR.jpg', 'r');
$this->body = $fp;
return $this;
}
}
With Renderers
Stream output can coexist with conventional renderers. Normally, Twig renderers and JSON renderers generate character strings, but when a stream is assigned to a part of it, the whole is output as a stream.
This is an example of assigning a string and a resource variable to the Twig template and generating a page of inline image.
Template
<!DOCTYPE html>
<html lang="en">
<body>
<p>Hello, {{ name }}</p>
<img src="data:image/jpg;base64,{{ image }}">
</body>
</html>
name assigns the string as usual, but assigns the resource variable of the image file’s pointer resource to image with the base64-encode filter.
class Image extends ResourceObject
{
use StreamTransferInject;
public function onGet(string $name = 'inline image'): static
{
$fp = fopen(__DIR__ . '/image.jpg', 'r');
stream_filter_append($fp, 'convert.base64-encode'); // image base64 format
$this->body = [
'name' => $name,
'image' => $fp
];
return $this;
}
}
If you want to further control streaming such as streaming bandwidth and timing control, uploading to the cloud, etc use StreamResponder which is build for it.
The demo is available at MyVendor.Stream.
This document needs to be proofread by native speaker.
Cache
There are only two hard things in Computer Science: cache invalidation and naming things.
– Phil Karlton
Overview
A good caching system fundamentally improves the quality of user experience and reduces resource utilization costs and environmental impact. BEAR.Sunday supports the following caching features in addition to traditional simple TTL-based caching:
- Event-driven cache invalidation
- Cache dependency resolution
- Donut cache and donut hole cache
- CDN control
- Conditional requests
Distributed Cache Framework
A distributed caching system that follows REST constraints saves not only computational resources but also network resources. BEAR.Sunday provides a caching framework that integrates server-side caches (such as Redis and APC handled directly by PHP), shared caches (known as content delivery networks - CDNs), and client-side caches (cached by web browsers and API clients) with modern CDNs.

Tag-based Cache Invalidation

Content caching has dependency issues. If content A depends on content B, and B depends on C, then when C is updated, not only must C’s cache and ETag be updated, but also B’s cache and ETag (which depends on C), and A’s cache and ETag (which depends on B).
BEAR.Sunday solves this problem by having each resource hold the URI of dependent resources as tags. When a resource embedded with #[Embed] is modified, the cache and ETag of all related resources are invalidated, and cache regeneration occurs for the next request.
Donut Cache

Donut caching is a partial caching technique for cache optimization. It separates content into cacheable and non-cacheable parts and combines them for output.
For example, consider content containing a non-cacheable resource like “Welcome to $name”. The non-cacheable (do-not-cache) part is combined with other cacheable parts for output.

In this case, since the entire content is dynamic, the whole donut is not cached. Therefore, no ETag is output either.
Donut Hole Cache

When the donut hole part is cacheable, it can be handled the same way as donut cache. In the example above, a weather forecast resource that changes once per hour is cached and included in the news resource.
In this case, since the donut content as a whole (news) is static, the entire content is also cached and given an ETag. This creates cache dependency. When the donut hole content is updated, the entire cached donut needs to be regenerated.
This dependency resolution happens automatically. To minimize computational resources, the donut part computation is reused. When the hole part (weather resource) is updated, the cache and ETag of the entire content are also automatically updated.
Recursive Donut

The donut structure is applied recursively. For example, if A contains B and B contains C, when C is modified, A’s cache and B’s cache are reused except for the modified C part. A’s and B’s caches and ETags are regenerated, but database access for A and B content retrieval and view rendering are not performed.
The optimized partial cache structure performs content regeneration with minimal cost. Clients don’t need to know about the content cache structure.
Event-Driven Content
Traditionally, CDNs considered content requiring application logic as “dynamic” and therefore not cacheable by CDNs. However, some CDNs like Fastly and Akamai now support immediate or tag-based cache invalidation within seconds, making this thinking obsolete.
BEAR.Sunday dependency resolution works not only server-side but also on shared caches. When AOP detects changes and makes PURGE requests to shared caches, related cache invalidation occurs on shared caches just like server-side.
Conditional Requests

Content changes are managed by AOP, and content entity tags (ETags) are automatically updated. HTTP conditional requests using ETags not only minimize computational resource usage, but responses returning only 304 Not Modified also minimize network resource usage.
Usage
For classes to be cached, use the #[DonutCache] attribute for donut cache (when embedded content is not cacheable), and #[CacheableResponse] for other cases:
use BEAR\RepositoryModule\Annotation\CacheableResponse;
#[CacheableResponse]
class BlogPosting extends ResourceObject
{
public $headers = [
RequestHeader::CACHE_CONTROL => CacheControl::NO_CACHE
];
#[Embed(rel: "comment", src: "page://self/html/comment")]
public function onGet(int $id = 0): static
{
$this->body['article'] = 'hello world';
return $this;
}
public function onDelete(int $id = 0): static
{
return $this;
}
}
recursive donut
The donut structure will be recursively applied. For example, if A contains B and B contains C and C is modified, A’s cache and B’s cache will be reused except for the modified C. A’s and B’s caches and ETags will be regenerated, but DB access to retrieve A’s and B’s content and rendering of views will not be done.
The optimized structure of the partial cache performs content regeneration with minimal cost. The client does not need to know about the content cache structure.
Event-driven content
Traditionally, CDNs have believed that content that requires application logic is “dynamic” and therefore cannot be cached by a CDN. However, some CDNs, such as Fastly and Akamai, allow immediate or tag-based cache invalidation within seconds, this idea is a thing of the past.
Sunday dependency resolution is done not only on the server side, but also on the shared cache; when AOP detects a change and makes a PURGE request to the shared cache, the related cache on the shared cache will be invalidated, just like on the server side.
Conditional request

Content changes are managed by AOP, and the entity tag (ETag) of the content is automatically updated. conditional requests for HTTP using ETag not only minimize the use of computational resources, but responses that only return 304 Not Modified also minimize the use of network resources. Conditional HTTP requests using ETag not only minimize the use of computational resources, but also minimize the use of network resources by simply returning 304 Not Modified.
Usage
Give the class to be cached the attribute #[DonutCache] if it is a donut cache (embedded content is not cacheable) and #[CacheableResponse] otherwise.
class Todo extends ResourceObject
{
#[CacheableResponse]
public function onPut(int $id = 0, string $todo): static
{
}
#[RefreshCache]
public function onDelete(int $id = 0): static
{
}
}
If you give attributes in either way, all the features introduced in the overview will apply. Caching is not disabled by time (TTL) by default, assuming event-driven content
Note that with #[DonutCache] the whole content will not be cached, but with #[CacheableResponse] it will be.
TTL
TTL is specified with DonutRepositoryInterface::put().
ttl is the cache time for non-donut holes, sMaxAge is the cache time for CDNs.
use BEAR\RepositoryModule\Annotation\CacheableResponse;
#[CacheableResponse]
class BlogPosting extends ResourceObject
{
public function __construct(private DonutRepositoryInterface $repository)
{}
#[Embed(rel: "comment", src: "page://self/html/comment")]
public function onGet(): static
{
// process ...
$this->repository->put($this, ttl:10, sMaxAge:100);
return $this;
}
}
Default TTL value
For event-driven content, changes to the content must be reflected immediately in the cache, so the default TTL varies depending on the CDN module installed. Therefore, the default TTL will vary depending on the CDN module installed: indefinitely (1 year) if the CDN supports tag-based disabling of caching, or 10 seconds if it does not.
The expected cache reflection time is immediate for Fastly, a few seconds for Akamai, and 10 seconds for others.
To customize it, bind it by implementing CdnCacheControlHeaderSetterInterface with reference to CdnCacheControlHeader.
Cache invalidation
Use the methods of DonutRepositoryInterface to manually invalidate the cache.
This will invalidate not only the specified cache, but also the cache of the ETag, any other resources it depends on, and the cache of the ETag on the server side and, if possible, on the CDN.
interface DonutRepositoryInterface
{
public function purge(AbstractUri $uri): void;
public function invalidateTags(array $tags): void;
}
Invalidate by URI
// example
$this->repository->purge(new Uri('app://self/blog/comment'));
Disable by tag
$this->repository->invalidateTags(['template_a', 'campaign_b']);
Tag Invalidation in CDN
In order to enable tag-based cache invalidation in CDN, you need to implement and bind PurgerInterface.
use BEAR\QueryRepository\PurgerInterface;
interface PurgerInterface
{
public function __invoke(string $tag): void;
}
Specify dependent tags.
Use the SURROGATE_KEY header to specify the key for PURGE. Use a space as a separator for multiple strings.
use BEAR\QueryRepository\Header;
class Foo
{
public $headers = [
Header::SURROGATE_KEY => 'template_a campaign_b'
];
If the cache is invalidated by template_a or campaign_b tags, Foo’s cache and Foo’s ETag will be invalidated both server-side and CDN.
Resource Dependencies.
Use UriTagInterface to convert a URI into a dependency tag string.
public function __construct(private UriTagInterface $uriTag)
{}
$this->headers[Header::SURROGATE_KEY] = ($this->uriTag)(new Uri('app://self/foo'));
This cache will be invalidated both server-side and CDN when app://self/foo is modified.
Make associative array a resource dependency.
// bodyの内容
[
['id' => '1', 'name' => 'a'],
['id' => '2', 'name' => 'b'],
]
If you want to generate a list of dependent URI tags from a body associative array like the above, you can specify the URI template with the fromAssoc() method.
$this->headers[Header::SURROGATE_KEY] = $this->uriTag->fromAssoc(
uriTemplate: 'app://self/item{?id}',
assoc: $this->body
);
In the above case, this cache will be invalidated for both server-side and CDN when app://self/item?id=1 and app://self/item?id=2 are changed.
Configuration
Redis Marshaller
The Redis cache adapter allows you to configure data compression and serialization methods.
A marshaller handles the serialization of PHP objects and arrays when storing them in Redis, and deserialization when retrieving them.
use BEAR\QueryRepository\StorageRedisDsnModule;
$this->install(
new StorageRedisDsnModule(
dsn: 'redis://localhost:6379',
marshallingOptions: [
'enabled' => true,
'type' => 'deflate', // 'default' or 'deflate'
'use_igbinary' => true // requires ext-igbinary
]
)
);
Marshaller types:
default: Uses PHP’s standard serialization (enablinguse_igbinaryuses a more efficient binary format)deflate: Compresses data before storing (uses zlib)
Use deflate if you want to reduce Redis memory usage. This is a trade-off with CPU usage.
CDN
If you install a module that supports a specific CDN, vendor-specific headers will be output.
$this->install(new FastlyModule())
$this->install(new AkamaiModule())
Multi-CDN
You can also configure a multi-tier CDN and set the TTL according to the role. For example, in this diagram, a multi-functional CDN is placed upstream, and a conventional CDN is placed downstream. Content invalidation is done for the upstream CDN, and the downstream CDN uses it.

Response headers
Sunday will automatically do the cache control for the CDN and output the header for the CDN. Client cache control is described in $header of ResourceObject depending on the content.
This section is important for security and maintenance purposes.
Make sure to specify the Cache-Control in all ResourceObjects.
Cannot cache
Always specify content that cannot be cached.
ResponseHeader::CACHE_CONTROL => CacheControl::NO_STORE
Conditional requests
Check the server for content changes before using the cache. Server-side content changes will be detected and reflected.
ResponseHeader::CACHE_CONTROL => CacheControl::NO_CACHE
Specify client cache time.
The client is cached on the client. This is the most efficient cache, but server-side content changes will not be reflected at the specified time.
Also, this cache is not used when the browser reloads. The cache is used when a transition is made with the <a> tag or when a URL is entered.
ResponseHeader::CACHE_CONTROL => 'max-age=60'
If response time is important to you, consider specifying SWR.
ResponseHeader::CACHE_CONTROL => 'max-age=30 stale-while-revalidate=10'
In this case, when the max-age of 30 seconds is exceeded, the old cached (stale) response will be returned for up to 10 seconds, as specified in the SWR, until a fresh response is obtained from the origin server. This means that the cache will be updated sometime between 30 and 40 seconds after the last cache update, but every request will be a response from the cache and will be fast.
RFC7234 compliant clients
To use the client cache with APIs, use an RFC7234 compliant API client.
- iOS NSURLCache
- Android HttpResponseCache
- PHP guzzle-cache-middleware
- JavaScript(Node) cacheable-request
- Go lox/httpcache
- Ruby faraday-http-cache
- Python requests-cache
private
Specify private if you do not want to share the cache with other clients. The cache will be saved only on the client side. In this case, do not specify the cache on the server side.
ResponseHeader::CACHE_CONTROL => 'private, max-age=30'
Even if you use shared cache, you don’t need to specify
publicin most cases.
Cache design
APIs (or content) can be divided into two categories: Information APIs (Information APIs) and Computation APIs (Computation APIs). The Computation API is content that is difficult to reproduce and is truly dynamic, making it unsuitable for caching. The Information API, on the other hand, is an API for content that is essentially static, even if it is read from a DB and processed by PHP.
It analyzes the content in order to apply the appropriate cache.
- Information API or Computation API?
- Dependencies are
- Are the comprehension relationships
- Is the invalidation triggered by an event or TTL?
- Is the event detectable by the application or does it need to be monitored?
- Is the TTL predictable or unpredictable?
Consider making cache design a part of the application design process and make it a specification. It should also contribute to the safety of your project throughout its lifecycle.
Adaptive TTL
Adaptive TTL is the ability to predict the lifetime of content and correctly tell the client or CDN when it will not be updated by an event during that time. For example, when dealing with a stock API, if it is Friday night, we know that the information will not be updated until the start of trading on Monday. We calculate the number of seconds until that time, specify it as the TTL, and then specify the appropriate TTL when it is time to trade.
The client does not need to request a resource that it knows will not be updated.
#[Cacheable].
The traditional ##[Cacheable] TTL caching is also supported.
Example: 30 seconds cache on the server side, 30 seconds cache on the client.
The same number of seconds will be cached on the client side since it is specified on the server side.
The same number of seconds will be cached on the client side. use BEAR\RepositoryModule\Annotation\Cacheable;
#[Cacheable(expirySecond: 30)]] class CachedResource extends ResourceObject {
Example: Cache the resource on the server and client until the specified expiration date (the date in `$body['expiry_at']`)
```php?start_inline
use BEAR\RepositoryModule\Annotation\Cacheable;
#[Cacheable(expiryAt: 'expiry_at')]]
class CachedResource extends ResourceObject
{
```.
See the [HTTP Cache](https://bearsunday.github.io/manuals/1.0/ja/http-cache.html) page for more information.
## Conclusion
Web content can be of the information (data) type or the computation (process) type. Although the former is essentially static, it is difficult to treat it as completely static content due to the problems of managing content changes and dependencies, so the cache was invalidated by TTL even though no content changes occurred. Sunday's caching framework treats information type content as static as possible, maximizing the power of the cache.
## Terminology
* [条件付きリクエスト](https://developer.mozilla.org/ja/docs/Web/HTTP/Conditional_requests)
* [ETag (バージョン識別子)](https://developer.mozilla.org/ja/docs/Web/HTTP/Headers/ETag)
* [イベントドリブン型コンテンツ](https://www.fastly.com/blog/rise-event-driven-content-or-how-cache-more-edge)
* [ドーナッツキャッシュ / 部分キャッシュ](https://www.infoq.com/jp/news/2011/12/MvcDonutCaching/)
* [サロゲートキー / タグベースの無効化](https://docs.fastly.com/ja/guides/getting-started-with-surrogate-keys)
* ヘッダー
* [Cache-Control](https://developer.mozilla.org/ja/docs/Web/HTTP/Headers/Cache-Control)
* [CDN-Cache-Control](https://blog.cloudflare.com/cdn-cache-control/)
* [Vary](https://developer.mozilla.org/ja/docs/Web/HTTP/Headers/Vary)
* [Stale-While-Revalidate (SWR)](https://www.infoq.com/jp/news/2020/12/ux-stale-while-revalidate/)
***
# High-Performance Servers
BEAR.Sunday applications can run on high-performance PHP servers that eliminate per-request bootstrap overhead. This guide covers three server options: Swoole, RoadRunner, and FrankenPHP.
## Overview
In traditional PHP-FPM, each request bootstraps the entire application:
```text
Request -> Boot Framework -> Route -> Execute -> Response -> Shutdown
Request -> Boot Framework -> Route -> Execute -> Response -> Shutdown
Request -> Boot Framework -> Route -> Execute -> Response -> Shutdown
With persistent worker mode, the application boots once:
Boot Framework (once)
|
Request -> Route -> Execute -> Response
Request -> Route -> Execute -> Response
Request -> Route -> Execute -> Response
This eliminates boot overhead, resulting in significantly lower latency and higher throughput.
BEAR.Sunday’s stateless resource design and immutable architecture are well-suited for persistent worker environments, enabling seamless transition to worker mode without global state issues.
Server Comparison
| Feature | Swoole | RoadRunner | FrankenPHP |
|---|---|---|---|
| Language | C + PHP | Go + PHP | Go + PHP |
| Worker Mode | Yes | Yes | Yes |
| HTTP/2 | Yes | Yes | Yes |
| HTTP/3 | No | No | Yes |
| WebSocket | Native | Native | Via Caddy |
| Coroutines | Yes | No | No |
| Hot Reload | Manual | Yes | Yes |
| Memory Limit | Shared | Per worker | Per worker |
Quick Start with Docker
The bear-sunday-servers repository provides ready-to-use Docker configurations for all three servers.
git clone https://github.com/bearsunday/bear-sunday-servers.git
cd bear-sunday-servers
# Swoole (port 8081)
cd swoole && docker compose up -d && curl http://localhost:8081/
# RoadRunner (port 8082)
cd roadrunner && docker compose up -d && curl http://localhost:8082/
# FrankenPHP (port 8080)
cd frankenphp && docker compose up -d && curl http://localhost:8080/
Swoole
Swoole is a coroutine-based PHP extension providing event-driven asynchronous I/O.
Features
- Event-Driven: Asynchronous I/O handling
- Coroutines: Concurrent request processing without threads
- Request Isolation: Coroutine-context request isolation
- High Performance: Eliminates per-request boot overhead
- Memory Efficient: Shared memory between workers
Install
Swoole Extension (ext-swoole ^6.1)
pecl install swoole
Or compile from source:
git clone https://github.com/swoole/swoole-src.git && \
cd swoole-src && \
phpize && \
./configure && \
make && make install
Add extension=swoole.so to your php.ini.
BEAR.Swoole Package
composer require bear/swoole
Bootstrap Script
Create bin/swoole.php:
<?php
declare(strict_types=1);
require dirname(__DIR__) . '/autoload.php';
$bootstrap = dirname(__DIR__) . '/vendor/bear/swoole/bootstrap.php';
$context = getenv('BEAR_CONTEXT') ?: 'prod-hal-app';
$ip = getenv('SWOOLE_IP') ?: '0.0.0.0';
$port = (int) (getenv('SWOOLE_PORT') ?: 8080);
exit((require $bootstrap)(
$context,
'MyVendor\MyProject',
$ip,
$port
));
Run
php bin/swoole.php
Swoole http server is started at http://127.0.0.1:8080
Environment Variables
| Variable | Default | Description |
|---|---|---|
BEAR_CONTEXT |
prod-hal-app | BEAR.Sunday context |
SWOOLE_IP |
0.0.0.0 | Server bind address |
SWOOLE_PORT |
8080 | Server port |
Architecture
Master Process
|
+-- Manager Process
|
+-- Worker 1 (coroutines)
+-- Worker 2 (coroutines)
+-- Worker N (coroutines)
Each worker can handle multiple concurrent requests using coroutines.
Development Notes
Xdebug is not fully compatible with Swoole’s coroutines. For debugging:
- Use
var_dump()/error_log()for simple debugging - Or disable Swoole and use PHP’s built-in server with Xdebug
Swoole does not support automatic hot reload. Restart after code changes:
# With Docker
docker compose restart
# Without Docker
pkill -f swoole.php && php bin/swoole.php
Parallel Execution
Swoole server involves two independent concerns:
- Server: How to run the application (this page)
- Parallel Execution: How to execute embedded resources concurrently
With BEAR.Async, #[Embed] resources are automatically executed in parallel using Swoole coroutines. See Parallel Resource Execution for details.
RoadRunner
RoadRunner is a high-performance Go application server with PSR-7 PHP workers.
Features
- Go Application Server: High-performance process manager
- PSR-7 Workers: Standard HTTP message interface
- Built-in Metrics: Prometheus-compatible endpoint
- Hot Reload: Automatic worker restart on file changes
Install
RoadRunner Binary
Download from releases or use Docker.
PHP Dependencies
composer require spiral/roadrunner-http nyholm/psr7
Configuration
Create .rr.yaml:
version: "3"
server:
command: "php bin/worker.php"
relay: pipes
http:
address: "0.0.0.0:8082"
pool:
num_workers: 4
max_jobs: 1000
allocate_timeout: 60s
destroy_timeout: 60s
logs:
mode: production
level: info
output: stdout
status:
address: "0.0.0.0:2112"
Worker Script
Create bin/worker.php:
<?php
declare(strict_types=1);
use BEAR\Resource\ResourceObject;
use BEAR\Sunday\Extension\Application\AppInterface;
use MyVendor\MyProject\Injector;
use MyVendor\MyProject\Module\App;
use Nyholm\Psr7\Factory\Psr17Factory;
use Psr\Http\Message\ServerRequestInterface;
use Spiral\RoadRunner\Http\PSR7Worker;
use Spiral\RoadRunner\Worker;
require dirname(__DIR__) . '/autoload.php';
// Get configuration from environment
$context = getenv('BEAR_CONTEXT') ?: 'prod-hal-app';
$maxRequests = (int) (getenv('MAX_REQUESTS') ?: 1000);
// Boot application once (outside the request loop)
$app = Injector::getInstance($context)->getInstance(AppInterface::class);
assert($app instanceof App);
// Create RoadRunner worker
$worker = Worker::create();
$factory = new Psr17Factory();
$psr7Worker = new PSR7Worker($worker, $factory, $factory, $factory);
$requestCount = 0;
while ($psrRequest = $psr7Worker->waitRequest()) {
try {
if (! $psrRequest instanceof ServerRequestInterface) {
break;
}
// Convert PSR-7 request to $_SERVER format
$server = createServerVars($psrRequest);
$globals = createGlobals($psrRequest);
// Route and execute request
$request = $app->router->match($globals, $server);
$response = $app->resource->{$request->method}->uri($request->path)($request->query);
assert($response instanceof ResourceObject);
// Convert ResourceObject to PSR-7 Response
$psrResponse = $factory->createResponse($response->code);
foreach ($response->headers as $name => $value) {
$psrResponse = $psrResponse->withHeader($name, $value);
}
$psrResponse = $psrResponse->withBody($factory->createStream((string) $response));
$psr7Worker->respond($psrResponse);
} catch (Throwable $e) {
$psr7Worker->respond($factory->createResponse(500)->withBody(
$factory->createStream($e->getMessage())
));
}
gc_collect_cycles();
$requestCount++;
if ($maxRequests > 0 && $requestCount >= $maxRequests) {
break;
}
}
function createServerVars(ServerRequestInterface $request): array
{
$uri = $request->getUri();
$server = $request->getServerParams();
$server['REQUEST_METHOD'] = $request->getMethod();
$server['REQUEST_URI'] = $uri->getPath() . ($uri->getQuery() ? '?' . $uri->getQuery() : '');
$server['QUERY_STRING'] = $uri->getQuery();
$server['HTTP_HOST'] = $uri->getHost();
foreach ($request->getHeaders() as $name => $values) {
$key = 'HTTP_' . strtoupper(str_replace('-', '_', $name));
$server[$key] = implode(', ', $values);
}
return $server;
}
function createGlobals(ServerRequestInterface $request): array
{
return [
'_GET' => $request->getQueryParams(),
'_POST' => (array) $request->getParsedBody(),
'_COOKIE' => $request->getCookieParams(),
'_FILES' => $request->getUploadedFiles(),
'_SERVER' => createServerVars($request),
];
}
Run
./rr serve -c .rr.yaml
Environment Variables
| Variable | Default | Description |
|---|---|---|
BEAR_CONTEXT |
prod-hal-app | BEAR.Sunday context |
MAX_REQUESTS |
1000 | Requests before worker restart |
Architecture
RoadRunner (Go)
|
+-- PHP Worker 1 (persistent)
+-- PHP Worker 2 (persistent)
+-- PHP Worker N (persistent)
Each worker boots BEAR.Sunday once and handles requests via pipes.
Metrics
Prometheus metrics available at http://localhost:2112/metrics.
FrankenPHP
FrankenPHP is a modern PHP application server built on Caddy with worker mode support.
Features
- Worker Mode: Eliminates application boot cost per request
- HTTP/2 & HTTP/3: Automatic HTTPS with Caddy
- Production Ready: OPcache JIT, multi-stage builds
- Development Ready: Xdebug, hot reload
Install
FrankenPHP is typically used via Docker. For standalone installation, see FrankenPHP documentation.
Worker Script
Create bin/worker.php:
<?php
declare(strict_types=1);
use BEAR\Resource\ResourceObject;
use BEAR\Sunday\Extension\Application\AppInterface;
use MyVendor\MyProject\Injector;
use MyVendor\MyProject\Module\App;
require dirname(__DIR__) . '/autoload.php';
// Get configuration from environment
$context = getenv('BEAR_CONTEXT') ?: 'prod-hal-app';
$maxRequests = (int) (getenv('MAX_REQUESTS') ?: 1000);
// Boot application once (outside the request loop)
$app = Injector::getInstance($context)->getInstance(AppInterface::class);
assert($app instanceof App);
$requestCount = 0;
// FrankenPHP worker loop
// Superglobals ($_GET, $_POST, $_SERVER) are automatically reset
do {
$running = frankenphp_handle_request(static function () use ($app): void {
try {
// Check HTTP cache
if ($app->httpCache->isNotModified($_SERVER)) {
$app->httpCache->transfer();
return;
}
// Route and execute request
$request = $app->router->match($GLOBALS, $_SERVER);
$response = $app->resource->{$request->method}->uri($request->path)($request->query);
assert($response instanceof ResourceObject);
$response->transfer($app->responder, $_SERVER);
} catch (Throwable $e) {
$app->throwableHandler->handle($e, $request ?? null)->transfer();
}
gc_collect_cycles();
});
$requestCount++;
if ($maxRequests > 0 && $requestCount >= $maxRequests) {
break;
}
} while ($running);
Caddyfile Configuration
{
admin off
frankenphp {
worker /app/bin/worker.php {
num {$FRANKENPHP_NUM_WORKERS:4}
}
}
}
{$SERVER_NAME::8080} {
root * /app/public
encode zstd br gzip
respond /health 200
php_server
log {
output stdout
format console
}
}
Run with Docker
docker run -v $PWD:/app -p 8080:8080 dunglas/frankenphp
Environment Variables
| Variable | Default | Description |
|---|---|---|
BEAR_CONTEXT |
prod-hal-app | BEAR.Sunday context |
MAX_REQUESTS |
1000 | Requests before worker restart |
SERVER_NAME |
:8080 | Listen address |
FRANKENPHP_NUM_WORKERS |
4 | Number of worker processes |
Memory Management
- Workers automatically restart after
MAX_REQUESTSto prevent memory leaks gc_collect_cycles()runs after each request- Set
MAX_REQUESTS=0for unlimited requests (development only)
Production Deployment
For production deployments, each server directory in bear-sunday-servers includes:
Dockerfile- Optimized production builddocker-compose.prod.yml- Production configuration- Health check endpoints
- OPcache optimization
Example production deployment:
cd swoole # or roadrunner, frankenphp
docker compose -f docker-compose.prod.yml up -d
Benchmarking
See BEAR.HelloworldBenchmark for benchmark comparisons.
Related
- Parallel Resource Execution - Parallel execution of
#[Embed]resources with BEAR.Async
References
- Swoole - Documentation
- RoadRunner - Documentation
- FrankenPHP - Documentation
- BEAR.Swoole
- bear-sunday-servers
Parallel Resource Execution Alpha
BEAR.Async turns the previously sequential fetch of #[Embed] resources into transparent parallel execution. Without touching your resource code, just add a dedicated entrypoint script for parallel execution and embedded resources automatically switch to parallel fetching.
Overview
In standard BEAR.Sunday, #[Embed] resources are fetched sequentially. With BEAR.Async and a runtime selected, they are fetched in parallel.
[Sequential] [Parallel]
Request Request
│ │
├── Embed 1 ──── 50ms ├── Embed 1 ──┬── 50ms
├── Embed 2 ──── 50ms ├── Embed 2 ──┤
├── Embed 3 ──── 50ms ├── Embed 3 ──┤
└── Embed 4 ──── 50ms └── Embed 4 ──┘
│ │
Response (200ms) Response (50ms)
Installation
composer require bear/async
Runtime environments
Choose a runtime that matches your server setup.
| Use case | Entrypoint | Runtime setup |
|---|---|---|
| PHP-FPM / Apache (with embedded resources) | bin/async.php |
the library bootstrap.php overlays the parallel runtime on AppModule |
| Swoole HTTP Server | bin/swoole.php |
install AsyncSwooleModule in AppModule |
Parallel execution (ext-parallel)
A runtime for typical web applications running on PHP-FPM / Apache. It executes #[Embed] in parallel using an ext-parallel thread pool.
Add bin/async.php next to bin/app.php. This entrypoint delegates to the library bootstrap.php, which overlays the ext-parallel runtime on top of the normal AppModule.
bin/async.php → vendor/bear/async/bootstrap.php → AppModule + parallel runtime
<?php // bin/async.php
declare(strict_types=1);
require dirname(__DIR__) . '/autoload.php';
$bootstrap = dirname(__DIR__) . '/vendor/bear/async/bootstrap.php';
if (! file_exists($bootstrap)) {
throw new LogicException('"bear/async" is not installed.');
}
$defaultContext = PHP_SAPI === 'cli' ? 'cli-hal-api-app' : 'hal-api-app';
$context = getenv('APP_CONTEXT') ?: $defaultContext;
exit((require $bootstrap)(
$context,
'MyVendor\MyApp',
dirname(__DIR__),
$GLOBALS,
$_SERVER,
));
To change the worker pool size (defaults to the number of CPU cores), pass it explicitly as the 6th argument.
exit((require $bootstrap)($context, 'MyVendor\MyApp', dirname(__DIR__), $GLOBALS, $_SERVER, 8));
ext-parallel constraints
Workers run on separate threads, each with an independent Zend memory space. Embedded resources executed in parallel should be read-only (idempotent GET) resources with no ordering dependency. Because each worker holds its own DI container, request-local mutable state and “same instance” assumptions do not carry across thread boundaries.
Arguments and return values that cross the thread boundary must be copyable: scalar values, null, and nested arrays of those. Passing objects, closures, or resources fails immediately. Keep any interceptors applied to embedded resources executed in parallel idempotent, and do not mutate request-local shared state.
Swoole execution (ext-swoole)
A runtime for applications already running on a Swoole HTTP server and aiming for high concurrency.
Because ext-parallel runs in workers (separate threads), it is selected via a separate entrypoint. ext-swoole, on the other hand, runs inside the same server process, so it is installed as an application module.
use BEAR\Async\Module\AsyncSwooleModule;
use BEAR\Async\Module\PdoPoolEnvModule;
class AppModule extends AbstractModule
{
protected function configure(): void
{
$this->install(new AsyncSwooleModule());
$this->install(new PdoPoolEnvModule('PDO_DSN', 'PDO_USER', 'PDO_PASSWORD'));
}
}
In Swoole, coroutines share memory, so a connection pool via PdoPoolEnvModule is required. In read-heavy setups that make heavy use of embedded resources, the pool size should account not only for the number of incoming HTTP requests but also for the number of embeds executed concurrently within one request. To avoid queueing, use PDO_POOL_SIZE >= embed_count * request_concurrency as a starting point; intentionally use a smaller pool when you want to cap concurrent connections to the database.
Technical note (pool connection acquisition): Connection acquisition from the pool is managed per coroutine. Even when both
PDOandExtendedPdoare injected within the same coroutine, they share a single connection and that connection is returned to the pool exactly once viaCoroutine::defer()when the coroutine ends. This prevents a single piece of work from unintentionally holding two connections. Furthermore, requests embedded via#[Embed]are lazily evaluated, so the pool is not touched at the point the embed is declared with#[Embed]; connection acquisition is deferred until each request is actually executed.Technical note (PDOProxy handling): Swoole wraps
PDOin its ownPDOProxyfor coroutine support, but BEAR.Async absorbs this wrapping internally so the value can be treated as a regularPDO. If the originalPDOcannot be extracted for some reason, the reflection failure is not propagated as-is; instead it is surfaced as a domain-specific PDO proxy extraction exception.
Swoole coroutines and an active Xdebug do not run safely together. Run Swoole entrypoints with a PHP that does not load Xdebug, or set XDEBUG_MODE=off for local verification.
Usage
Once a runtime is selected, existing #[Embed] resources are automatically executed in parallel.
class Dashboard extends ResourceObject
{
#[Embed(rel: 'user', src: '/user{?id}')]
#[Embed(rel: 'notifications', src: '/notifications{?user_id}')]
#[Embed(rel: 'stats', src: '/stats{?user_id}')]
public function onGet(string $id): static
{
$this->body['id'] = $id;
return $this;
}
}
In development, run synchronously via bin/app.php for debugging; in production, switch to parallel execution by starting from bin/async.php.
Why no code change is needed
In BEAR.Sunday, information is structured as resources identified by URIs. #[Embed] does not embed the result of a resource — it embeds the resource request itself and declares a relationship between resources. Choosing the execution strategy — sequential, ext-parallel workers, or Swoole coroutines — is the Linker’s job; resource classes do not need to know whether they were called synchronously or in parallel.
In the default mode these requests are resolved one by one at rendering time. In parallel mode, the moment the first embedded request is resolved, the remaining embedded requests are executed together in parallel. BEAR.Async asynchronous requests share the same type as ordinary BEAR.Resource requests, so the HAL renderer and other surrounding machinery can integrate them into serialization without being aware of the difference.
The “function coloring” problem often raised in async programming — a function calling an async function must itself be async, contaminating the whole codebase — is cut off at the resource boundary. The code is the same under sync and parallel execution; only the execution strategy changes.
This is not specific to BEAR.Async; it is a property of BEAR.Sunday as a whole. Where MVC frameworks write how to execute procedurally, BEAR.Sunday expresses relationships between resources declaratively. Because the declaration is independent of the execution strategy, swapping strategies has no effect on the code.
Demo and benchmarks
The BEAR.Async repository includes a Docker-based demo and benchmark scripts that compare Sync, ext-parallel, and Swoole behavior. See the demo guide and benchmark results for details.
Requirements
Each runtime requires the corresponding PHP extension.
| Runtime | Requires | Application-side change |
|---|---|---|
| ext-parallel | ZTS PHP + ext-parallel | add bin/async.php |
| ext-swoole | ext-swoole | install AsyncSwooleModule, use bin/swoole.php |
SQL resources with BDR + #[Embed]
To run multiple SQL queries for one page, split each query into its own ResourceObject and let #[Embed] parallelize them via AsyncLinker. The call site just composes resources — the runtime decides how to execute the embeds in parallel.
Combined with Ray.MediaQuery’s BDR pattern (#[DbQuery] interface + factory + immutable domain object), SQL stays in var/sql/*.sql, the call site reads as plain objects, and the resource graph itself is what gets parallelized.
Recipe dependency (not bundled with BEAR.Async):
composer require ray/media-query
use BEAR\Resource\Annotation\Embed;
use BEAR\Resource\ResourceObject;
use Ray\MediaQuery\Annotation\DbQuery;
// Domain object — immutable snapshot
final class UserAccount
{
public function __construct(
public readonly int $id,
public readonly string $name,
) {
}
}
// Repository — SQL lives in var/sql/user.sql.
// UserFactory hydrates the row into UserAccount; see BDR_PATTERN.md for factory details.
interface UserRepositoryInterface
{
#[DbQuery('user', factory: UserFactory::class)]
public function getUser(int $id): UserAccount;
}
// Resource — one resource per SQL
class User extends ResourceObject
{
public function __construct(private UserRepositoryInterface $repo)
{
}
public function onGet(int $id): static
{
$this->body = ['user' => $this->repo->getUser($id)];
return $this;
}
}
// Aggregate — Embeds parallelize automatically under AsyncLinker
class UserDashboard extends ResourceObject
{
#[Embed(rel: 'user', src: 'app://self/user{?id}')]
#[Embed(rel: 'posts', src: 'app://self/user/posts{?id}')]
#[Embed(rel: 'comments', src: 'app://self/user/comments{?id}')]
public function onGet(int $id): static
{
return $this;
}
}
- SQL stays in
var/sql/*.sql(Ray.MediaQuery convention) - Domain objects are immutable snapshots; no
$results['user'][0] ?? nullplumbing at the call site - AsyncLinker runs the three embeds in parallel via ext-parallel (PHP-FPM / Apache) or Swoole coroutines
- Without ext-parallel and without Swoole the same code runs synchronously per request, which is fine for PHP-FPM (each request is its own process)
- For Swoole, install
PdoPoolEnvModuleso each coroutine borrows a pooled PDO connection
References
- BEAR.Async
- BEAR.Async Demo Guide
- BEAR.Async Benchmark Results
- Ray.MediaQuery BDR Pattern
- Parallel Execution Architecture
Coding Guide
Project
Vendor should be the company name, team name or the owner (excite, koriym etc.).
Package is the name of the application or service (blog, news etc.).
Projects must be created on a per application basis. Even when you create a Web API and an HTML from different hosts, they are considered one project.
Style
BEAR.Sunday follows the PSR style.
Here is ResourceObject code example.
<?php
namespace Koriym\Blog\Resource\App;
use BEAR\RepositoryModule\Annotation\Cacheable;
use BEAR\Resource\Annotation\Embed;
use BEAR\Resource\Annotation\Link;
use BEAR\Resource\Code;
use BEAR\Resource\ResourceObject;
use BEAR\Sunday\Inject\ResourceInject;
use Ray\AuraSqlModule\AuraSqlInject;
#[Cacheable]
class Entry extends ResourceObject
{
use AuraSqlInject;
use ResourceInject;
#[Embed(rel: 'author', src: '/author{?author_id}')]
public function onGet(string $author_id, string $slug): static
{
// ...
return $this;
}
#[Link(rel: 'next_act', href: '/act1')]
#[Link(rel: 'next_act2', href: '/act2')]
public function onPost (
string $tile,
string $body,
string $uid,
string $slug
): static {
// ...
$this->code = Code::CREATED;
return $this;
}
}
A DocBlock comment is optional. A DocBlock contains the method summary in one line. Then followed by the description, which can be a multiple lines. We should also put @params after description if possible.
Resources
See Resource Best Practices for best practices for resources.
Globals
We do not recommend referencing global values in resources or application classes. It is only used with Modules.
- Do not refer to the value of Superglobal
- Do not use define
- Do not create
Configclass to hold set values. - Do not use global object container (service locator) [1], [2]
- Use Date function and DateTime class. It is not recommended to get the time directly. Inject the time from outside using koriym/now.
Global method calls such as static methods are also not recommended.
The values required by the application code are all injected. The setting files are used for injecting. When you need an external value such as Web API, make a special gateway class for all requests. Then you can mock that special class with DI or AOP.
Classes and object
-
- Traits are not recommended. Traits for injection such as
ResourceInjectthat reduce boilerplate code for injection were added in PHP8 constructor property promotion (declaring properties in the constructor signature). Use constructor injection.
- Traits are not recommended. Traits for injection such as
- It is not recommended for the child classes to use the parent class methods. Common functions are not shared by inheritance and trait, they are dedicated classes and they are injected and used. Composite from inheritance.
- A class with only one method should reflect the function to the class name and should set the name of the method to
__invoke ()so that function access can be made.
Script command
- It is recommended to end the setup by using the
composer setupcommand. This script includes the necessary database initialization and library checking. If manual operation such as.envsetting is required, it is recommended that the procedure be displayed on the screen. - It is recommended that all application caches and logs are cleared with
composer cleanupcommand. - It is recommended that all executable test (phpinit/phpcs/phpmd ..) are invoked with
composer testcommand. - It is recommended an application is deployed with
composer deploycommand.
Code check
It is recommended to check the codes for each commit with the following commands. These commands can be installed with bear/qatools.
phpcs src tests
phpmd src text ./phpmd.xml
php-cs-fixer fix --config-file=./.php_cs
phpcbf src
Resources
Please also refer to Resouce best practice.
Code
Returns the appropriate status code. Testing is easier, and the correct information can be conveyed to bots and crawlers.
100Continue Continuation of multiple requests200OK201Created Resource Creation202Accepted queue / batch acceptance204If there is no content body304Not Modified Not Updated400Bad request401Unauthorized Authentication required403Forbidden ban404Not Found405Method Not Allowed503Service Unavailable Temporary error on server side
In OnPut method, you deal with the resource state with idempotence. For example, resource creation with UUID or update resource state.
OnPatch is implemented when changing the state of a part of a resource.
HTML Form Method
BEAR.Sunday can overwrite methods using the X-HTTP-Method-Override header or _method query at the POST request in the HTML web form, but it is not necessarily recommended . For the Page resource, it is OK to implement policies other than onGet and onPost. [1], [2]
Hyperlink
- It is recommended that resources with links be indicated by
#[Link]. - It is recommended that resources be embedded as a graph of semantic coherence with
#[Embed].
DI
- Do not inject the value itself of the execution context (prod, dev etc). Instead, we inject instances according to the context. The application does not know in which context it is running.
- Setter injection is not recommended for library code.
- It is recommended that you override the
toConstructorbindings instead and avoid theProviderbindings as much as possible. - Avoid binding by
Moduleaccording to conditions. AvoidConditionalLogicInModules - It is not recommended to reference environmental variables since there is no module. Pass it in the constructor.
AOP
- Do not make interceptor mandatory. We will make the program work even without an interceptor. (For example, if you remove
#[Transactional]interceptor, the function of transaction will be lost, but “core concerns” will work without issue.) - Prevent the interceptor from injecting dependencies in methods. Values that can only be determined at implementation time are injected into arguments via
#[Assisted]injection. - If there are multiple interceptors, do not depend on the execution order.
- If it is an interceptor unconditionally applied to all methods, consider the description in
bootstrap.php.
Environment
To make applications testable, it should also work on the console, and not only on the Web.
It is recommended not to include the .env file in the project repository.
Testing
- Focus on resource testing using resource clients, adding resource representation testing (e.g. HTML) if needed.
- Hypermedia tests can leave use cases as tests.
prodis the context for production. Use of theprodcontext in tests should be minimal, preferably none.
HTML templates
- Avoid large loop statements. Consider replacing if statements in loops with Generator.
PHPDoc Types
PHPDoc types let static analysis tools understand array structures, generics, string constraints, type guards, and security-related data flow that cannot be fully expressed with native PHP type declarations.
This page separates broadly portable types from Psalm-specific and PHPStan-specific features. PHPDoc, Psalm, and PHPStan do not support exactly the same syntax, so public APIs should prefer shared syntax and use tool-specific tags only when needed.
How to Read This Page
| Area | Use |
|---|---|
| Common PHPDoc | Basic types understood by IDEs, phpDocumentor, Psalm, and PHPStan |
| Psalm/PHPStan common | Advanced types that are practical in both major analyzers |
| Psalm-specific | @psalm-* tags, Psalm utility types, taint analysis |
| PHPStan-specific | @phpstan-* tags, PHPStan type aliases, PHPStan-specific additions |
Basic Types
Scalar and Special Types
/** @param int $id */
/** @param positive-int $count */
/** @param non-negative-int $offset */
/** @param non-zero-int $delta */
/** @param float $amount */
/** @param string $name */
/** @param non-empty-string $label */
/** @param bool $enabled */
/** @return null */
/** @return true */
/** @return false */
/** @return mixed */
/** @return never */
/** @return void */
mixed explicitly allows any type. PHPStan distinguishes implicit mixed from explicitly documented mixed.
never describes a function that never returns normally, for example because it always throws or exits. PHPStan also treats noreturn, never-return, never-returns, and no-return as equivalent names.
Integer Ranges and Masks
/** @param positive-int $id */
/** @param negative-int $delta */
/** @param non-positive-int $max */
/** @param non-negative-int $offset */
/** @param int-mask<1, 2, 4> $flags */
/** @param int-mask-of<Foo::INT_*> $flags */
Psalm uses int-range<0, 100> for integer ranges.
/** @param int-range<0, 100> $percentage */
PHPStan uses int<0, 100>, int<min, 100>, and int<50, max>.
/** @param int<0, 100> $percentage */
String Types
/** @param numeric-string $number */
/** @param lowercase-string $lower */
/** @param non-empty-lowercase-string $lower */
/** @param literal-string $sql */
/** @param callable-string $callable */
/** @param class-string $class */
/** @param class-string<User> $userClass */
/** @param trait-string $trait */
/** @param enum-string<Suit> $enum */
PHPStan also supports non-falsy-string / truthy-string, non-empty-uppercase-string, non-empty-literal-string, and interface-string<T>. It also has decimal-int-string and non-decimal-int-string for safer string array keys. PHP converts string keys like '123' to integer keys, so strict array<string, mixed> APIs may need the safer type.
/** @param non-empty-uppercase-string $upper */
/** @param non-falsy-string $truthy */
/** @param non-empty-literal-string $fragment */
/** @param interface-string<ServiceInterface> $service */
/** @param decimal-int-string $key */
/** @param non-decimal-int-string $safeStringKey */
Object Types
/** @param object $object */
/** @param \DateTimeInterface $date */
/** @return static */
/** @return $this */
/** @return object{foo: int, bar?: string} */
/** @return object{foo: int, bar?: string}&\stdClass */
object{...} is an object shape. In PHPStan, object shape properties are read-only; intersecting with a class such as \stdClass can express writable properties.
Arrays and Lists
Generic Arrays
/** @return array<string, int> */
/** @return array<int, User> */
/** @return non-empty-array<string, User> */
/** @return iterable<int, User> */
Type[] is an older shorthand equivalent to array<array-key, Type>. Prefer array<TKey, TValue> in new code when the key type matters.
/** @param User[] $users */
/** @param array<int, User> $users */
PHPStan also supports associative-array as a basic type.
/** @return associative-array */
Lists
list<T> is an array with continuous integer keys starting at zero.
/** @param list<string> $names */
/** @return non-empty-list<User> */
Psalm and PHPStan also support list shapes.
/** @return list{string, int} */
PHPStan can also combine non-empty list syntax with shape syntax, for example non-empty-list{string, int}.
Array Shapes
Array shapes describe different value types for known keys.
/**
* @return array{
* id: positive-int,
* name: non-empty-string,
* email?: non-empty-string,
* roles: list<non-empty-string>
* }
*/
function userProfile(): array;
Psalm and PHPStan can describe unsealed/open shapes that allow extra keys.
/** @param array{verbose: bool, ...} $options */
/** @param array{foo: int, ...<string, int>} $data */
/** @return list{string, int, ...<bool>} */
PHPStan treats sealed array shapes strictly. If extra keys are intended, document that intent with an unsealed shape.
Composite Types
Union, Intersection, Parentheses
/** @param int|string $id */
/** @return User|null */
/** @param Countable&Traversable $collection */
/** @param (A&B)|C $value */
Literal and Constant Types
/** @return 'success'|'error'|'pending' */
/** @return 200|400|500 */
/** @param Foo::STATUS_* $status */
/** @param Foo::* $constant */
Callables
/** @param callable(int, string): bool $callback */
/** @param callable(string &$value): void $normalizer */
/** @param callable(float ...$values): int|null $aggregate */
/** @param Closure(User): string $formatter */
/** @param pure-callable(User): string $formatter */
/** @param pure-Closure(User): string $formatter */
PHPStan supports @param-closure-this to specify $this inside a closure.
/**
* @param Closure(): void $callback
* @param-closure-this User $callback
*/
function withUser(Closure $callback): void;
Generics
Function Templates
/**
* @template T
* @param list<T> $items
* @param callable(T): bool $predicate
* @return list<T>
*/
function filter(array $items, callable $predicate): array;
Class Templates
/**
* @template TKey of array-key
* @template TValue
* @implements IteratorAggregate<TKey, TValue>
*/
final class Collection implements IteratorAggregate
{
/** @var array<TKey, TValue> */
private array $items = [];
/** @return Traversable<TKey, TValue> */
public function getIterator(): Traversable
{
yield from $this->items;
}
}
Psalm and PHPStan support @template-covariant and @template-contravariant. PHPStan also supports call-site variance such as Collection<covariant Animal> and Collection<contravariant Dog>, plus star projection such as Collection<*>.
Conditional Types
/**
* @template T of int|array<int>
* @param T $id
* @return (T is int ? User : list<User>)
*/
function fetch(int|array $id): User|array;
PHPStan can also express negated conditions.
/**
* @return ($value is not null ? string : never)
*/
function stringify(mixed $value): string;
Type Operators
key-of / value-of
/**
* @param key-of<User::FIELDS> $field
* @return value-of<User::FIELDS>
*/
function fieldValue(string $field): string|int;
In PHPStan, value-of<BackedEnum> can extract a backed enum’s value type.
/** @param value-of<Suit> $suit */
function selectSuit(string $suit): void;
Offset Access
/**
* @template T of array<string, mixed>
* @template K of key-of<T>
* @param T $data
* @param K $key
* @return T[K]
*/
function get(array $data, string $key): mixed
{
return $data[$key];
}
Psalm Utility Types
Psalm provides utility types such as properties-of<T>, public-properties-of<T>, protected-properties-of<T>, private-properties-of<T>, class-string-map<T of Foo, T>, and variable templates. See PHPDoc Utility Types for details.
/**
* @template T of object
* @param class-string-map<T, T> $instances
* @param class-string<T> $class
* @return T
*/
function instance(array $instances, string $class): object
{
return $instances[$class];
}
PHPStan Utility Types
PHPStan supports template-type to extract a template type from an object argument, and new to create an object type from a class-string<T>.
/**
* @template T of object
* @param class-string<T> $class
* @return new<T>
*/
function create(string $class): object
{
return new $class();
}
Type Aliases
Psalm Type Aliases
/**
* @psalm-type UserId = positive-int
* @psalm-type UserData = array{id: UserId, name: non-empty-string}
*/
final class UserTypes {}
/**
* @psalm-import-type UserData from UserTypes
* @param UserData $user
*/
function saveUser(array $user): void {}
PHPStan Type Aliases
/**
* @phpstan-type UserId positive-int
* @phpstan-type UserData array{id: UserId, name: non-empty-string}
*/
final class UserTypes {}
/**
* @phpstan-import-type UserData from UserTypes
* @param UserData $user
*/
function saveUser(array $user): void {}
PHPStan also supports global type aliases in phpstan.neon.
parameters:
typeAliases:
UserId: positive-int
UserData: 'array{id: UserId, name: non-empty-string}'
Assert and Type Guards
Psalm Assertions
/**
* @psalm-assert non-empty-string $value
*/
function assertNonEmptyString(mixed $value): void
{
if (! is_string($value) || $value === '') {
throw new InvalidArgumentException();
}
}
/**
* @psalm-assert-if-true User $value
*/
function isUser(mixed $value): bool
{
return $value instanceof User;
}
Psalm also supports @psalm-if-this-is and @psalm-this-out for changing the inferred type of $this.
PHPStan Assertions
/**
* @phpstan-assert non-empty-string $value
*/
function assertNonEmptyString(mixed $value): void;
/**
* @phpstan-assert-if-true User $value
*/
function isUser(mixed $value): bool;
PHPStan supports @phpstan-self-out and @phpstan-this-out for changing the current object’s type after a method call.
/**
* @template TValue
*/
final class Bag
{
/**
* @template TItem
* @param TItem $item
* @phpstan-self-out self<TValue|TItem>
*/
public function add(mixed $item): void {}
}
By-Reference Output Types
Psalm and PHPStan support @param-out to describe the type of a by-reference parameter after a function call. Psalm also supports @psalm-param-out.
/**
* @param-out non-empty-string $value
*/
function fillDefault(?string &$value): void
{
$value ??= 'default';
}
Immutability and Side Effects
Psalm can describe purity, mutation, and immutability.
/**
* @psalm-immutable
*/
final class Point
{
public function __construct(
public float $x,
public float $y
) {}
/** @psalm-mutation-free */
public function move(float $x, float $y): self
{
return new self($this->x + $x, $this->y + $y);
}
}
Common Psalm tags:
| Tag | Meaning |
|---|---|
@psalm-pure |
Pure function depending only on its input |
@psalm-impure |
Function with side effects |
@psalm-mutation-free |
Method that mutates neither itself nor external state |
@psalm-external-mutation-free |
Method that does not mutate external state |
@psalm-immutable |
Immutable class |
@psalm-readonly / @readonly |
Read-only property |
@psalm-allow-private-mutation |
Property can be mutated only in private context |
PHPStan supports @phpstan-pure and @phpstan-impure. For readonly properties that can be changed privately, use @phpstan-allow-private-mutation or @phpstan-readonly-allow-private-mutation.
Security Analysis
Psalm taint analysis can express untrusted input sources, dangerous sinks, escaping, and flow.
/**
* @psalm-taint-source input
*/
function userInput(): string
{
return $_GET['q'] ?? '';
}
/**
* @psalm-taint-sink sql $query
*/
function query(string $query): void {}
/**
* @psalm-taint-escape sql
*/
function escapeSql(string $value): string
{
return addslashes($value);
}
Main taint tags:
| Tag | Use |
|---|---|
@psalm-taint-source <type> |
Untrusted input source |
@psalm-taint-sink <type> <param> |
Dangerous sink |
@psalm-taint-escape <type> |
Escaping or sanitizing operation |
@psalm-taint-unescape <type> |
Mark escaped data as tainted again |
@psalm-taint-specialize |
Specialize taint in functions or classes |
@psalm-flow (...) -> return |
Explicit taint flow |
Debugging and Checking Tags
/** @psalm-trace $value */
$value = userInput();
/** @psalm-check-type $value = non-empty-string */
$value = 'BEAR';
/** @psalm-check-type-exact $value = 'BEAR' */
$value = 'BEAR';
These tags are development aids for checking Psalm’s inferred types.
BEAR.Sunday Recommendations
- Use native PHP type declarations when they can express the type.
- Use PHPDoc for element types, array shapes, lists, generics, and type aliases.
- Prefer syntax that both Psalm and PHPStan understand for public APIs.
- Use
@psalm-*for Psalm-only analysis and@phpstan-*for PHPStan-only analysis. - When a shape becomes too large, consider a DTO, value object, or entity instead of a large array shape.
- For SQL, HTML, file paths, commands, and other security boundaries, combine
literal-string, taint annotations, and semantic types.
Compatibility Notes
| Item | Note |
|---|---|
int-range / int<min, max> |
Psalm uses int-range; PHPStan uses int<min, max>. |
@psalm-type / @phpstan-type |
Tool-specific. Define both when both analyzers need the alias. |
properties-of |
Psalm utility type. Use another expression for PHPStan. |
| Unsealed shapes | Use them when extra keys are intentional. |
literal-string |
Useful for security-sensitive strings such as SQL and template fragments. |
array<string, T> |
PHP may cast decimal string keys to int. Consider PHPStan’s non-decimal-int-string. |
References
- Psalm - Atomic types
- Psalm - Array types
- Psalm - Utility types
- Psalm - Supported annotations
- Psalm - Taint annotations
- PHPStan - PHPDoc Types
- PHPStan - PHPDocs Basics
- PHPStan - Unsealed Array Shapes, Safer Array Keys, and More
PHPDoc Utility Types
Utility types are type operators that derive keys, values, property maps, or indexed value types from existing types. For the broader PHPDoc type reference, see PHPDoc Types.
Some types, such as properties-of and class-string-map, are Psalm-specific, so check the analyzer you use before adopting them.
key-of
key-of<T> extracts the key type from an array type, array shape, or constant array.
final class User
{
public const FIELDS = [
'id' => 1,
'name' => 2,
'email' => 3,
];
}
/**
* @param key-of<User::FIELDS> $field
*/
function selectField(string $field): void {}
selectField('name'); // OK
selectField('age'); // static analysis error
When combined with templates, constrain T to an array type.
/**
* @template T of array
* @param T $data
* @return list<key-of<T>>
*/
function keys(array $data): array
{
return array_keys($data);
}
value-of
value-of<T> extracts the value type. PHPStan also supports value-of<BackedEnum>.
enum Suit: string
{
case Hearts = 'H';
case Spades = 'S';
}
/**
* @param value-of<Suit> $suit
*/
function chooseSuit(string $suit): void {}
With constant arrays, it extracts literal value types.
/**
* @param value-of<User::FIELDS> $fieldId
*/
function byFieldId(int $fieldId): void {}
T[K]
T[K] represents the value type of array type T at key K. It preserves the relationship between a key and its value in array shapes and configuration arrays.
/**
* @template T of array<string, mixed>
* @template K of key-of<T>
* @param T $data
* @param K $key
* @return T[K]
*/
function get(array $data, string $key): mixed
{
return $data[$key];
}
$config = [
'debug' => true,
'name' => 'BEAR.Sunday',
];
$debug = get($config, 'debug'); // bool
$name = get($config, 'name'); // string
properties-of (Psalm)
properties-of<T> represents a class’ properties as an array-shape-like map of property names to property types.
final class Profile
{
public int $id;
public string $name;
protected string $token;
}
/**
* @param Profile $profile
* @param key-of<public-properties-of<Profile>> $property
* @return value-of<public-properties-of<Profile>>
*/
function publicProperty(Profile $profile, string $property): mixed
{
return $profile->$property;
}
Psalm provides these variants:
| Type | Scope |
|---|---|
properties-of<T> |
All properties |
public-properties-of<T> |
Public properties |
protected-properties-of<T> |
Protected properties |
private-properties-of<T> |
Private properties |
class-string-map<T of Foo, T> (Psalm)
class-string-map<T of Foo, T> describes an array whose keys are class-name strings and whose values are instances of the corresponding classes.
interface Handler {}
final class CreateHandler implements Handler {}
final class DeleteHandler implements Handler {}
/**
* @template T of Handler
* @param class-string-map<T, T> $handlers
* @param class-string<T> $class
* @return T
*/
function handler(array $handlers, string $class): Handler
{
return $handlers[$class];
}
This is useful for containers, factories, and registries.
template-type and new (PHPStan)
PHPStan supports template-type to extract a template type from an object argument, and new to represent the object type created from a class-string<T>.
/**
* @template T of object
* @param class-string<T> $class
* @return new<T>
*/
function create(string $class): object
{
return new $class();
}
new<T> is useful when a factory or container returns an instance related to a class-name string.
Combining with Type Aliases
Complex utility types are easier to read when named with type aliases.
/**
* @psalm-type UserProfile = array{
* id: positive-int,
* name: non-empty-string,
* roles: list<non-empty-string>
* }
*/
final class UserTypes {}
/**
* @psalm-import-type UserProfile from UserTypes
* @param UserProfile $profile
* @param key-of<UserProfile> $property
* @return value-of<UserProfile>
*/
function profileValue(array $profile, string $property): mixed
{
return $profile[$property];
}
For PHPStan, use @phpstan-type and @phpstan-import-type.
Compatibility Notes
| Type | Psalm | PHPStan | Notes |
|---|---|---|---|
key-of<T> |
Supported | Supported | Useful with arrays, array shapes, and constant arrays |
value-of<T> |
Supported | Supported | PHPStan also supports backed enums |
T[K] |
Supported | Supported | Offset access |
properties-of<T> |
Supported | Not supported | Psalm utility type |
class-string-map<T of Foo, T> |
Supported | Not supported | Psalm utility type |
template-type |
Not supported | Supported | PHPStan utility type |
new<T> |
Not supported | Supported | PHPStan utility type |
References
Test
Proper testing makes software better with continuity. A clean application of BEAR.Sunday is test friendly, with all dependencies injected and crosscutting interests provided in the AOP.
Run test
Run vendor/bin/phpunit or composer test. Other commands are as follows.
composer test // phpunit test
composer tests // test + sa + cs
composer coverage // test coverage
composer pcov // test coverage (pcov)
composer sa // static analysis
composer cs // coding standards check
composer cs-fix // coding standards fix
Resource test
Everything is a resource - BEAR.Sunday application can be tested with resoure access.
This is a test that tests that 201 (Created) will be returned by POSTing ['title' => 'test'] to URI page://self/todo of Myvendor\MyProject application in html-app context.
<?php
use BEAR\Resource\ResourceInterface;
class TodoTest extends TestCase
{
private ResourceInterface $resource;
protected function setUp(): void
{
$injector = Injector::getInstance('test-html-app');
$this->resource = $injector->getInstance(ResourceInterface::class);
}
public function testOnPost(): void
{
$page = $this->resource->post('page://self/todo', ['title' => 'test']);
$this->assertSame(StatusCode::CREATED, $page->code);
}
}
Test Double
A Test Double is a substitute that replaces a component on which the software test object depends. Test doubles can have the following patterns
- Stub (provides “indirect input” to the test target)
- Mock ( validate “indirect output” from the test target inside a test double)
- Spy (records “indirect output” from the target to be tested)
- Fake (simpler implementation that works closer to the actual object)
- Dummy (necessary to generate the test target but no call is made)
Test Double Binding
There are two ways to change the bundling for a test. One is to change the bundling across all tests in the context module, and the other is to temporarily change the bundling only for a specific purpose within one test only.
Context Module
Create a TestModule to make the test context available in bootstrap.
class TestModule extends AbstractModule
{
public function configure(): void
{
$this->bind(DateTimeInterface::class)->toInstance(new DateTimeImmutable('1970-01-01 00:00:00'));
$this->bind(Auth::class)->to(FakeAuth::class);
}
}
Injector with test context.
$injector = Injector::getInstance('test-hal-app', $module);
Temporary binding change
Temporary bundle changes for a single test specify the bundle to override with Injector::getOverrideInstance.
public function testBindFake(): void
{
$module = new class extends AbstractModule {
protected function configure(): void
{
$this->bind(FooInterface::class)->to(FakeFoo::class);
}
}
$injector = Injector::getOverrideInstance('hal-app', $module);
}
Mock
public function testBindMock(): void
{
$mock = $this->createMock(FooInterface::class);
// expect that update() will be called once and the parameter will be the string 'something'.
mock->expects($this->once())
->method('update')
->with($this->equalTo('something'));
$module = new class($mock) extends AbstractModule {
public function __construct(
private FooInterface $foo
){}
protected function configure(): void
{
$this->bind(FooInterface::class)->toInstance($this->foo);
}
};
$injector = Injector::getOverrideInstance('hal-app', $module);
}
spy
Installs a SpyModule by specifying the interface or class name of the spy target. 25 After running the SUT containing the spy target, verify the number of calls and the value of the calls in the spy log.
public function testBindSpy(): void
{
$module = new class extends AbstractModule {
protected function configure(): void
{
$this->install(new SpyModule([FooInterface::class]));
}
};
$injector = Injector::getOverrideInstance('hal-app', $module);
$resource = $injector->getInstance(ResourceInterface::class);
// Spy logs of FooInterface objects are logged, whether directly or indirectly.
$resource->get('/');
// Spyログの取り出し
$spyLog = $injector->getInstance(\Ray\TestDouble\LoggerInterface::class);
// @var array<int, Log> $addLog
$addLog = $spyLog->getLogs(FooInterface, 'add');
$this->assertSame(1, count($addLog), 'Should have received once');
// Argument validation from SUT
$this->assertSame([1, 2], $addLog[0]->arguments);
$this->assertSame(1, $addLog[0]->namedArguments['a']);
}
Dummy
Use Null Binding to bind a null object to an interface.
Hypermedia Test
Resource testing is an input/output test for each endpoint. Hypermedia tests, on the other hand, test the workflow behavior of how the endpoints are connected.
Workflow tests are inherited from HTTP tests and are tested at both the PHP and HTTP levels in a single code. HTTP testing is done with curl and the request/response is logged in a log file.
Best Practice
- Test the interface, not the implementation.
- Create a actual fake class rather than using a mock library.
- Testing is a specification. Ease of reading rather than ease of coding.
Reference
Security Beta
Security tools can scan your application for vulnerability assessment. With static analysis, dynamic testing, taint analysis, and AI auditing, architecture-aware tools analyze from multiple angles, detecting vulnerabilities that generic tools miss.
Installation
Install bear/security.
composer require --dev bear/security
Scanning Tools
| Tool | What it does | When to use |
|---|---|---|
| SAST26 | Static analysis to find dangerous patterns in your code | During development |
| DAST27 | Dynamic analysis to send attack requests to your app | Before deployment |
| AI Auditor | AI reviews your code for security issues | Code review |
| Psalm Plugin | Traces user input to dangerous operations | During development |
Design Philosophy: Recall-First
Security scanners have traditionally had two approaches: precision-first (report only certain issues) and recall-first (report suspicious patterns), with a trade-off between them.
BEAR.Security adopts a recall-first approach. Missing a vulnerability (False Negative) is critical, but false positives (False Positive) can be reviewed and excluded. With AI agents now able to handle false positive verification, this strategy is more effective than ever.
Recommended Workflow
# 1. Run SAST to detect pattern-based vulnerabilities
./vendor/bin/bear.security-scan src
# 2. Review results and fix vulnerabilities
# Add @security-ignore comment to false positives (see example below)
# 3. Run AI Auditor to detect business logic issues
./vendor/bin/bear-security-audit src
# 4. Review and fix detected issues
Example of suppressing a false positive:
$path = $this->buildPath($id); // @security-ignore PATH_TRAVERSAL_FILE_OPS: $id is validated integer from router
Once @security-ignore is added, the issue is suppressed in subsequent scans.
SAST
Scans your source code for dangerous patterns. We recommend running this from an AI agent (such as Claude Code) and having the AI verify whether detections are false positives.
./vendor/bin/bear.security-scan src
Detects 14 vulnerability types:
| Category | Examples |
|---|---|
| Injection | SQL injection, Command injection, XSS |
| Access Control | Path traversal, Open redirect |
| Cryptography | Weak hash algorithms, Hardcoded secrets |
| Data Protection | Insecure deserialization, XXE |
| Session | Session fixation, CSRF |
| Network | SSRF, Remote file inclusion |
See the Vulnerability Reference for details on each vulnerability.
DAST
Sends attack payloads to your running application to test real vulnerabilities:
./vendor/bin/bear-security-dast 'MyVendor\MyApp' prod-app /path/to/app
Tests include:
| Test | What it sends |
|---|---|
| SQL Injection | ' OR '1'='1, ; DROP TABLE |
| XSS | <script>alert(1)</script> |
| Command Injection | ; ls -la, \| cat /etc/passwd |
| Path Traversal | ../../../etc/passwd |
| Security Headers | Checks for missing headers |
AI Auditor
Uses Claude AI to find security issues that pattern matching cannot detect:
# Option 1: API Key
export ANTHROPIC_API_KEY=sk-ant-...
./vendor/bin/bear-security-audit src
# Option 2: Claude CLI (Max Plan - no API key required)
claude auth login
./vendor/bin/bear-security-audit src
| Issue | Description |
|---|---|
| IDOR | Accessing other users’ data without authorization check |
| Mass Assignment | Accepting unvalidated fields in updates |
| Race Condition | Time-of-check to time-of-use flaws |
| Business Logic | Application-specific security flaws |
Psalm Plugin (Taint Analysis)
Taint analysis is a static analysis technique that marks user input as tainted variables and traces how that taint propagates through your code. It reports vulnerabilities when tainted data reaches SQL queries or HTML output without proper sanitization.
Setup
Add the plugin and stubs to your psalm.xml:
<?xml version="1.0"?>
<psalm
xmlns="https://getpsalm.org/schema/config"
errorLevel="1"
>
<projectFiles>
<directory name="src"/>
</projectFiles>
<stubs>
<file name="vendor/bear/security/stubs/AuraSql.phpstub"/>
<file name="vendor/bear/security/stubs/PDO.phpstub"/>
<file name="vendor/bear/security/stubs/Qiq.phpstub"/>
</stubs>
<plugins>
<pluginClass class="BEAR\Security\Psalm\ResourceTaintPlugin">
<targets>
<target>Page</target>
<target>App</target>
</targets>
</pluginClass>
</plugins>
</psalm>
The targets specify which resources receive external input. Use Page when serving web pages with html context, App when serving APIs with api context.
Stubs
Stubs provide taint annotations for third-party libraries:
| Stub | Purpose |
|---|---|
AuraSql.phpstub |
Marks SQL query methods as taint sinks |
PDO.phpstub |
Marks PDO methods as taint sinks |
Qiq.phpstub |
Marks template output as taint sinks |
Running
Run taint analysis:
./vendor/bin/psalm --taint-analysis
Add convenience scripts to composer.json:
{
"scripts": {
"security": "./vendor/bin/bear.security-scan src",
"taint": "./vendor/bin/psalm --taint-analysis 2>&1 | grep -E 'Tainted' || true"
},
"scripts-descriptions": {
"security": "Run SAST security scan",
"taint": "Run Psalm taint analysis"
}
}
Then run with:
composer security
composer taint
GitHub Actions
You can add security scanning to your CI pipeline:
cp vendor/bear/security/workflows/security-sast.yml .github/workflows/
This workflow runs on every push and pull request:
| Job | What it does |
|---|---|
| SAST Scan | Scans code and uploads results to GitHub Security tab |
| Psalm Taint | Traces user input flows and uploads results to GitHub Security tab |
Results appear in your repository’s Security > Code scanning section.
Recommended: Run the scan from an AI agent first, add @security-ignore to false positives, then enable CI.
Architecture and Security
BEAR.Sunday’s architecture makes security scanning more effective:
-
Clear Entry Points: Every endpoint is a ResourceObject with
onGet,onPostmethods. Scanners can identify all inputs and trace data flow. -
No Hidden Magic: Dependencies are explicit through constructor injection. Scanners can analyze the complete code path.
-
Framework-Aware AI: The AI Auditor understands BEAR.Sunday patterns and can detect business logic flaws, not just generic vulnerabilities.
Prompt for AI Agents
To set up bear/security with an AI coding assistant, use this prompt:
Follow the setup instructions at:
https://raw.githubusercontent.com/bearsunday/BEAR.Skills/1.x/.claude/skills/bear-security-setup/SKILL.md
Examples
This example application is built on the principles described in the Coding Guide.
Polidog.Todo
https://github.com/koriym/Polidog.Todo
Todos is a basic CRUD application. The DB is accessed using the static SQL file in the var/sql directory. Includes REST API using hyperlinks and testing, as well as form validation tests.
- ray/aura-sql-module - Extended PDO (Aura.Sql)
- ray/web-form-module - Web form (Aura.Input)
- madapaja/twig-module - Twig template engine
- koriym/now - Current datetime
- koriym/query-locator - SQL locator
- koriym/http-constants - Contains the values HTTP
MyVendor.ContactForm
https://github.com/bearsunday/MyVendor.ContactForm
It is a sample of various form pages.
- Minimal form page
- Multiple forms page
- Looped input form page
- Preview form page including checkbox and radio button
Attributes
BEAR.Sunday supports PHP8’s attributes in addition to the annotations.
Annotation
/**
* @Inject
* @Named('admin')
*/
public function setLogger(LoggerInterface $logger)
Attribute
#[Inject, Named('admin')]
public function setLogger(LoggerInterface $logger)
#[Embed(rel: 'weather', src: 'app://self/weather{?date}')]
#[Link(rel: 'event', href: 'app://self/event{?news_date}')]
public function onGet(string $date): self
Apply to parameters
While some annotations can only be applied to methods and require the argument names to be specified by name, the Attributes can be used to decorate arguments directly.
public __construct(#[Named('payment')] LoggerInterface $paymentLogger, #[Named('debug')] LoggerInterface $debugLogger)
public function onGet($id, #[Assisted] DbInterface $db = null)
public function onGet(#[CookieParam('id')]string $tokenId): void
public function onGet(#[ResourceParam(uri: 'app://self/login#nickname')] string $nickname = null): static
Compatibility
Attributes and annotations can be mixed in a single project. 2 All annotations described in this manual will work when converted to attributes.
Performance
Although the cost of loading annotations/attributes for production is minimal due to optimization, you can speed up development by declaring that you will only use attribute readers, as follows
// tests/bootstap.php
use Ray\ServiceLocator\ServiceLocator;
ServiceLocator::setReader(new AttributeReader());
// DevModule
$this->install(new AttributeModule());
API Doc
Your application is the documentation.
- ApiDoc HTML: Developer documentation
- OpenAPI 3.1: Tool chain integration
- JSON Schema: Information model
- ALPS: Vocabulary semantics for AI understanding
- llms.txt: AI-readable application overview
Demo
Installation
composer require bear/api-doc --dev
./vendor/bin/apidoc init
The init command generates apidoc.xml from your composer.json. Edit it to customize.
<apidoc>
<appName>MyVendor\MyProject</appName> <!-- Application namespace -->
<scheme>app</scheme> <!-- app or page -->
<docDir>docs/api</docDir>
<format>html</format> <!-- html, openapi, etc. -->
</apidoc>
The format accepts comma-separated values: html, md, openapi, llms.
Usage
Generate documentation from the command line.
./vendor/bin/apidoc
OpenAPI HTML Generation
When openapi format is specified, openapi.json is generated. Use Redocly CLI to convert it to HTML.
npm install -g @redocly/cli
redocly build-docs docs/api/openapi.json -o docs/api/openapi.html
llms.txt
The llms format generates llms.txt following the llms.txt specification. The output includes API endpoints, resource objects, infrastructure interfaces (Query/Command), SQL statements, and entity definitions.
Composer Scripts
Add scripts to composer.json for convenience.
{
"scripts": {
"docs": "./vendor/bin/apidoc"
},
"scripts-descriptions": {
"docs": "Generate API documentation"
}
}
composer docs
GitHub Actions
Push to main branch to automatically generate and publish API documentation to GitHub Pages. The reusable workflow handles HTML generation, OpenAPI conversion with Redocly, and ALPS state diagram creation.
name: API Docs
on:
push:
branches: [main]
jobs:
docs:
uses: bearsunday/BEAR.ApiDoc/.github/workflows/apidoc.yml@v1
with:
format: 'html,openapi,llms'
Enable GitHub Pages: Settings → Pages → Source: “GitHub Actions”
Inputs
| Input | Default | Description |
|---|---|---|
php-version |
'8.2' |
PHP version |
format |
'html,openapi,llms' |
Comma-separated: html, md, openapi, llms |
docs-path |
'docs' |
Output directory |
publish-to |
'github-pages' |
github-pages or artifact-only |
Output Structure
docs/
├── index.html # API documentation
├── llms.txt # AI-readable overview
├── openapi.json # OpenAPI spec
└── schemas/
├── index.html # Schema list
└── *.json # JSON Schema
Configuration
<?xml version="1.0" encoding="UTF-8"?>
<apidoc
xmlns:xsi="http://www.w3.org/2001/XMLSchema-instance"
xsi:noNamespaceSchemaLocation="https://bearsunday.github.io/BEAR.ApiDoc/apidoc.xsd">
<appName>MyVendor\MyProject</appName>
<scheme>app</scheme>
<docDir>docs</docDir>
<format>html</format>
<alps>alps.json</alps>
</apidoc>
| Option | Required | Description |
|---|---|---|
appName |
Yes | Application namespace |
scheme |
Yes | app or page |
docDir |
Yes | Output directory |
format |
Yes | html, md, openapi, llms |
title |
API title | |
alps |
ALPS profile path |
Profile
ALPS profile defines your API vocabulary. Centralized definitions prevent inconsistencies and aid shared understanding.
{
"$schema": "https://alps-io.github.io/schemas/alps.json",
"alps": {
"descriptor": [
{"id": "firstName", "title": "The person's first name."},
{"id": "familyName", "def": "https://schema.org/familyName"}
]
}
}
Application as Documentation
Code is the single source of truth. Documentation generated from your application never diverges from the implementation.
llms.txt provides AI-readable application overviews. When an AI agent encounters your application, it can quickly grasp the entire structure through this single document—generated directly from your code. Unlike typical API references that list endpoints, llms.txt captures the full information architecture following Dan Klyn’s framework—Ontology, Taxonomy, and Choreography. Combined with ALPS vocabulary semantics and JSON Schema information models, AI agents can understand not just what operations exist, but the meaning and structure behind them.
Reference
- BEAR.ApiDoc - API documentation generator
- ALPS - Application-Level Profile Semantics
- JSON Schema - Data validation and documentation
- Redocly CLI - OpenAPI to HTML conversion
Reference
Attributes
| Attribute | Description |
|---|---|
#[CacheableResponse] |
An attribute to indicate a cacheable response. |
#[Cacheable(int $expirySecond = 0)] |
An attribute to indicate the cacheability of a resource. $expirySecond is the cache expiration time in seconds. |
#[CookieParam(string $name)] |
An attribute to receive parameters from cookies. $name is the name of the cookie. |
#[DonutCache] |
An attribute to indicate Donut cache. |
#[Embed(src: string $src, rel: string $rel)] |
An attribute to indicate embedding other resources. $src is the URI of the embedded resource, $rel is the relation name. |
#[EnvParam(string $name)] |
An attribute to receive parameters from environment variables. $name is the name of the environment variable. |
#[FormParam(string $name)] |
An attribute to receive parameters from form data. $name is the name of the form field. |
#[Inject] |
An attribute to indicate setter injection. |
#[InputValidation] |
An attribute to indicate input validation. |
#[JsonSchema(key: string $key = null, schema: string $schema = null, params: string $params = null)] |
An attribute to specify the JSON schema for input/output of a resource. $key is the schema key, $schema is the schema file name, $params is the schema file name for parameters. |
#[Link(rel: string $rel, href: string $href, method: string $method = null)] |
An attribute to indicate links between resources. $rel is the relation name, $href is the URI of the linked resource, $method is the HTTP method. |
#[Named(string $name)] |
An attribute to indicate named binding. $name is the binding name. |
#[OnFailure(string $name = null)] |
An attribute to specify a method for validation failure. $name is the name of the validation. |
#[OnValidate(string $name = null)] |
An attribute to specify a validation method. $name is the name of the validation. |
#[Produces(array $mediaTypes)] |
An attribute to specify the output media types of a resource. $mediaTypes is an array of producible media types. |
#[QueryParam(string $name)] |
An attribute to receive query parameters. $name is the name of the query parameter. |
#[RefreshCache] |
An attribute to indicate cache refresh. |
#[ResourceParam(uri: string $uri, param: string $param)] |
An attribute to receive the result of another resource as a parameter. $uri is the URI of the resource, $param is the parameter name. |
#[ReturnCreatedResource] |
An attribute to indicate that the created resource will be returned. |
#[ServerParam(string $name)] |
An attribute to receive parameters from server variables. $name is the name of the server variable. |
#[Ssr(app: string $appName, state: array $state = [], metas: array $metas = [])] |
An attribute to indicate server-side rendering. $appName is the name of the JS application, $state is the state of the application, $metas is an array of meta information. |
#[Transactional(array $props = ['pdo'])] |
An attribute to indicate that a method will be executed within a transaction. $props is an array of properties to which the transaction will be applied. |
#[UploadFiles] |
An attribute to receive uploaded files. |
#[Valid(form: string $form = null, onFailure: string $onFailure = null)] |
An attribute to indicate request validation. $form is the form class name, $onFailure is the method name for validation failure. |
Modules
| Module Name | Description |
|---|---|
ApcSsrModule |
A module for server-side rendering using APCu. |
ApiDoc |
A module for generating API documentation. |
AppModule |
The main module of the application. It installs and configures other modules. |
AuraSqlModule |
A module for database connection using Aura.Sql. |
AuraSqlQueryModule |
A module for query builder using Aura.SqlQuery. |
CacheVersionModule |
A module for cache version management. |
CliModule |
A module for command-line interface. |
DoctrineOrmModule |
A module for database connection using Doctrine ORM. |
FakeModule |
A fake module for testing purposes. |
HalModule |
A module for HAL (Hypertext Application Language). |
HtmlModule |
A module for HTML rendering. |
ImportAppModule |
A module for loading other applications. |
JsonSchemaModule |
A module for input/output validation of resources using JSON schema. |
JwtAuthModule |
A module for authentication using JSON Web Token (JWT). |
NamedPdoModule |
A module that provides named PDO instances. |
PackageModule |
A module that installs the basic modules provided by BEAR.Package together. |
ProdModule |
A module for production environment settings. |
QiqModule |
A module for the Qiq template engine. |
ResourceModule |
A module for settings related to resource classes. |
AuraRouterModule |
A module for routing using Aura.Router. |
SirenModule |
A module for Siren (Hypermedia Specification). |
SpyModule |
A module for recording method calls. |
SsrModule |
A module for server-side rendering. |
TwigModule |
A module for the Twig template engine. |
ValidationModule |
A module for validation. |
-
Attributes take precedence when mixed in a single method. ↩ ↩2 ↩3
-
This SQL conforms to the SQL Style Guide. It can be configured from PhpStorm as Joe Celko. ↩
-
Database Diagrams, etc. to check the query plan and execution plan to improve the quality of the SQL you create. ↩
-
PHP 8.0+ named arguments ¶, column order for PHP 7.x. ↩
-
MediaQuery README Here we run it directly from mysql as an example, but you should also learn how to enter seed in the migration tool and use the IDE’s DB tools. ↩
-
Ray.MediaQuery also supports HTTP API requests. ↩
-
MediaQuery also supports HTTP API requests. This hierarchical structure of content is called Taxonomy in IA (Information Architecture). See Understanding Information Architecture. ↩
-
It is a widespread misconception that the Uniform Interface is not an HTTP method. See Uniform Interface. ↩
-
The so-called “Restish API”; many APIs introduced as REST APIs have this URI/object style, and REST is misused. ↩
-
If you remove the links from the tutorial, you get the URI style. ↩
-
https://www.iana.org/assignments/media-types/media-types.xhtml ↩
-
REST methods are not a mapping to CRUD. They are divided into two categories: safe ones that do not change the resource state, or idempotent ones. ↩
-
Called with named arguments in PHP8.x, but with positional arguments in PHP7.x. ↩
-
When sending API requests as JSON, set the
content-typeheader toapplication/json. ↩ -
out-bound links e.g.) html can link to other related html. ↩
-
embedded links Example: html can embed independent image resources. ↩
-
This is similar to an object graph where the dependency tree is a graph in DI. ↩
-
query-locater is a library for handling SQL as files, which is useful with Aura.Sql. ↩
-
The mechanism is similar to Java’s DB access framework Doma. ↩
-
The name is derived from a similar feature in the Seaside framework for Smalltalk. ↩
-
ray/test-double must be installed to use SpyModule. ↩
-
Static Application Security Testing ↩
-
Dynamic Application Security Testing ↩